Installation
If you are new to WordPress and/or looking for information that are outside of the scope of this documentation, WordPress has a series of tutorials that will help you get started. Please visit the official Getting Started with WordPress guide. There is also guide how to install WordPress.
Installing by theme upload in WordPress
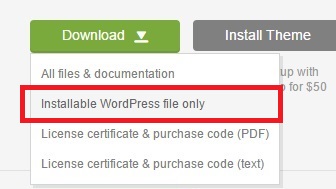
You may download the theme ZIP file in https://themeforest.net/downloads. If you are not logged in, log in first. Click there on the button Download next to the theme Title. Submenu will be opened. Click there on Installable WordPress file only.
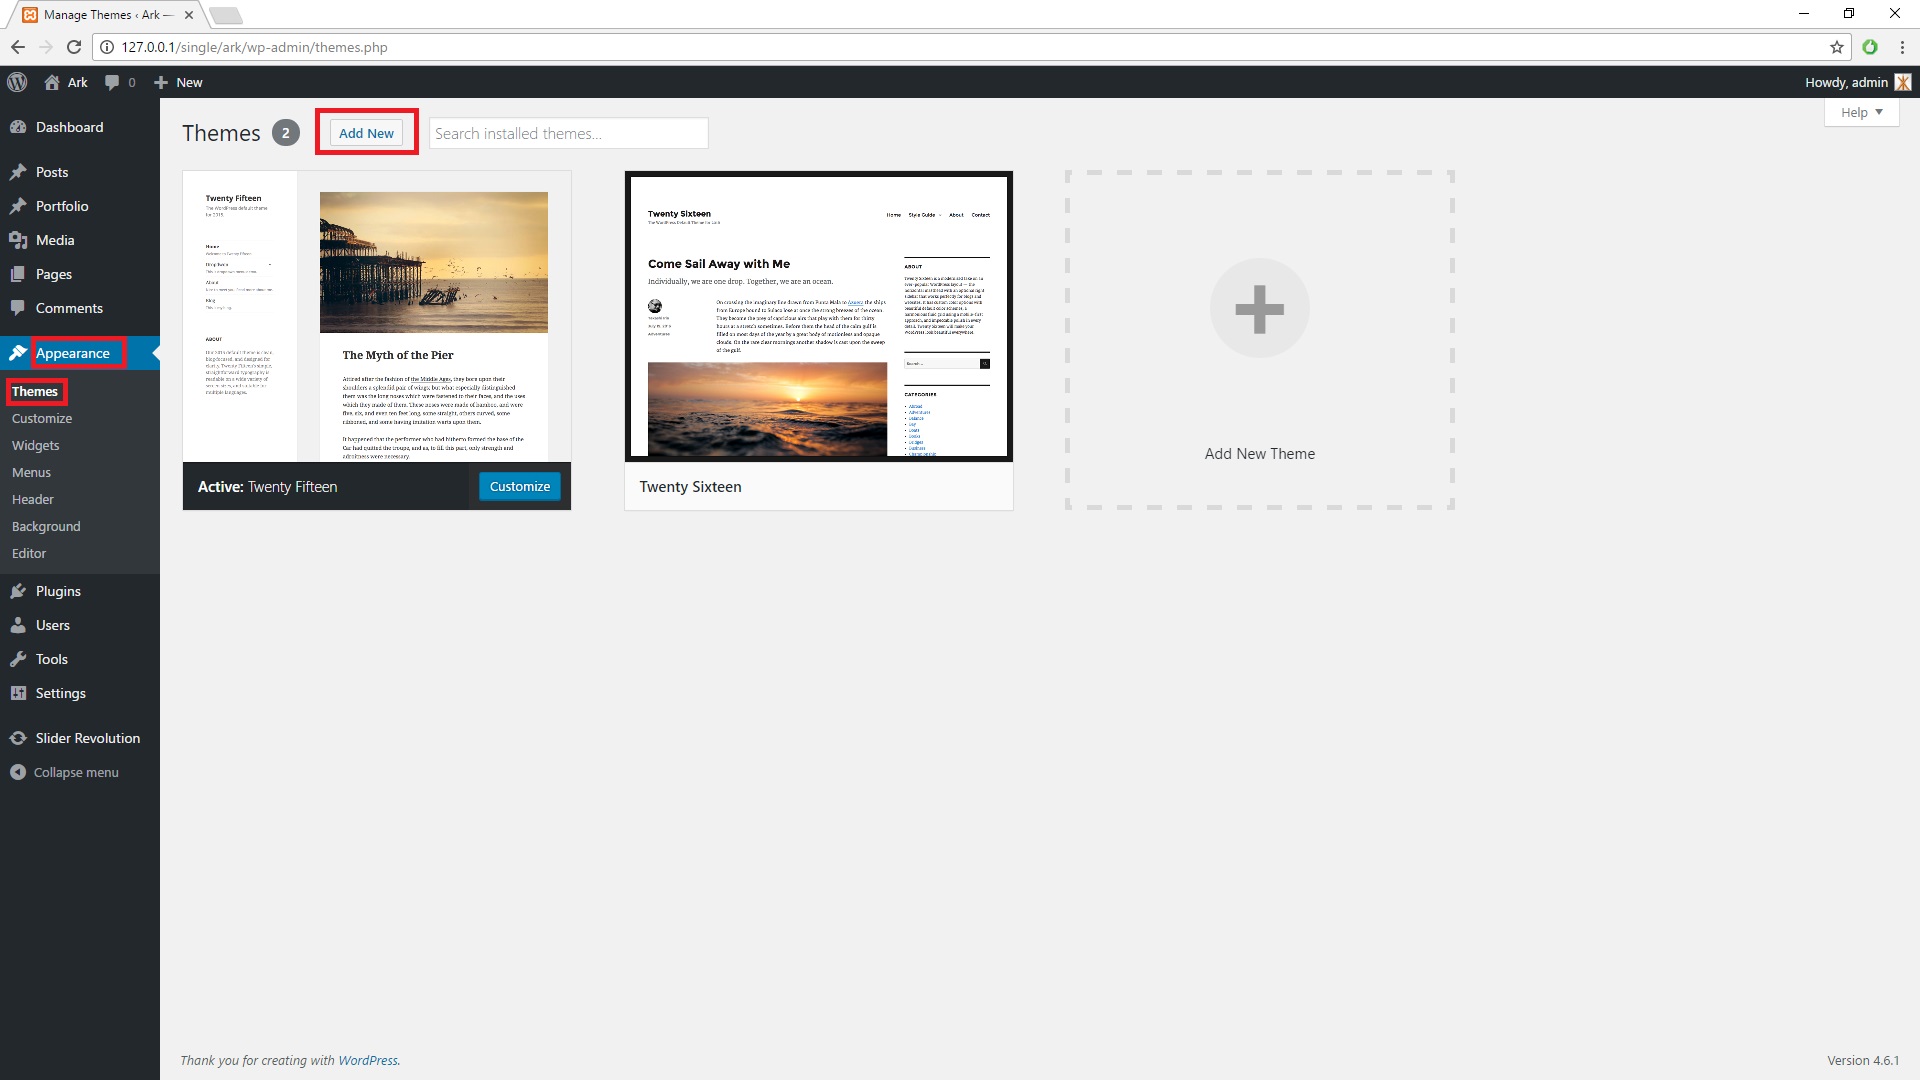
Upload the theme ZIP file via WordPress Admin ⇒ Themes ⇒ Add New.
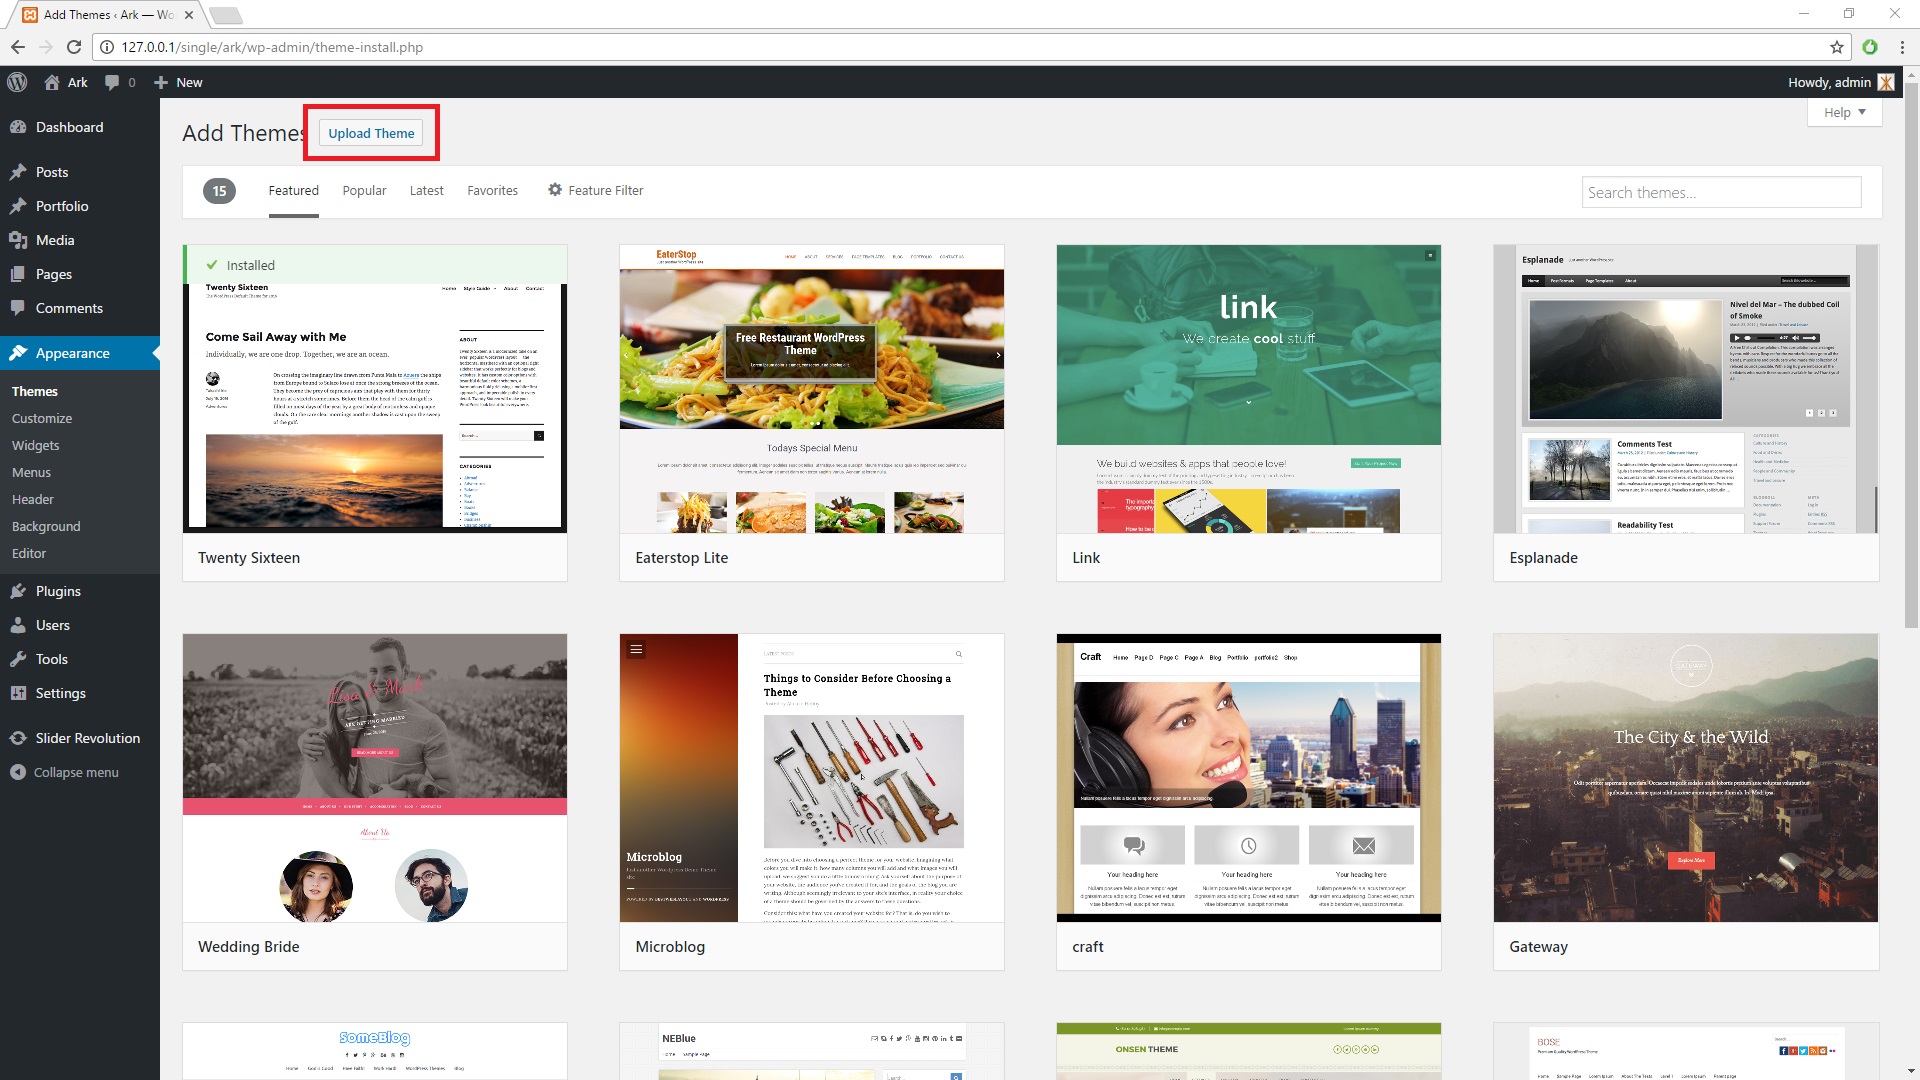
Click on Upload.
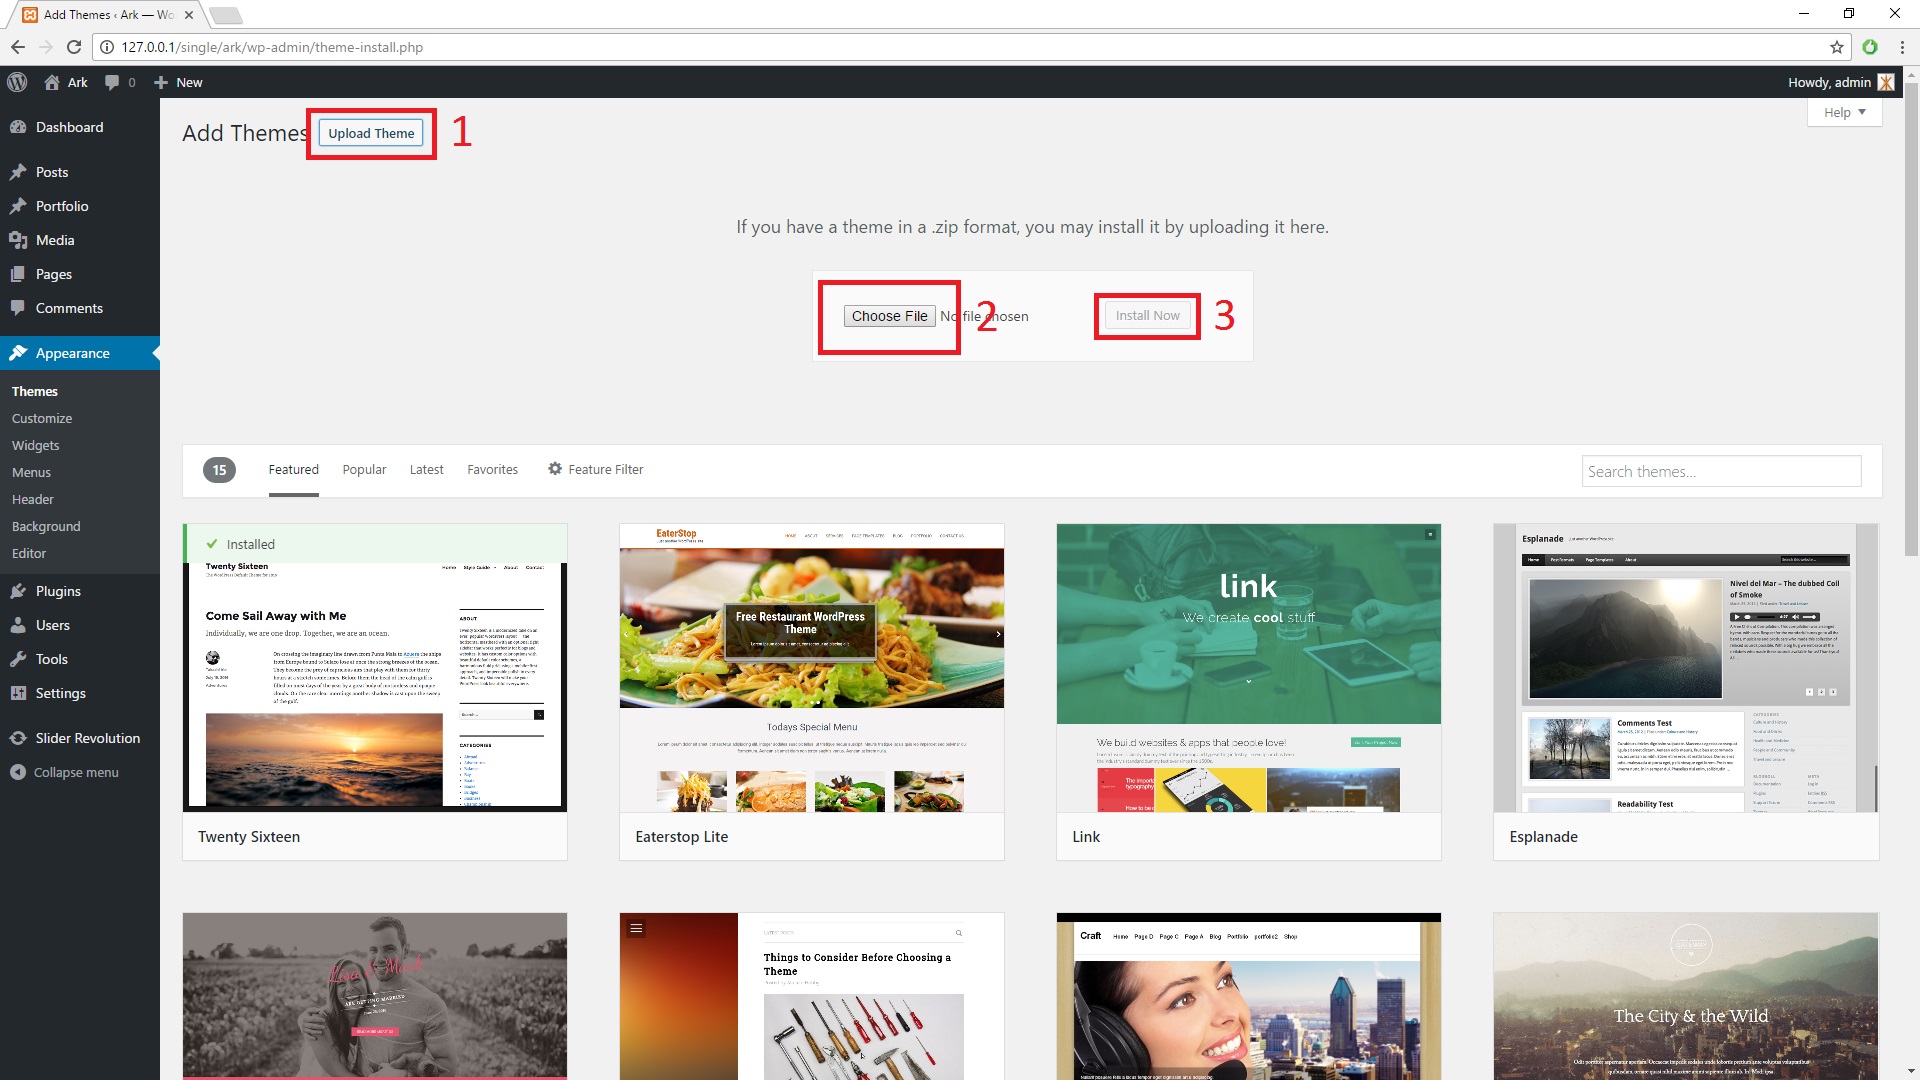
- After you click on upload [1], there will appear input for file.
- Click on file input [2] and pick the downloaded ZIP file with theme.
- Click on Install Now [3].
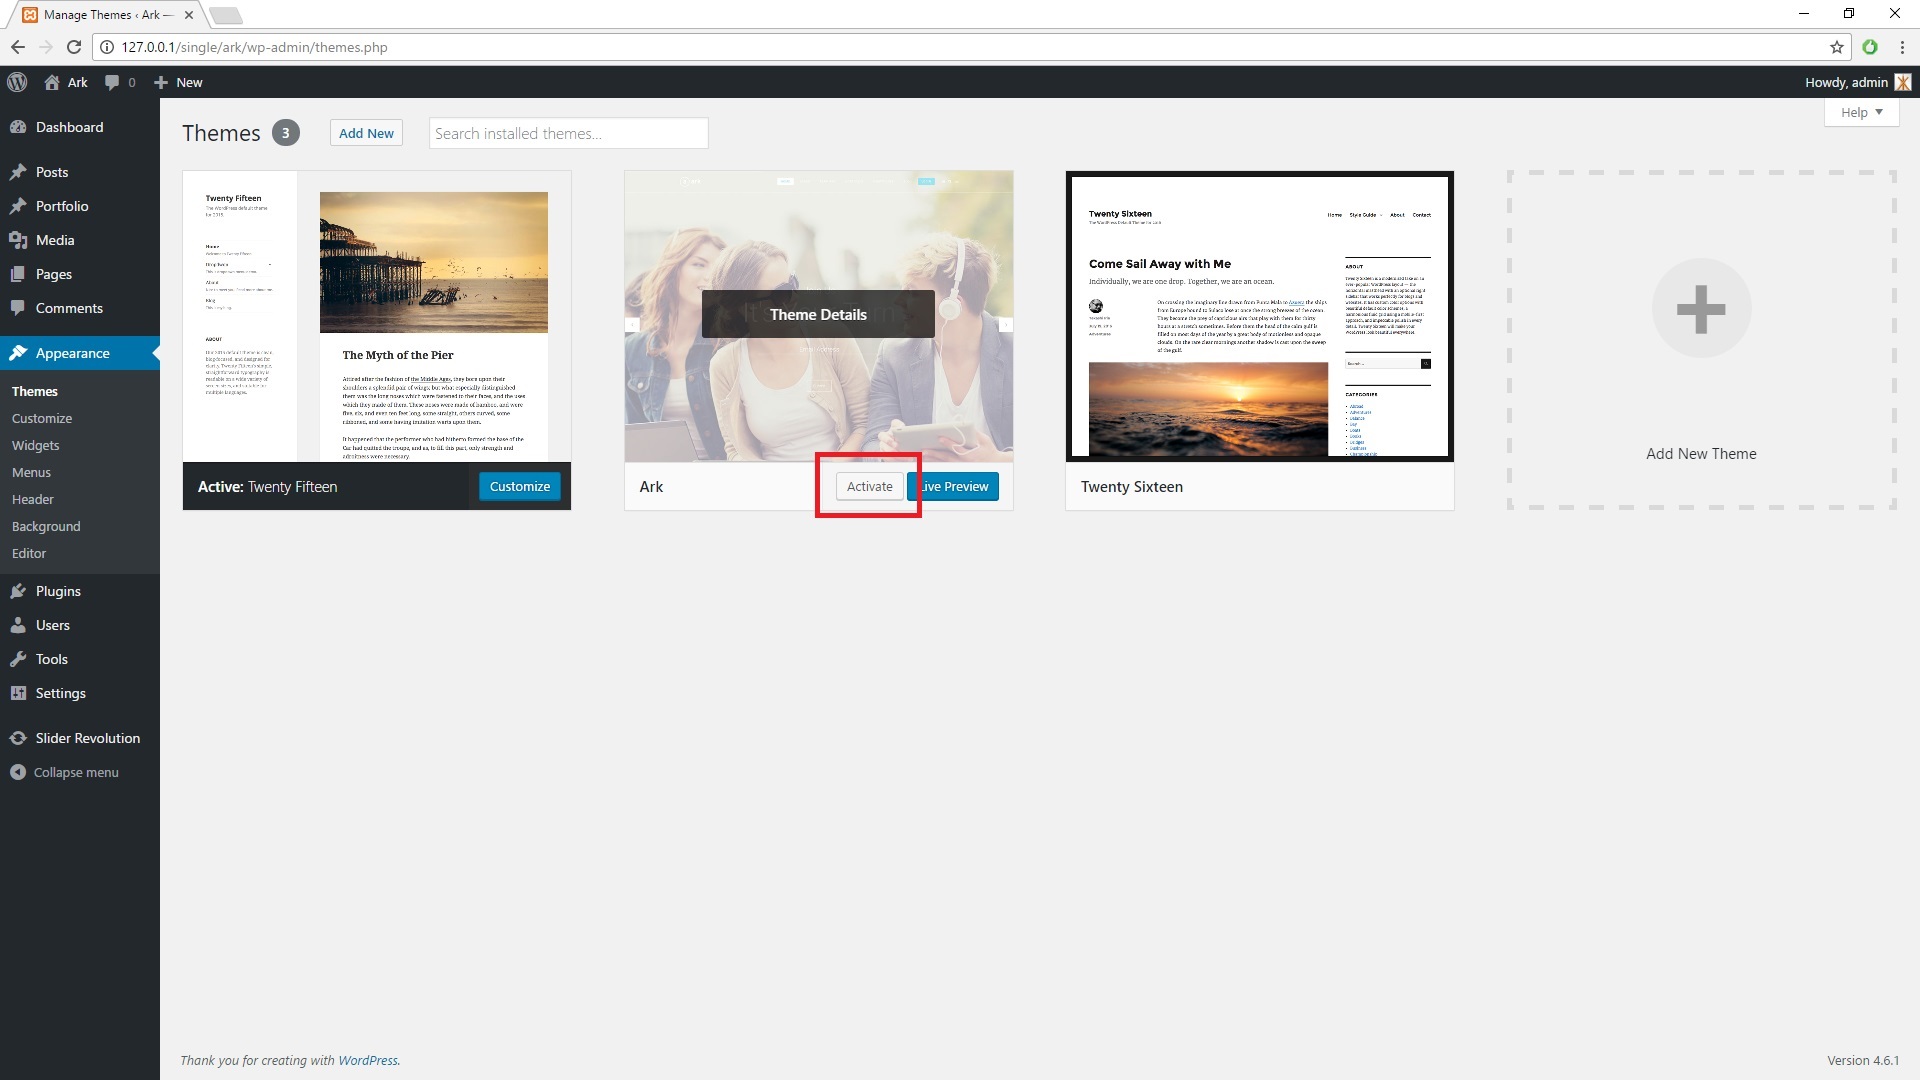
Once uploaded successfully, you can activate your new theme in WordPress Admin ⇒ Appearance ⇒ Themes ⇒ Activate. This will show the option for installation additional plugins.
If you receive an error during upload via the WordPress Admin, it's usually caused by one of these problems:
Installing by FTP
If you are experiencing problems with classic WP theme upload, we strongly recommend you to upload the theme via FTP. In that case upload unzipped theme into the /wp-content/themes/ directory.
Theme plugins installation
Even if theme works without "Fresh Framework" or "Ark Core", but we strongly recommend you to install and active it to use 100% theme options and settings.
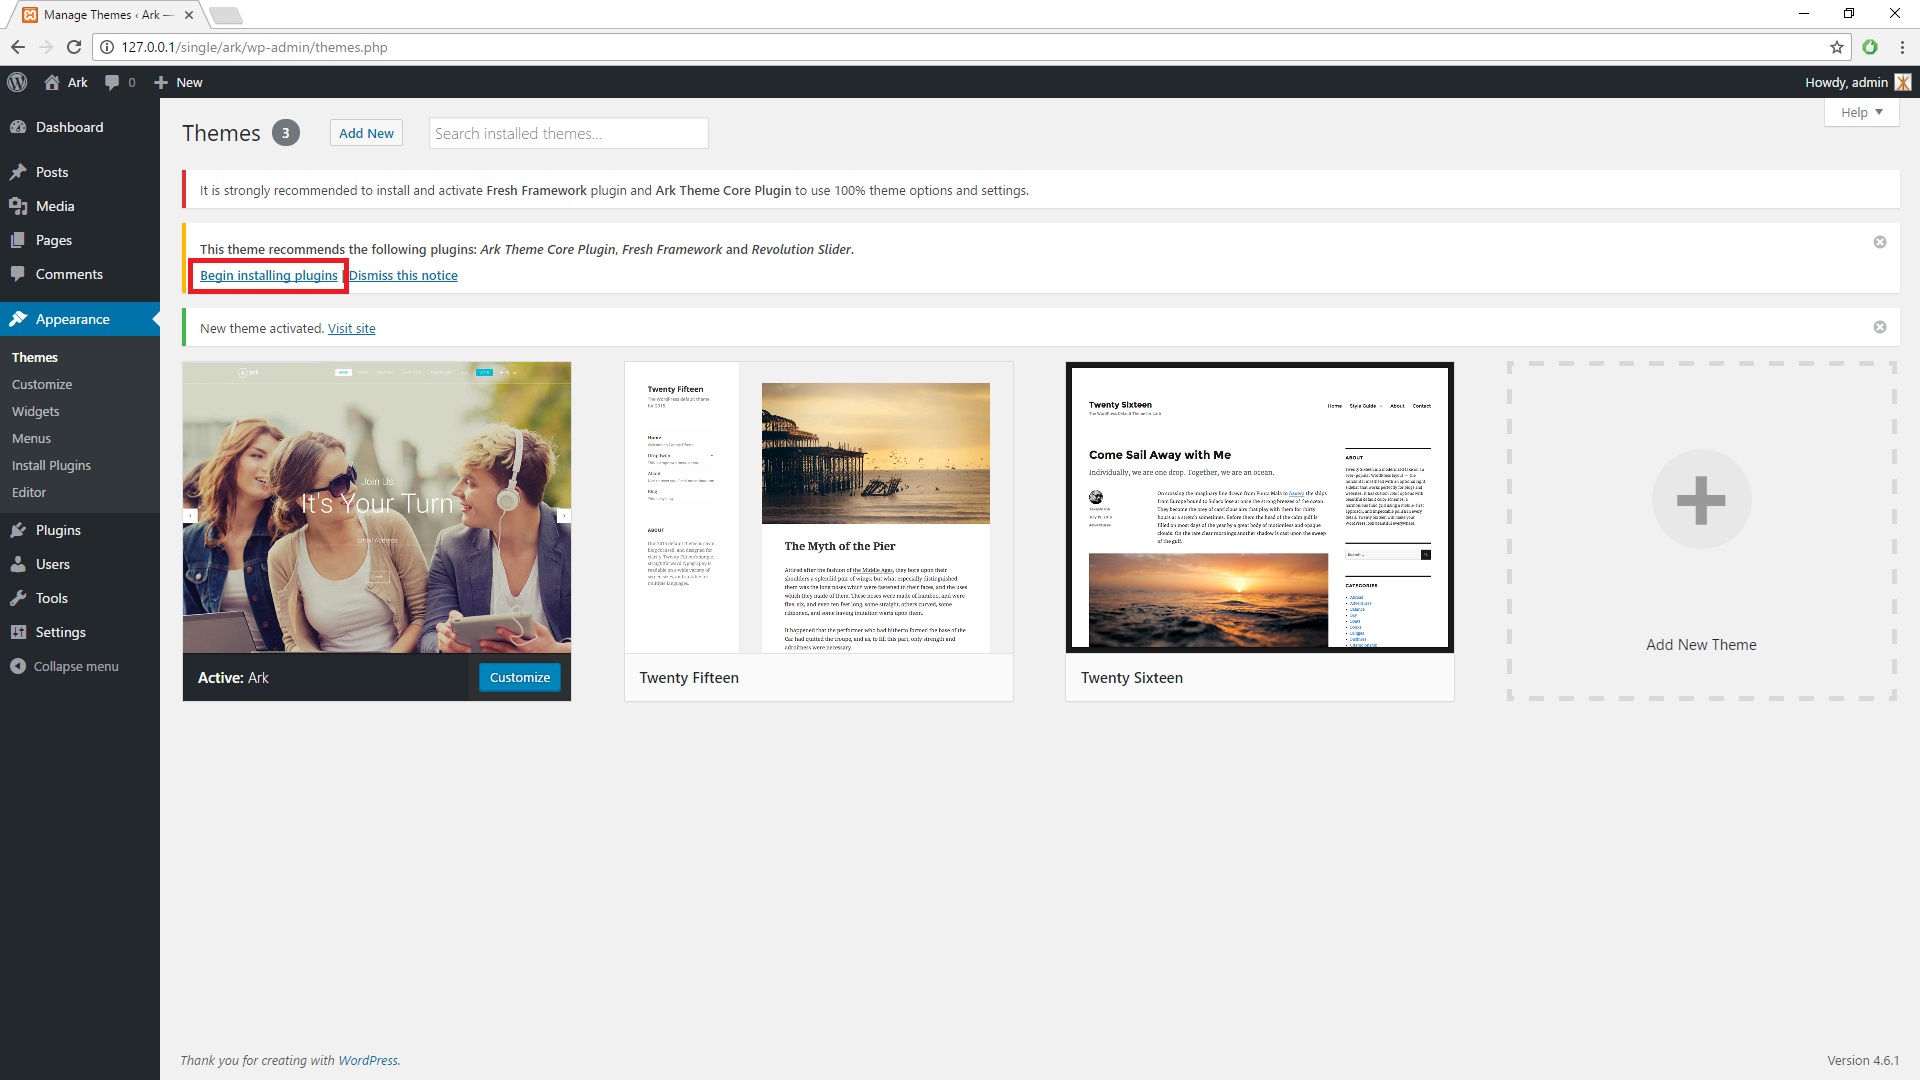
After the theme installation and activation you will see a few notices at the top of WP administration pages. There will be notice box with title The following recommended plugins are currently inactive: .... with link Begin installing plugins.
Click on the link and install the plugins and with similar procedure activate the plugins.
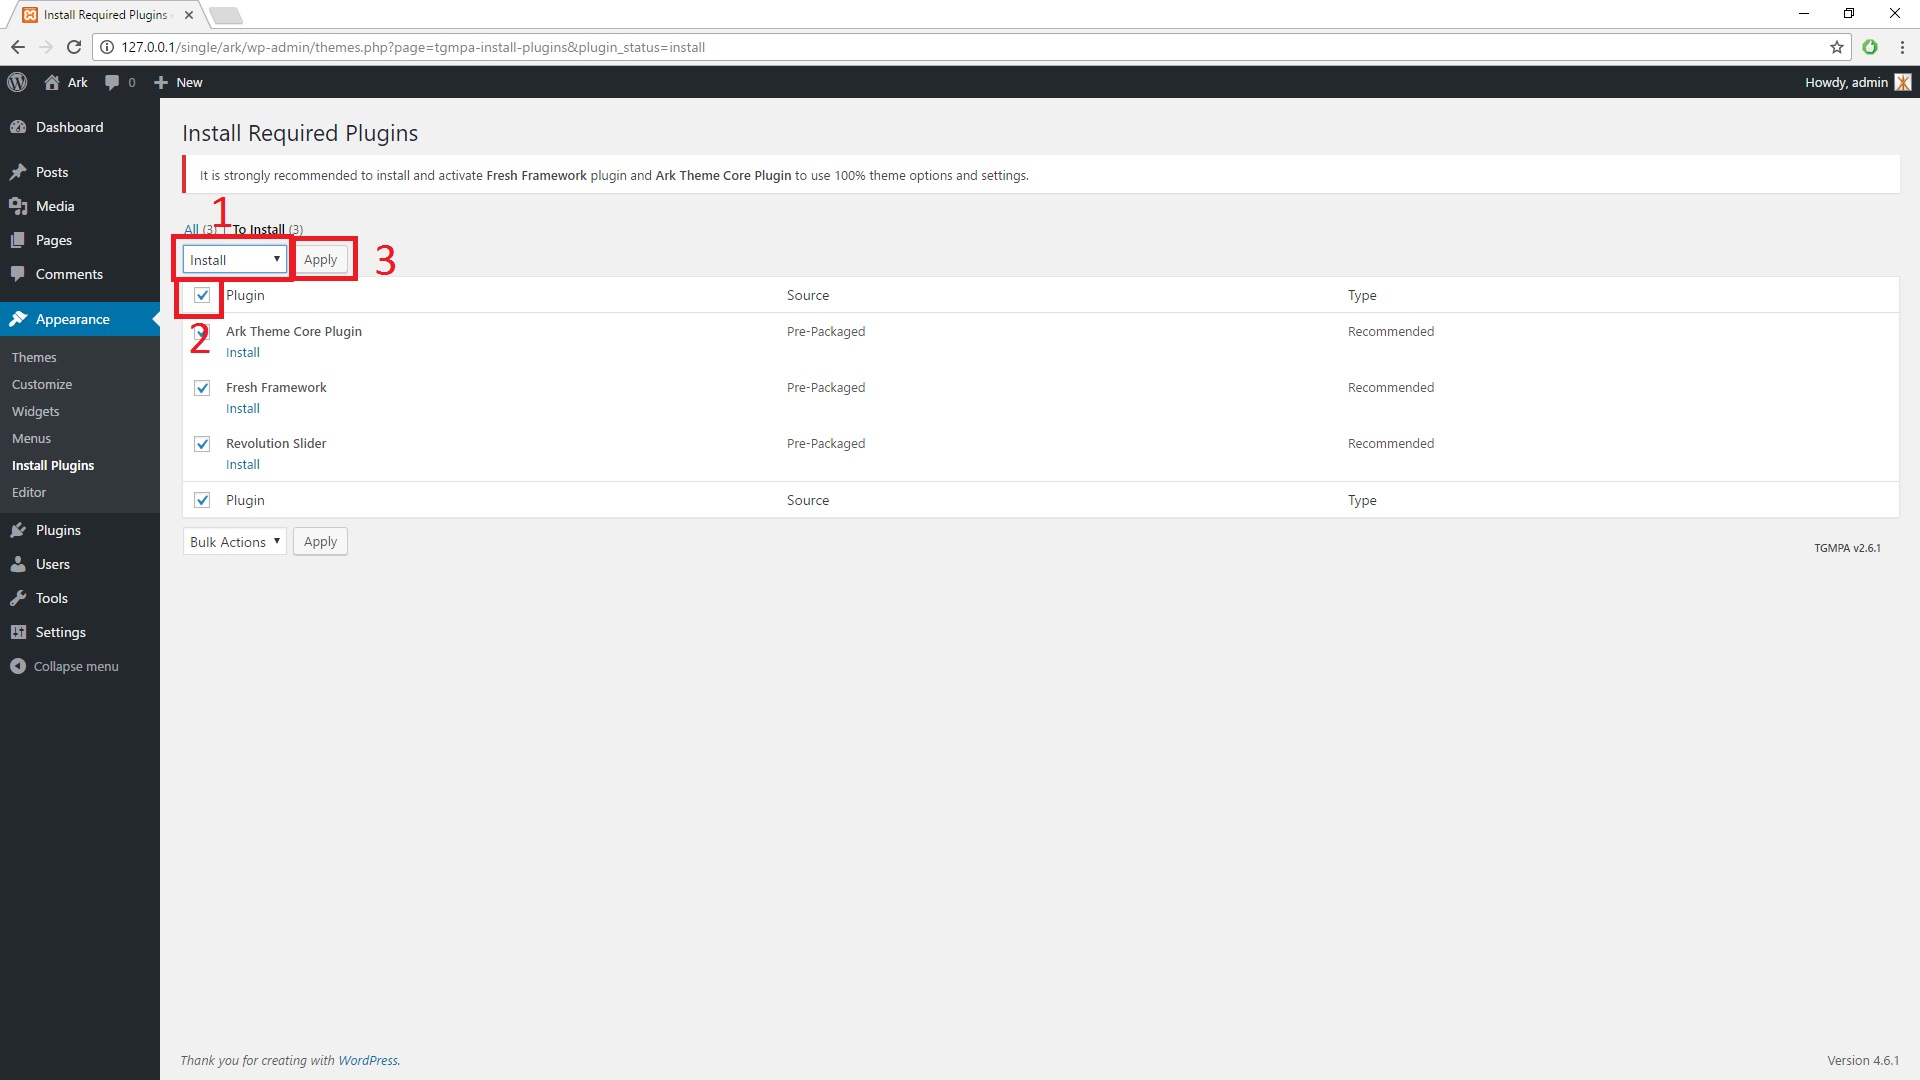
Page with plugins to install will be opened.
- Change select with value Bulk Actions to value Install [1].
- Click on the checkbox with labe Plugin [2].
- Confirm by clicking on Apply [3].
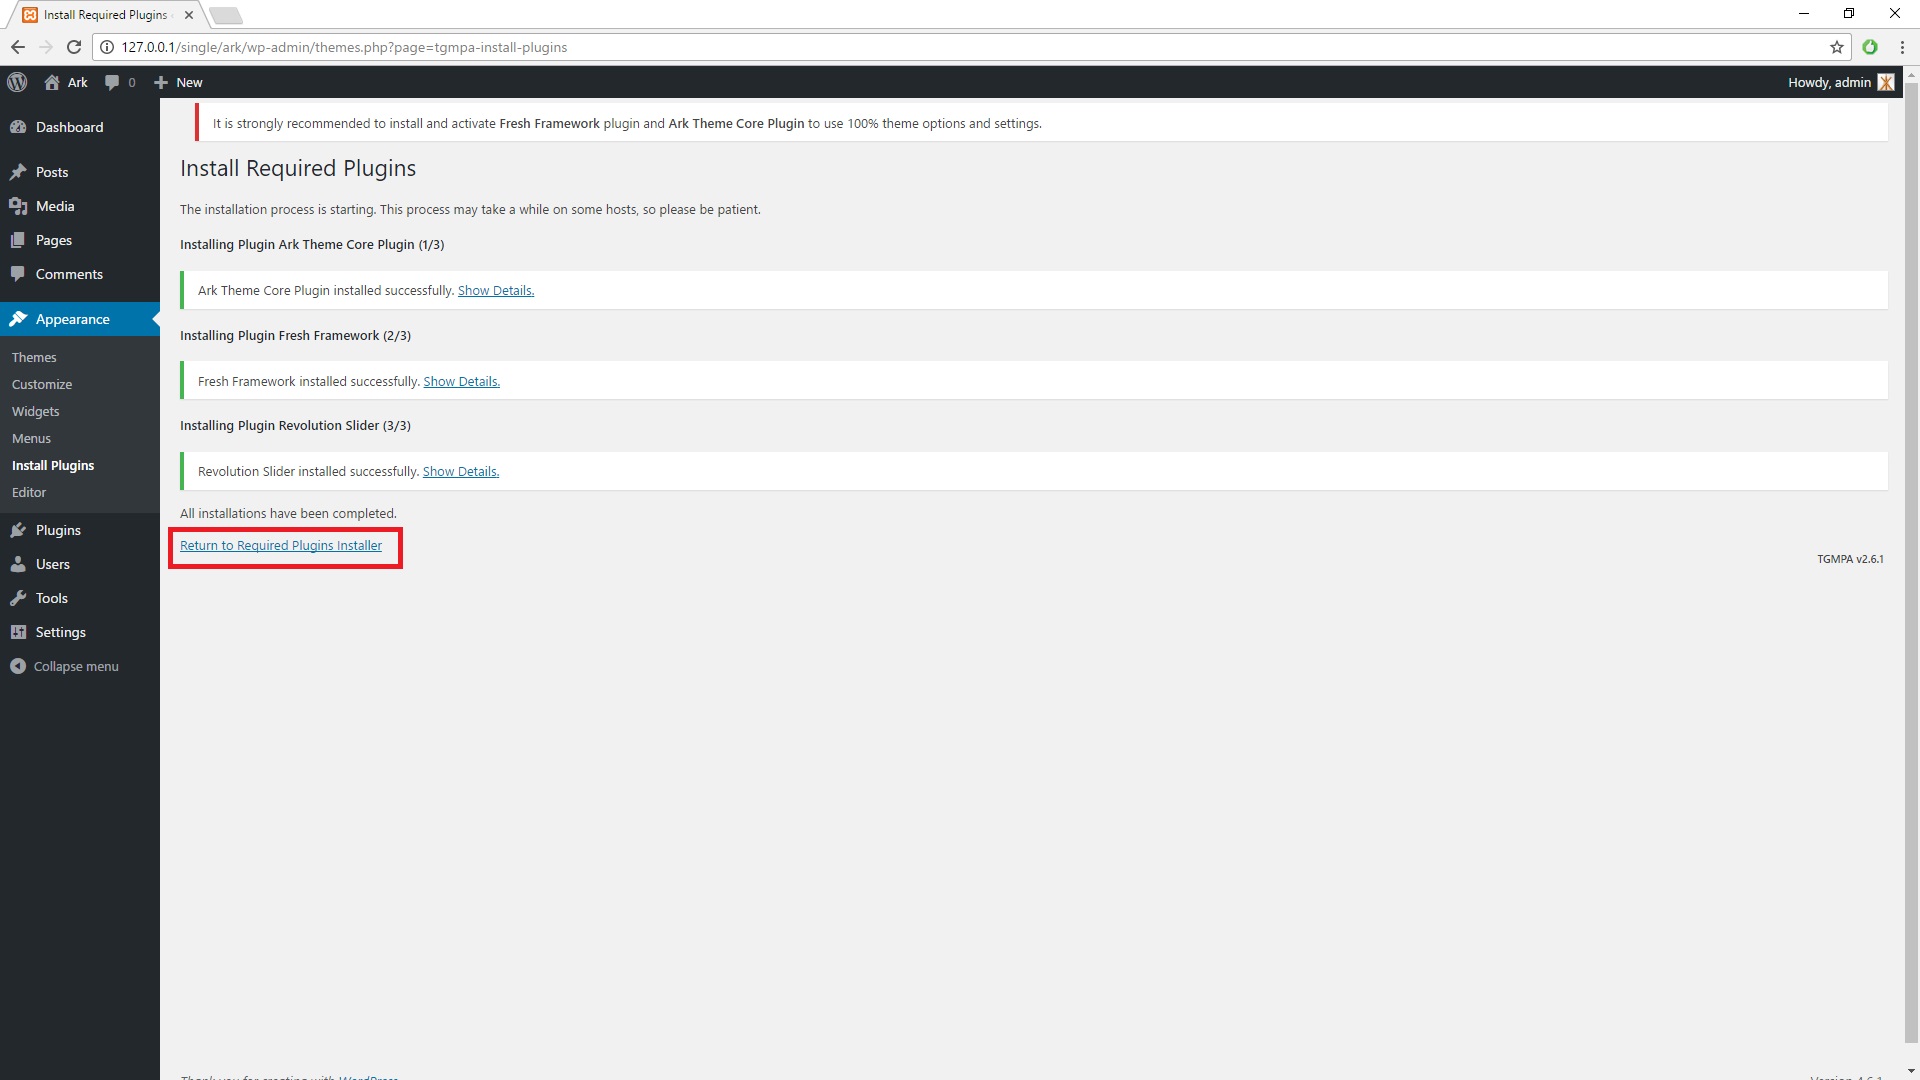
Plugins will be installed, continue by clicking on Return to Required Plugins Installer.
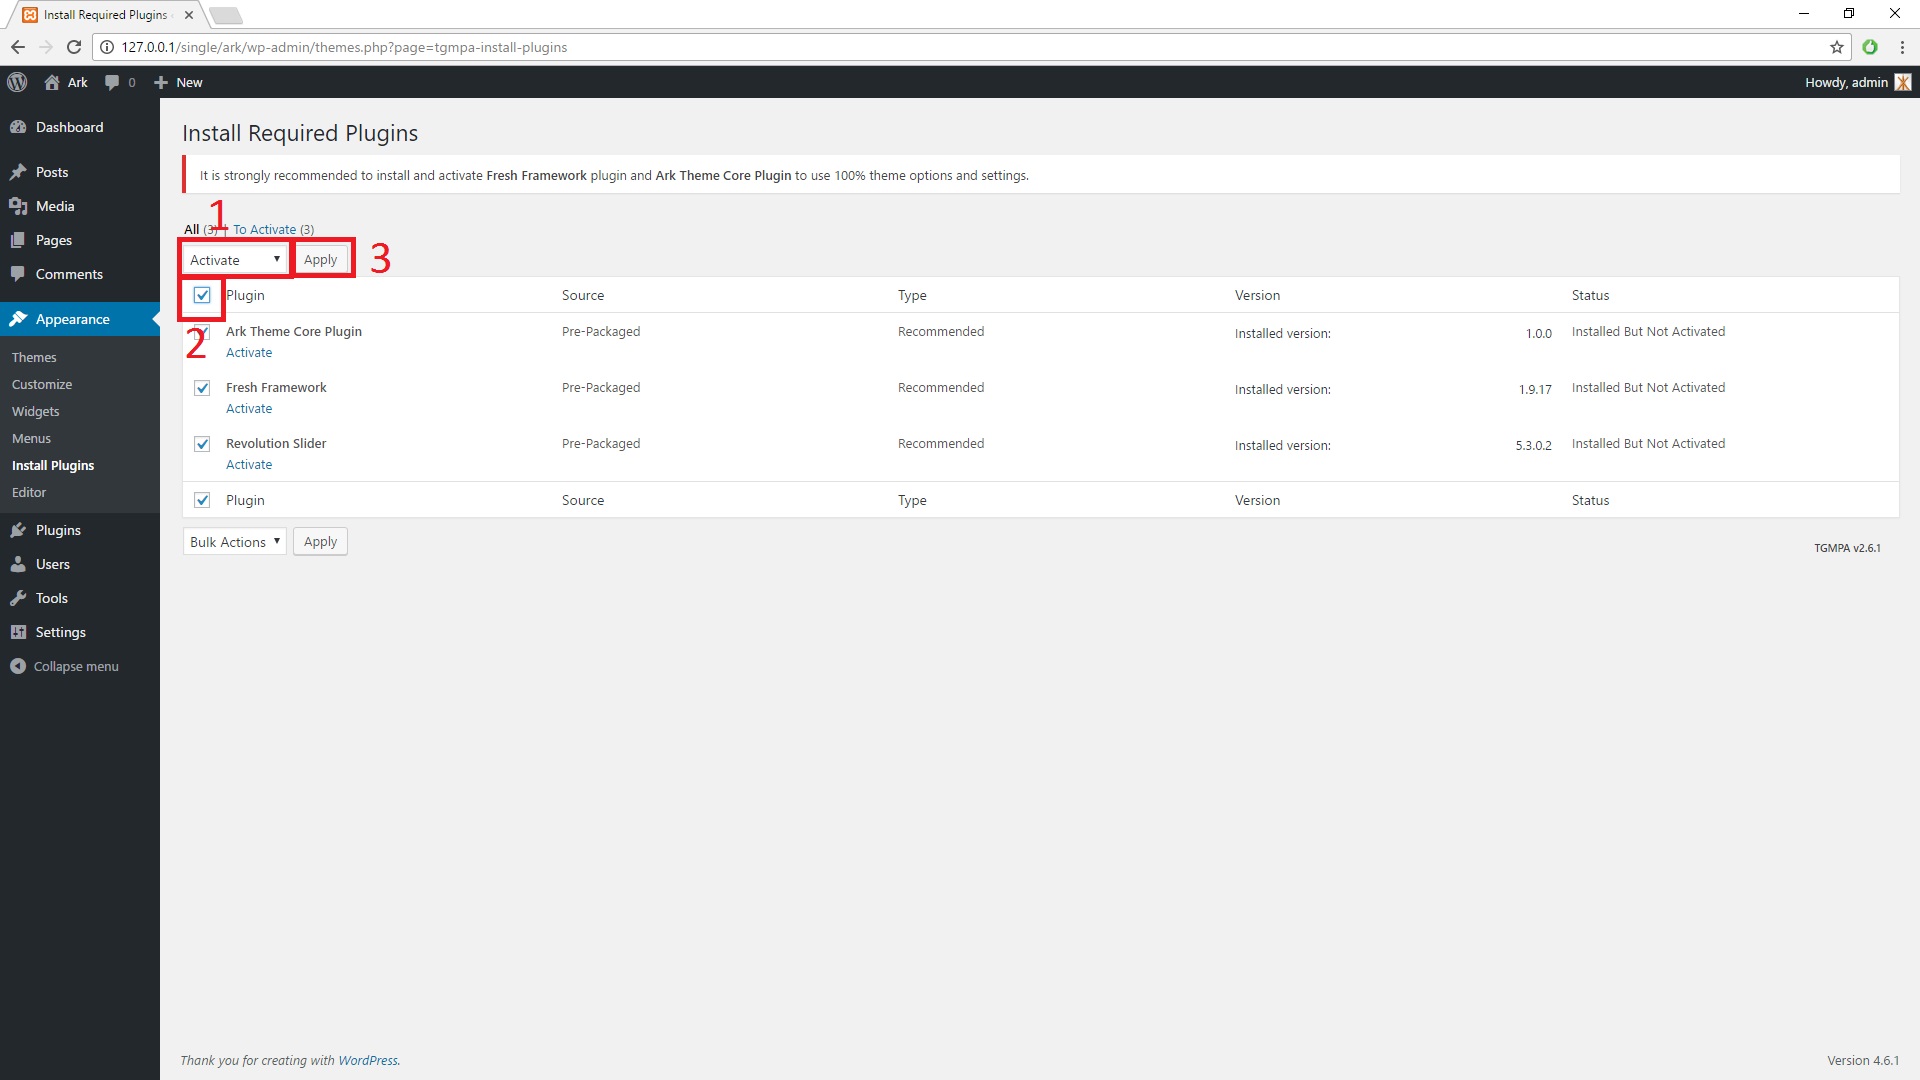
Page with plugins to activate will be opened.
- Change select with value Bulk Actions to value Activate [1].
- Click on the checkbox with labe Plugin [2].
- Confirm by clicking on Apply [3].
If you receive the error during the installation and activation, there are probably similar errors, which may occur during the theme installation.
In that case we recommend you to unzip files in the theme directory /ark/install/zips/ and upload them to the server to the directory /wp-content/plugins/ via FTP client.
Updating the Ark Theme and it's Plugins
Here is a step-by-step on how to update them:
1. Download and install: https://www.envato.com/lp/market-plugin/ (drag & drop the ZIP file to "Plugins > Add New > Upload Plugin")
2. Name your token as you wish and click "Create Token" with the already pre-selected settings here https://build.envato.com/create-token/?default=t&purchase:download=t&purchase:list=t and you will get your token. You can use this same Envato connection token on multiple websites.
3. In the "Envato Market" plugin, in "Settings" tab, then under "Single Item Tokens (Advanced)", click "Add Item" and insert your token and Ark ID: 19016121
4. Update Ark theme via "Envato Market" plugin, in "Themes" tab
5. Update the bundled plugins via "Appearance > Install Plugins"
Wordpress Settings and Options
Setting up your Front Page as Page
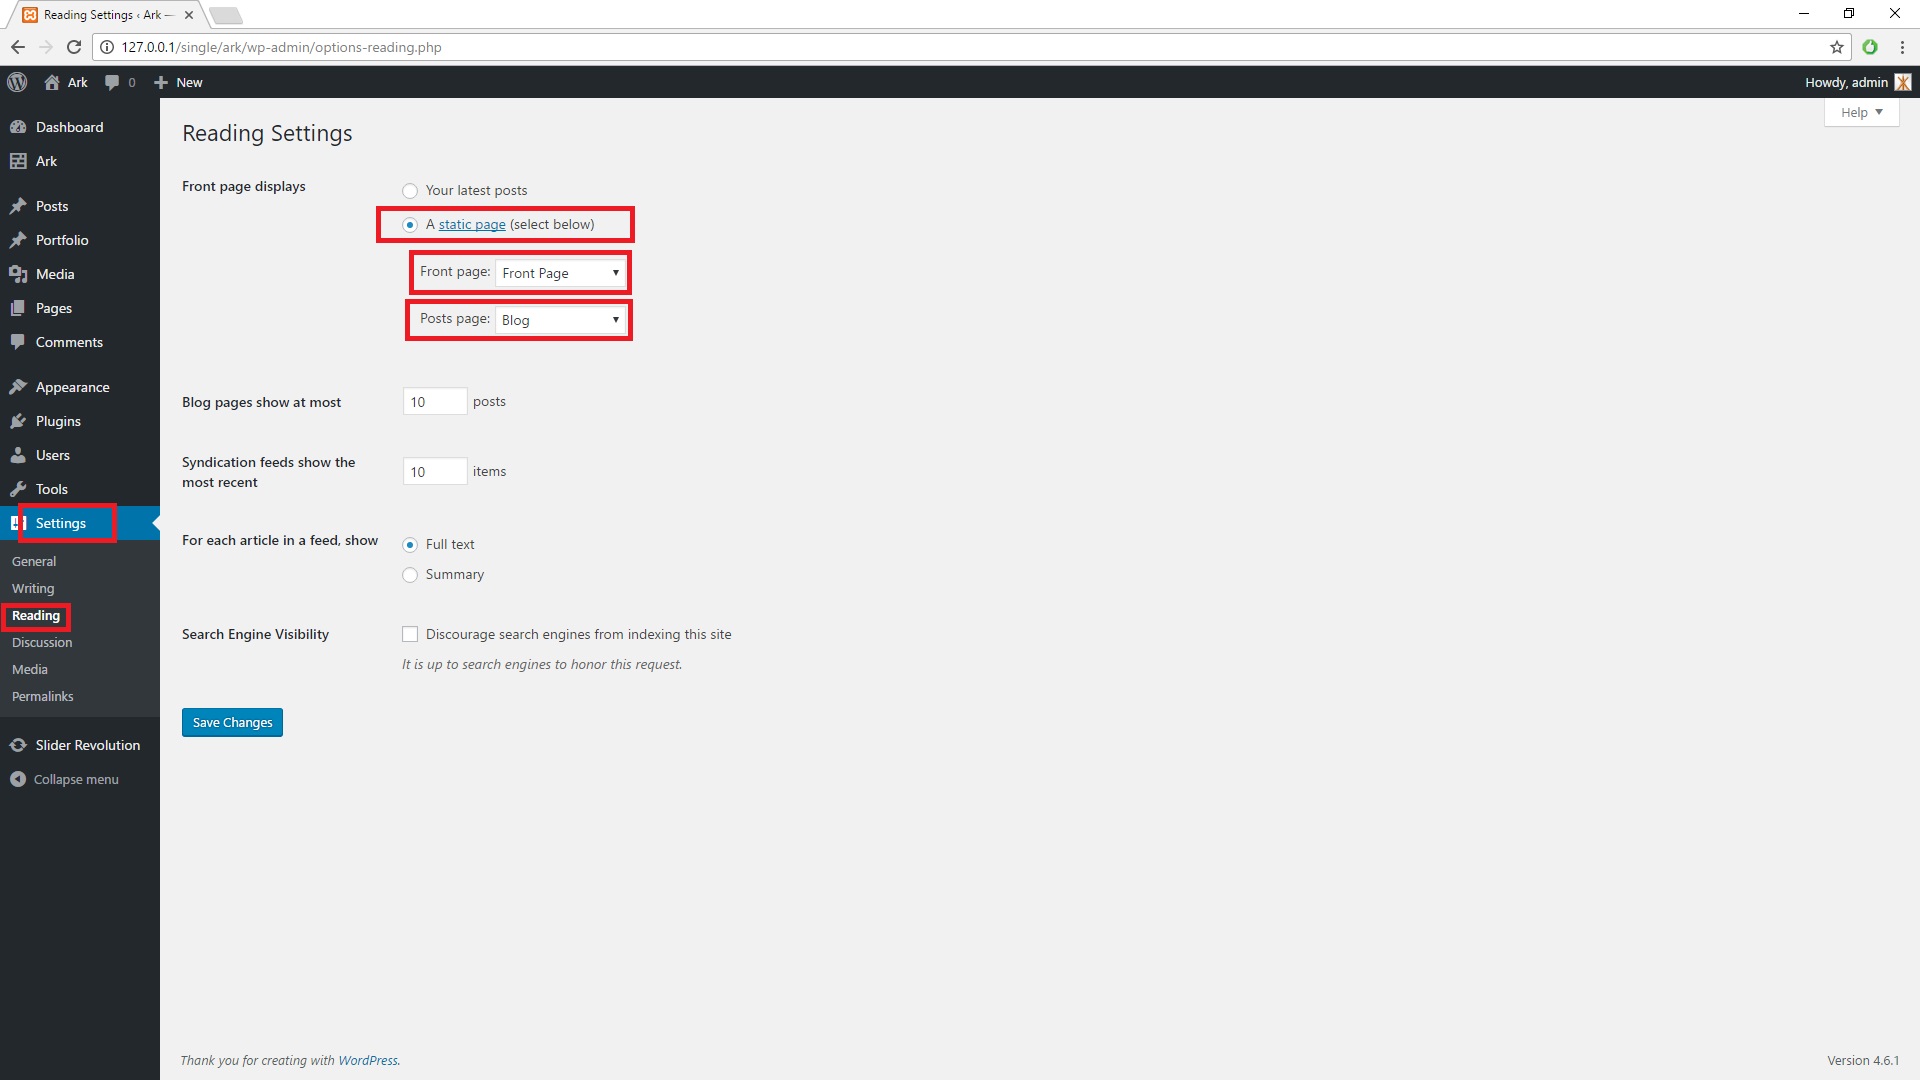
- Go to WordPress Admin Menu ⇒ Settings ⇒ Reading
- Select in Front page displays section an option static page
- You can choose there your Front Page (Home) in select option
- You can choose the Blog page in select option Posts Page
Setting up your Front Page as Blog
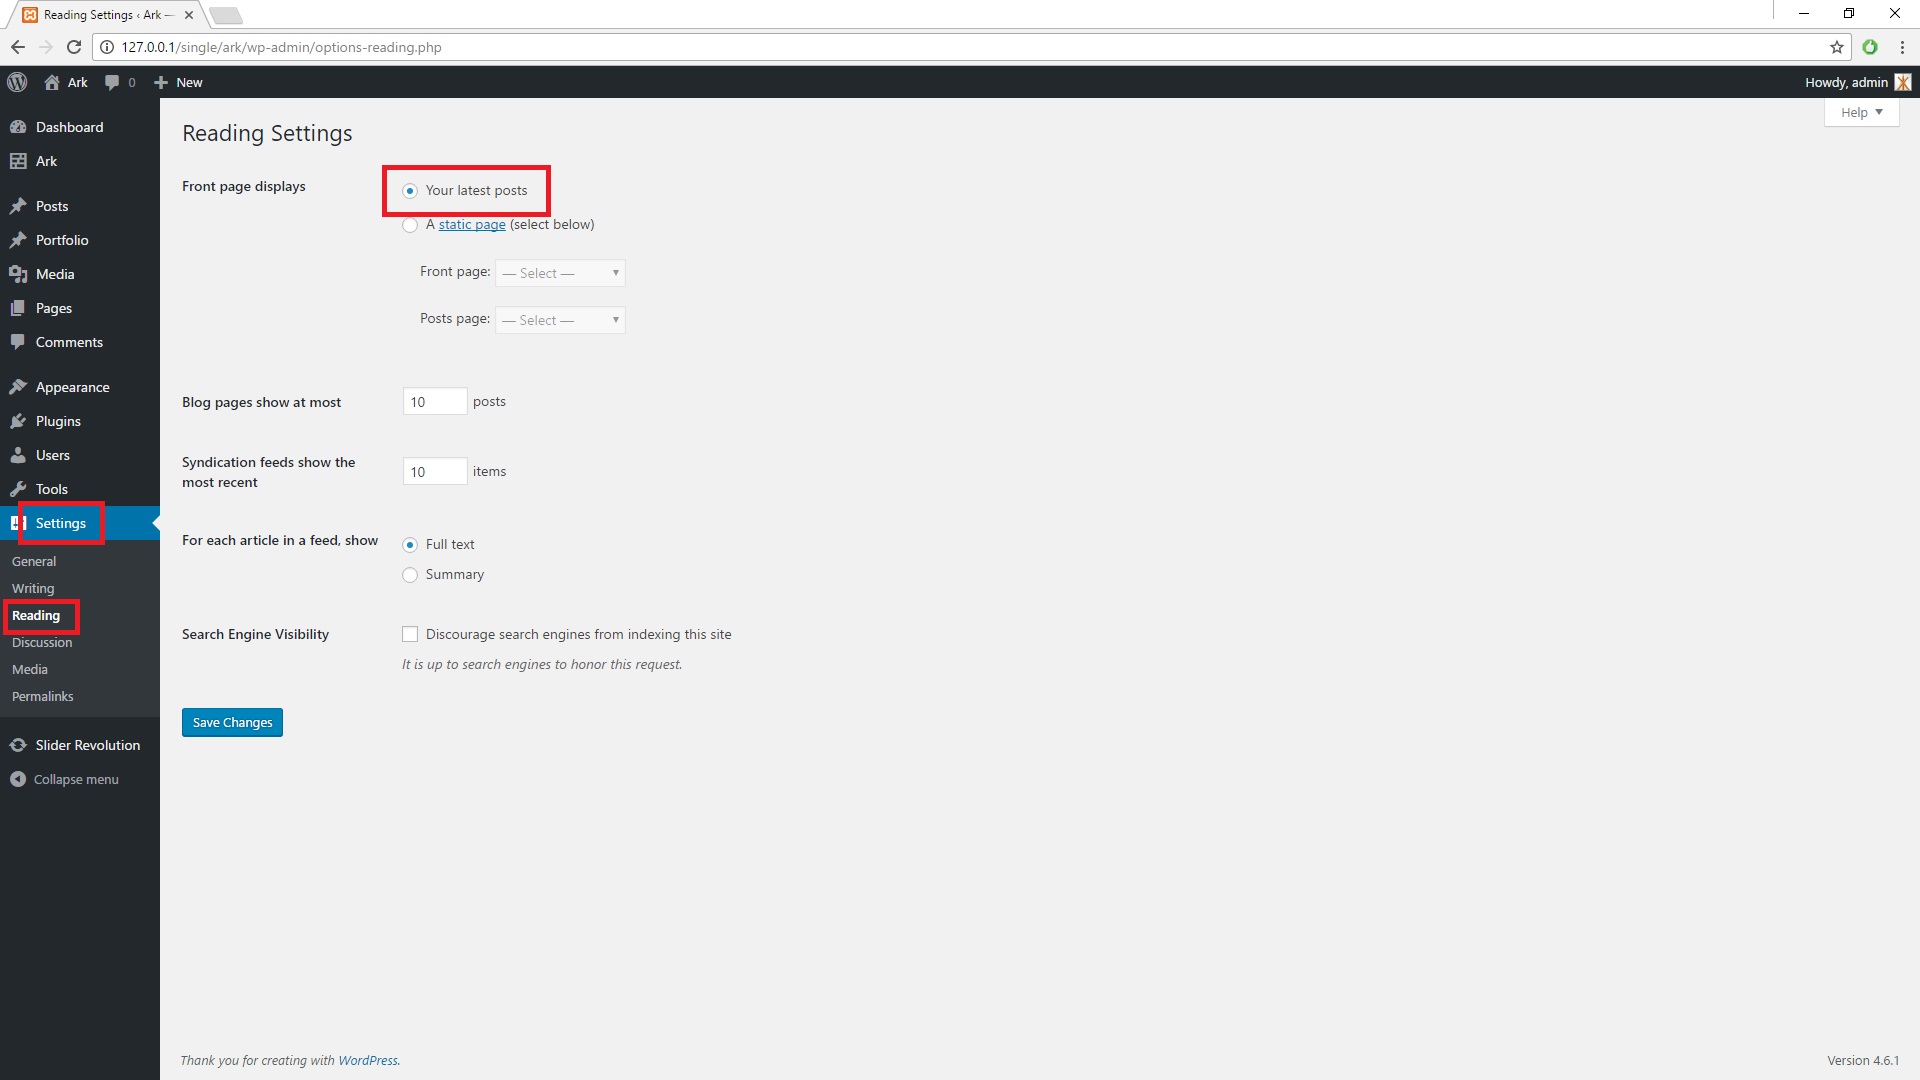
- Go to WordPress Admin Menu ⇒ Settings ⇒ Reading
- Select in Front page displays section an option Your latest posts
Fresh Builder
How to activate Fresh Builder
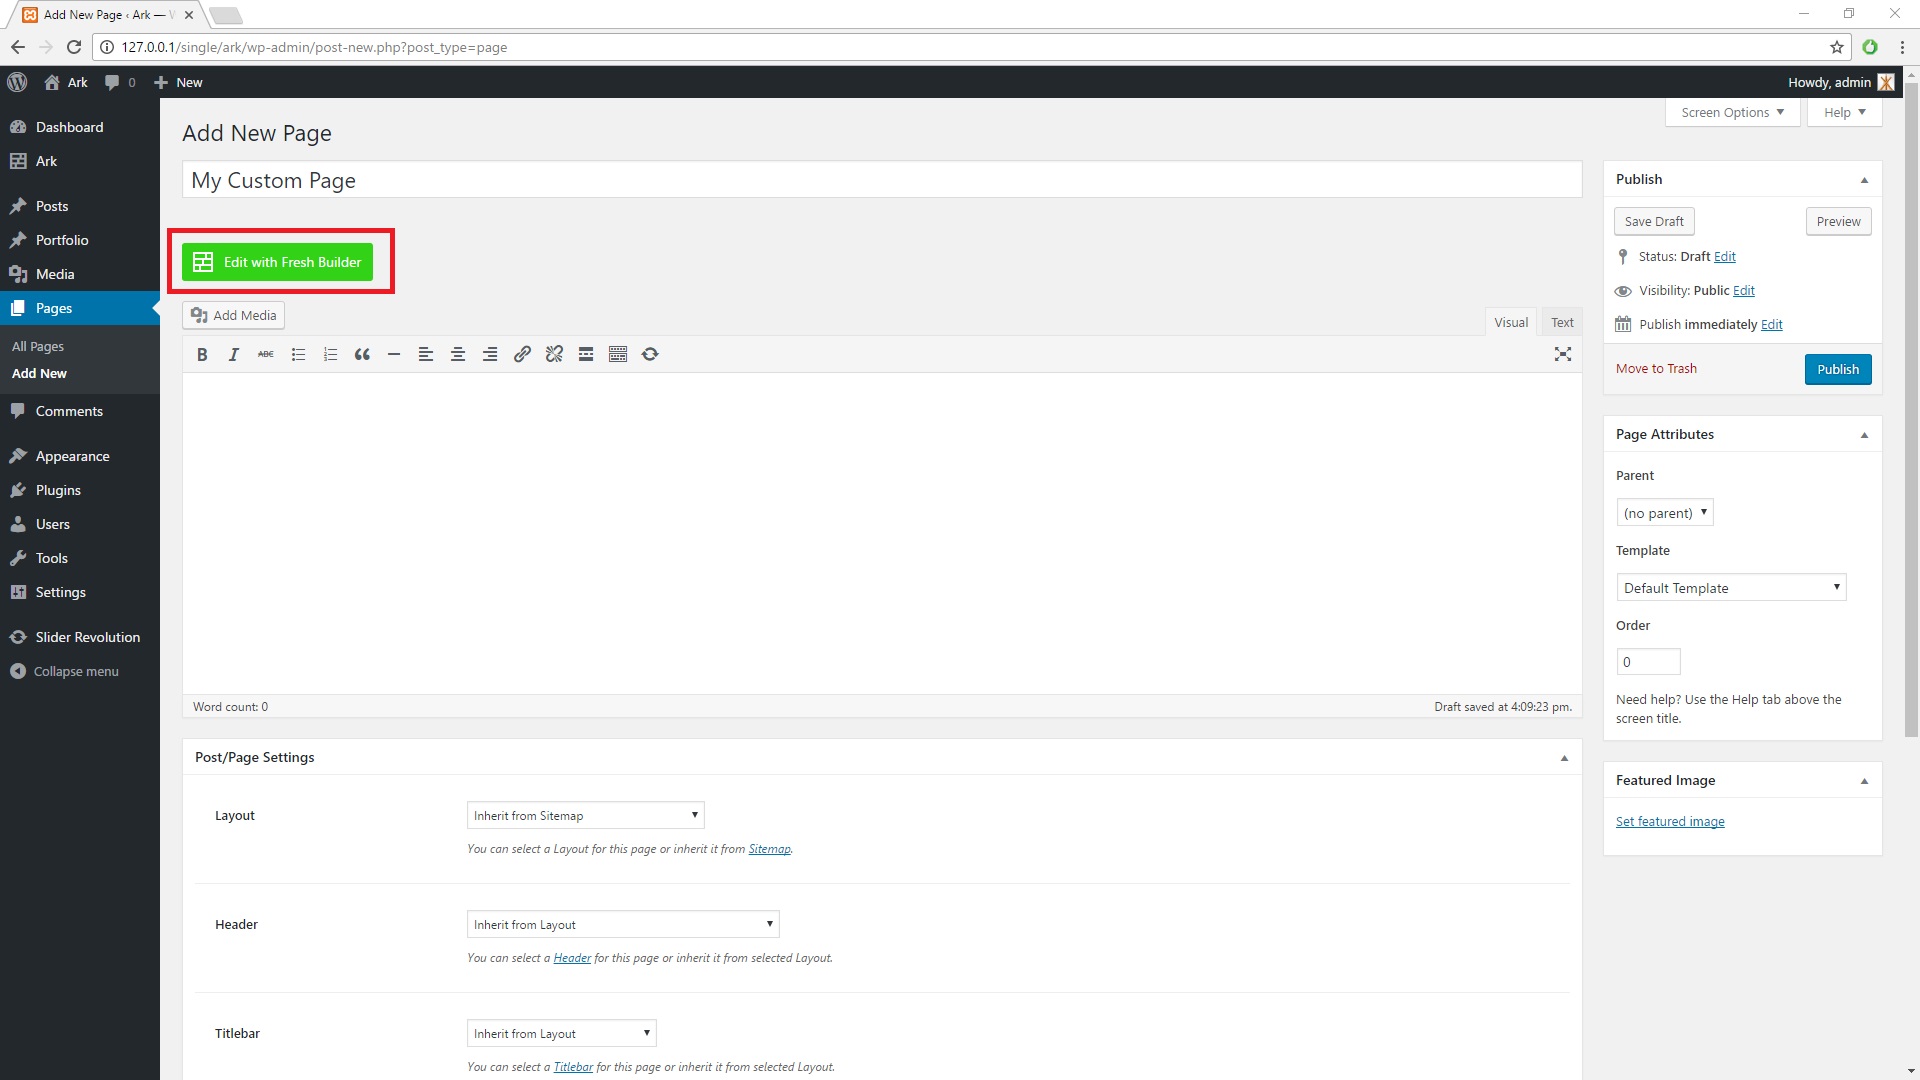
- Open existing or create new page.
- Click on the Edit with Fresh Builder button if builder mode is not activated.
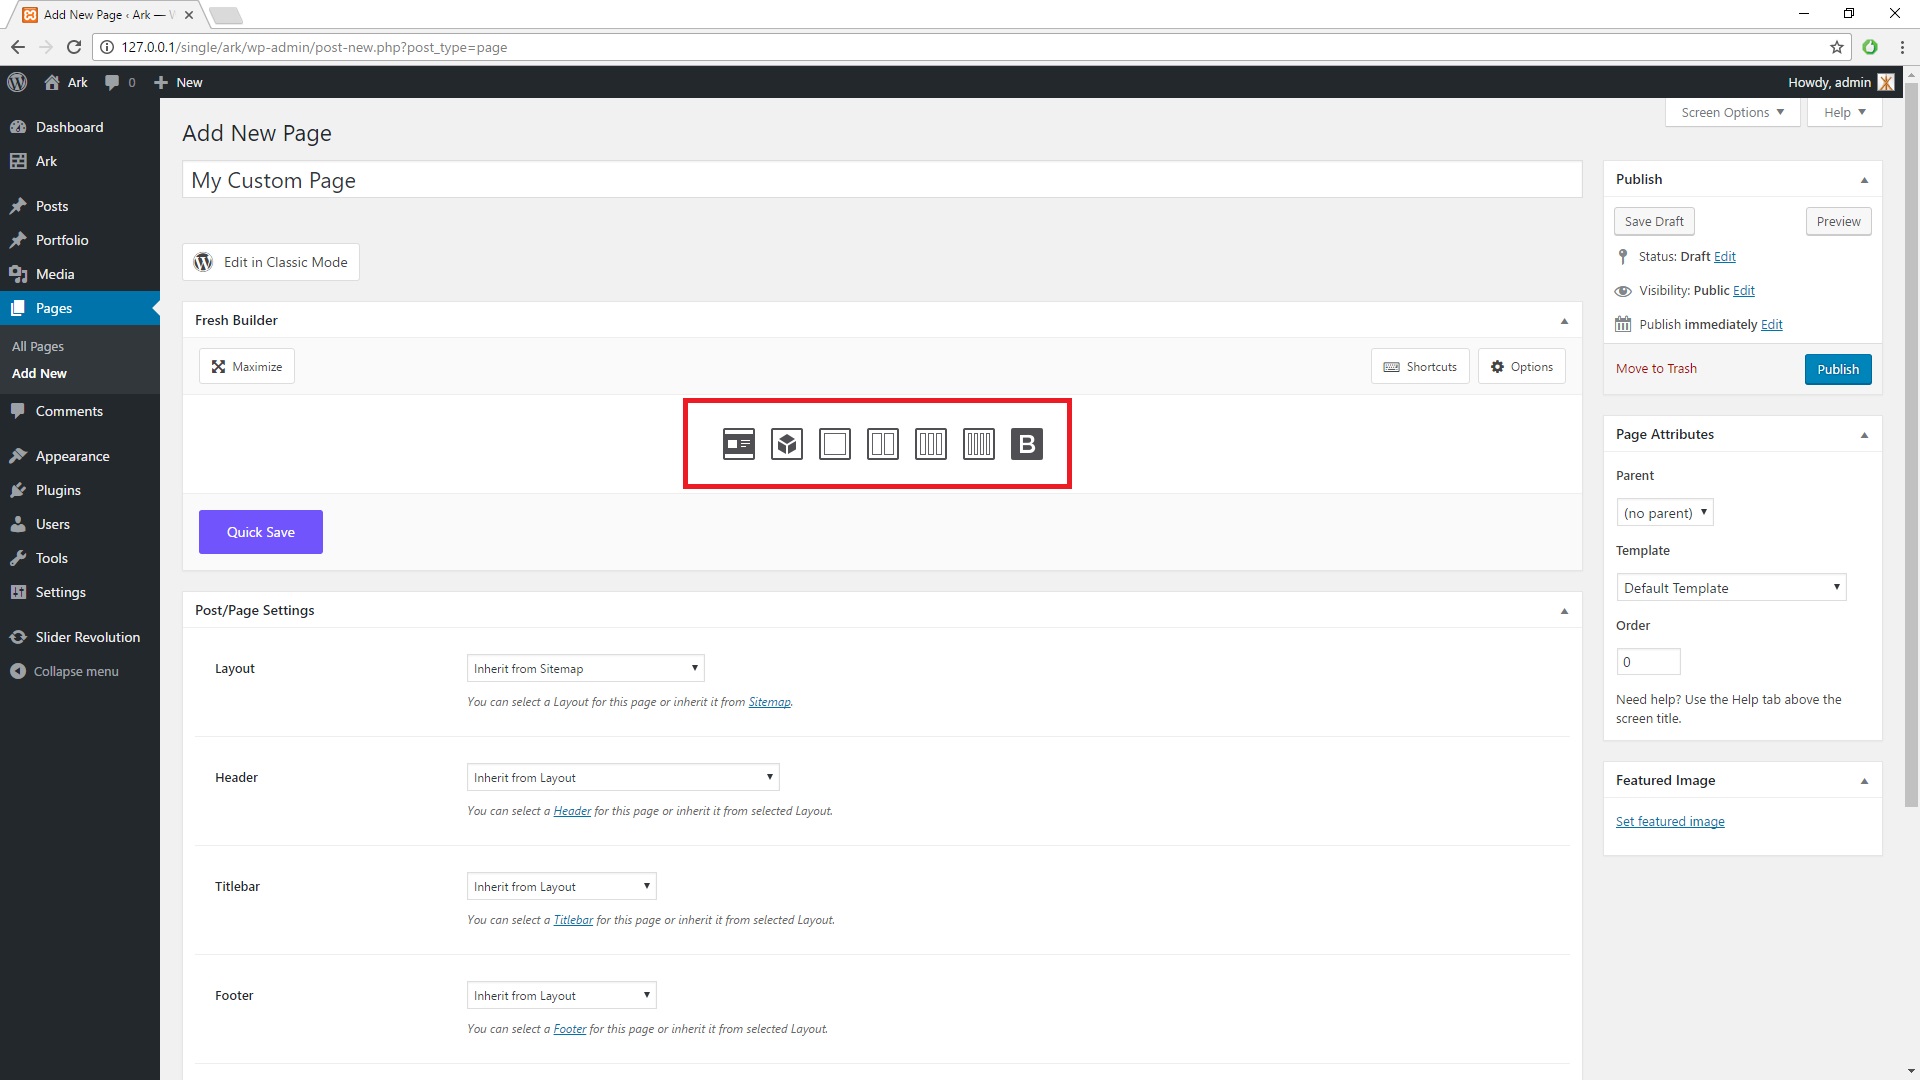
Buttons with tooltip will appear:
- Add Section From Library
- Add Element
- Add Section with 1 Empty Column
- Add Section with 2 Empty Columns
- Add Section with 3 Empty Columns
- Add Section with 4 Empty Columns
- Add Advanced Bootstrap Grid Section
How to insert Hello World!
Meaning of Hello World is the simplest example program that, when run, displays the message: Hello World. I will show you how to make in in the Fresh Builder.

Click on the Add Section with 1 Empty Column icon button.
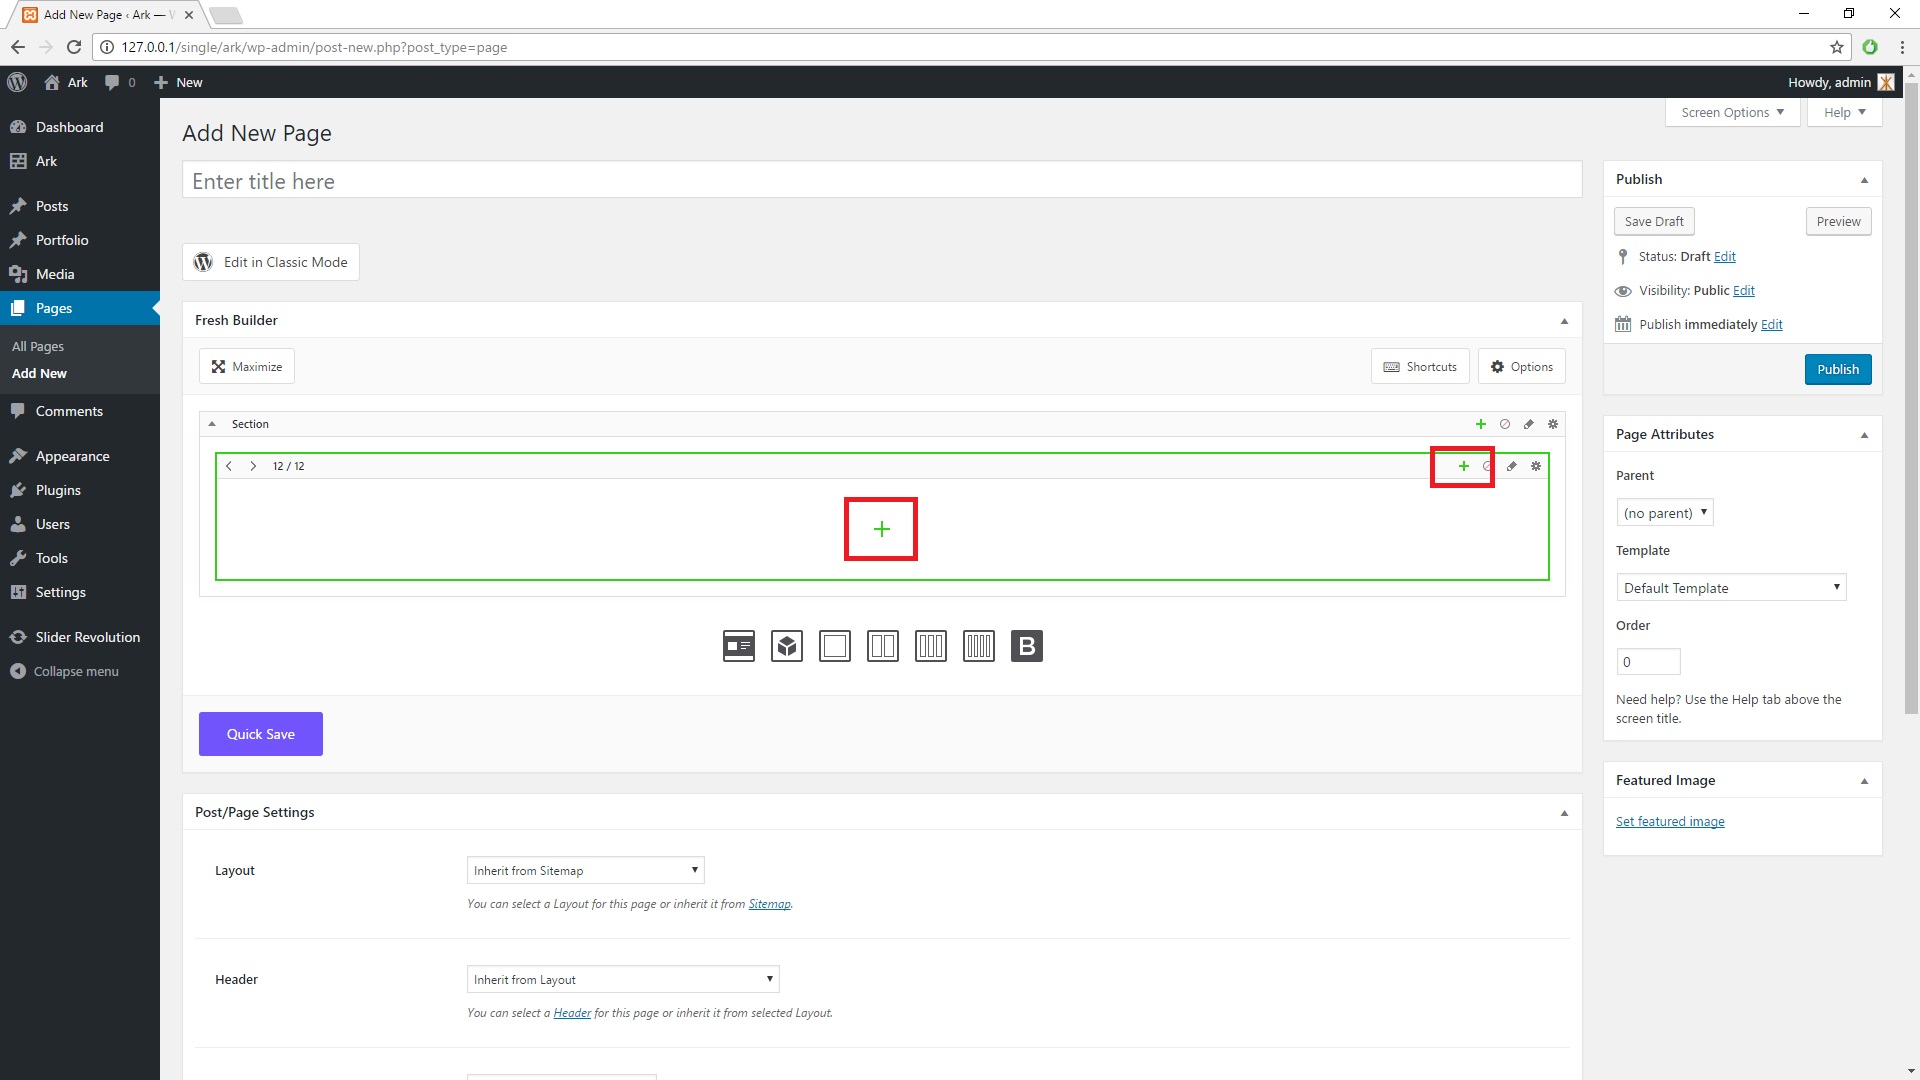
Click on the Big + icon button in the column or on the + icon button in the column menu.
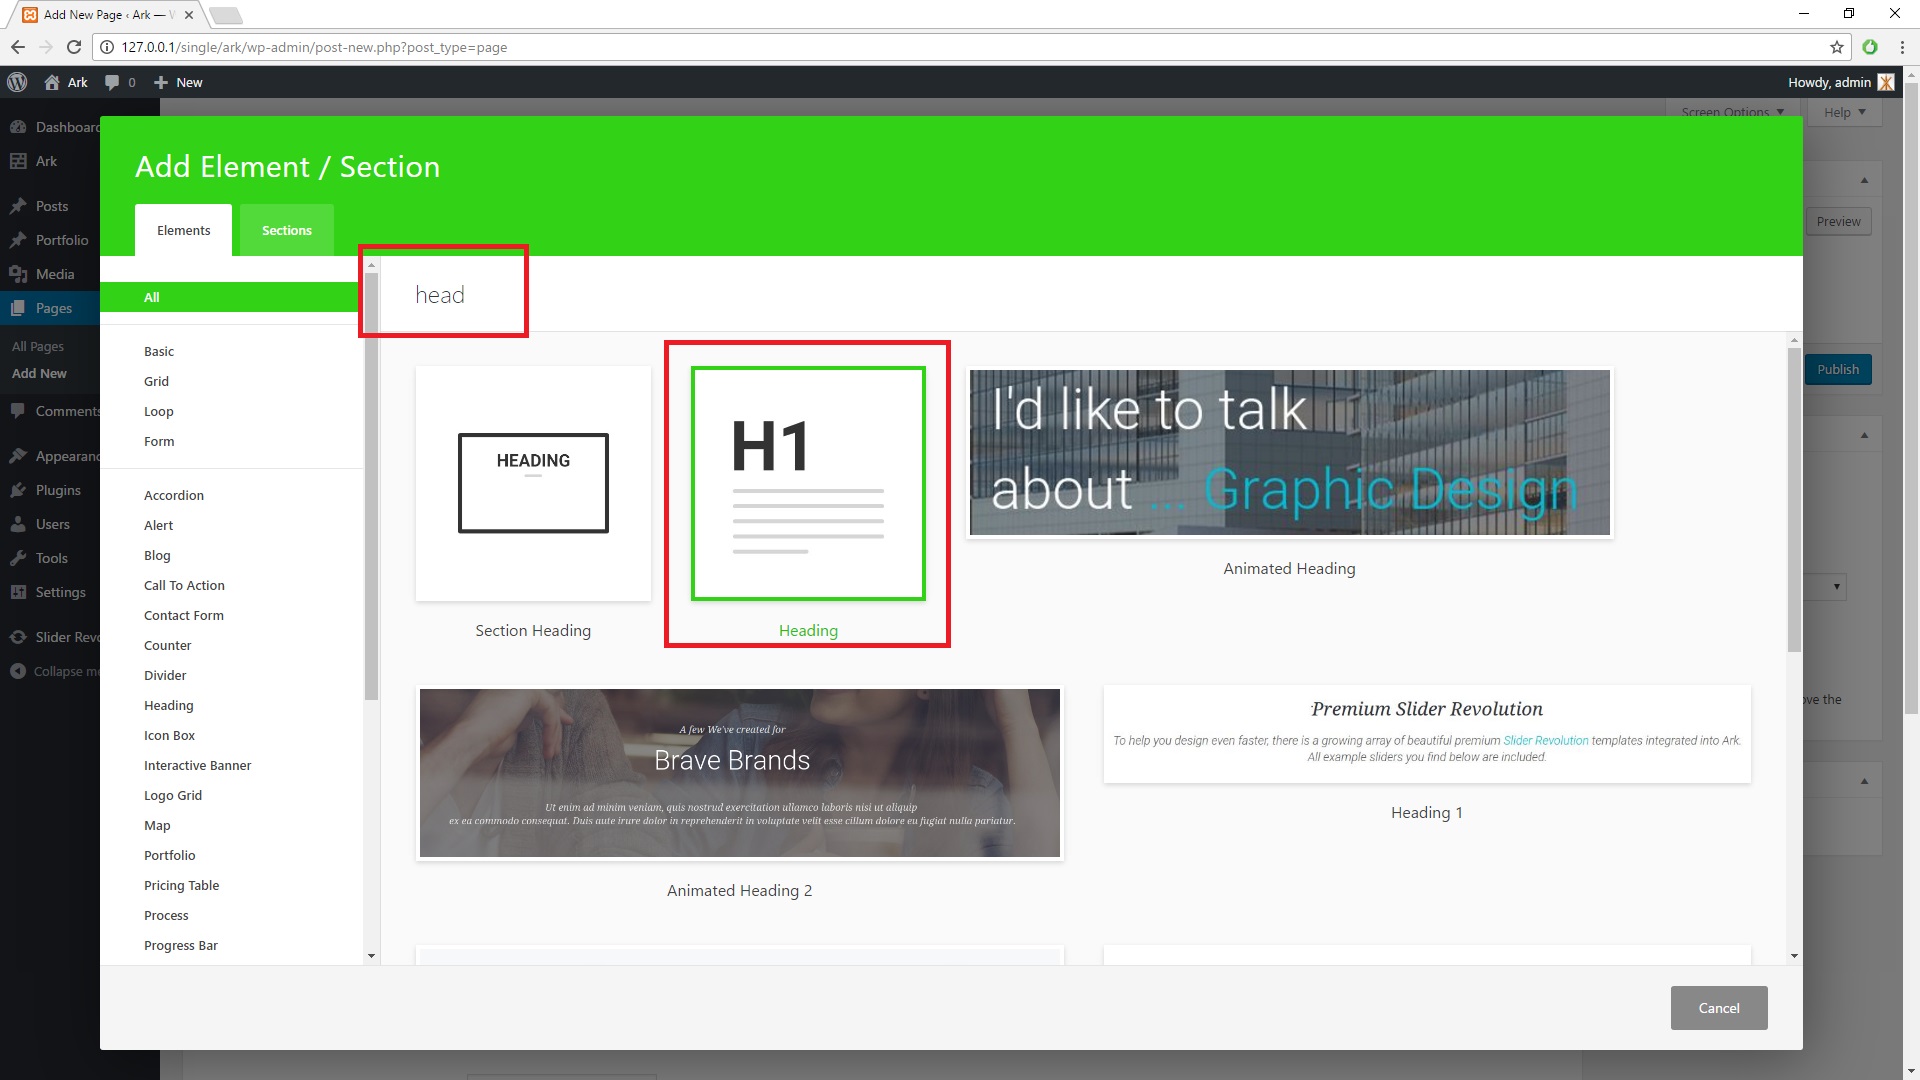
Type into the search field "Head" and choose Heading element.
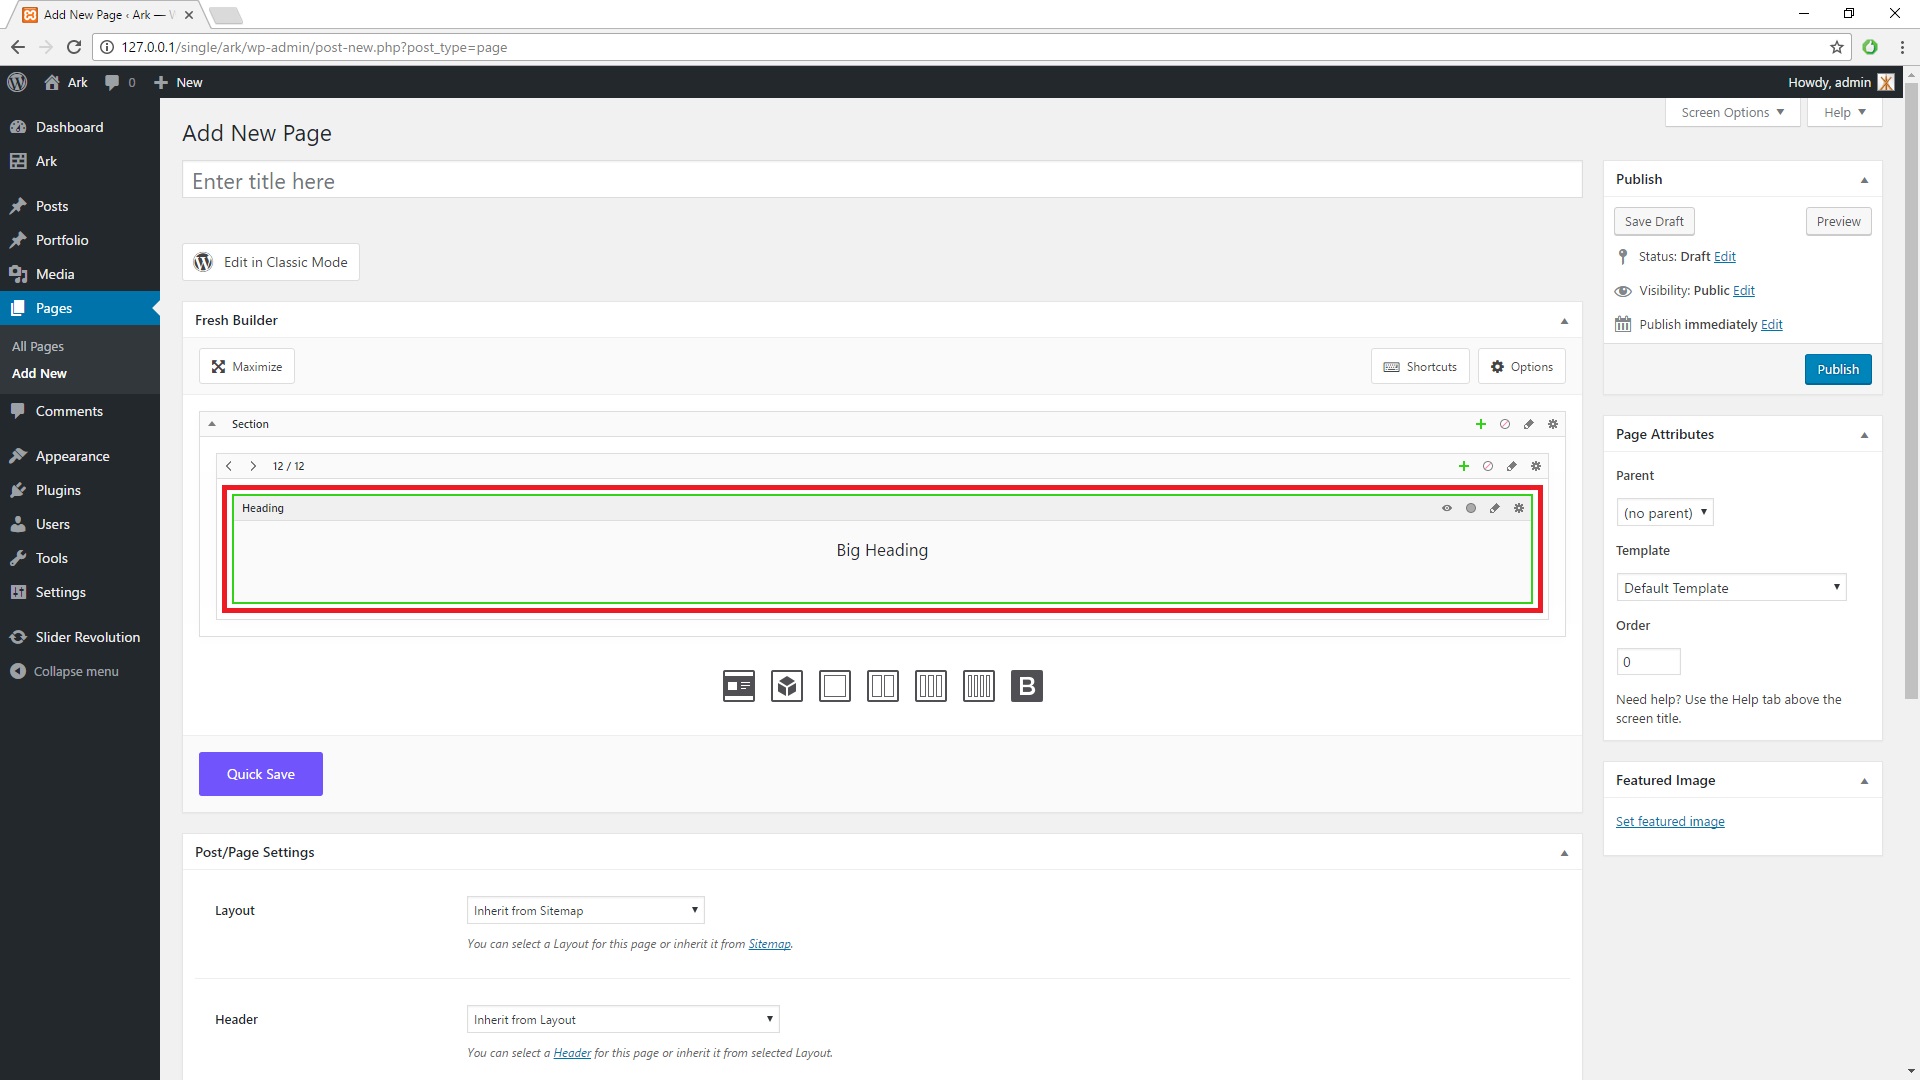
Click on element Heading to edit it.
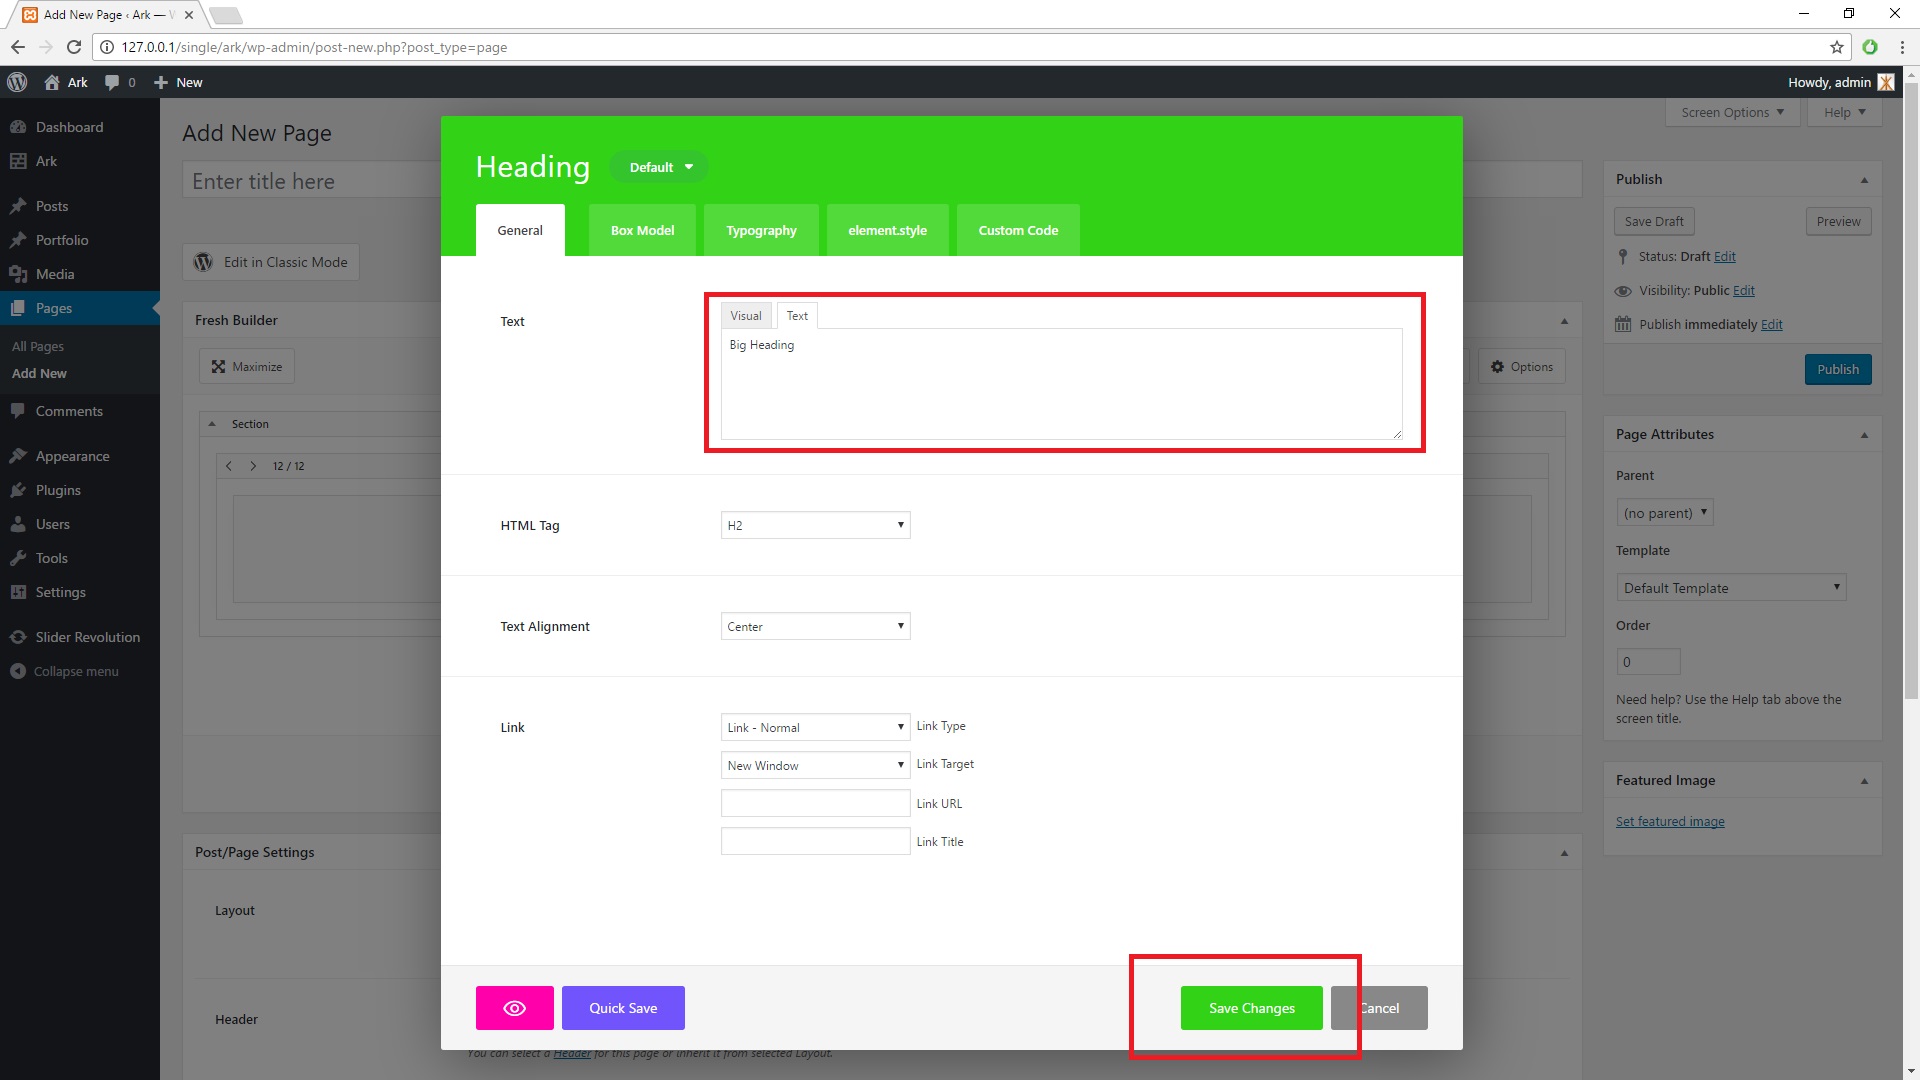
Change the text to "Hello World" and press Save Changes button
Controls
Basics
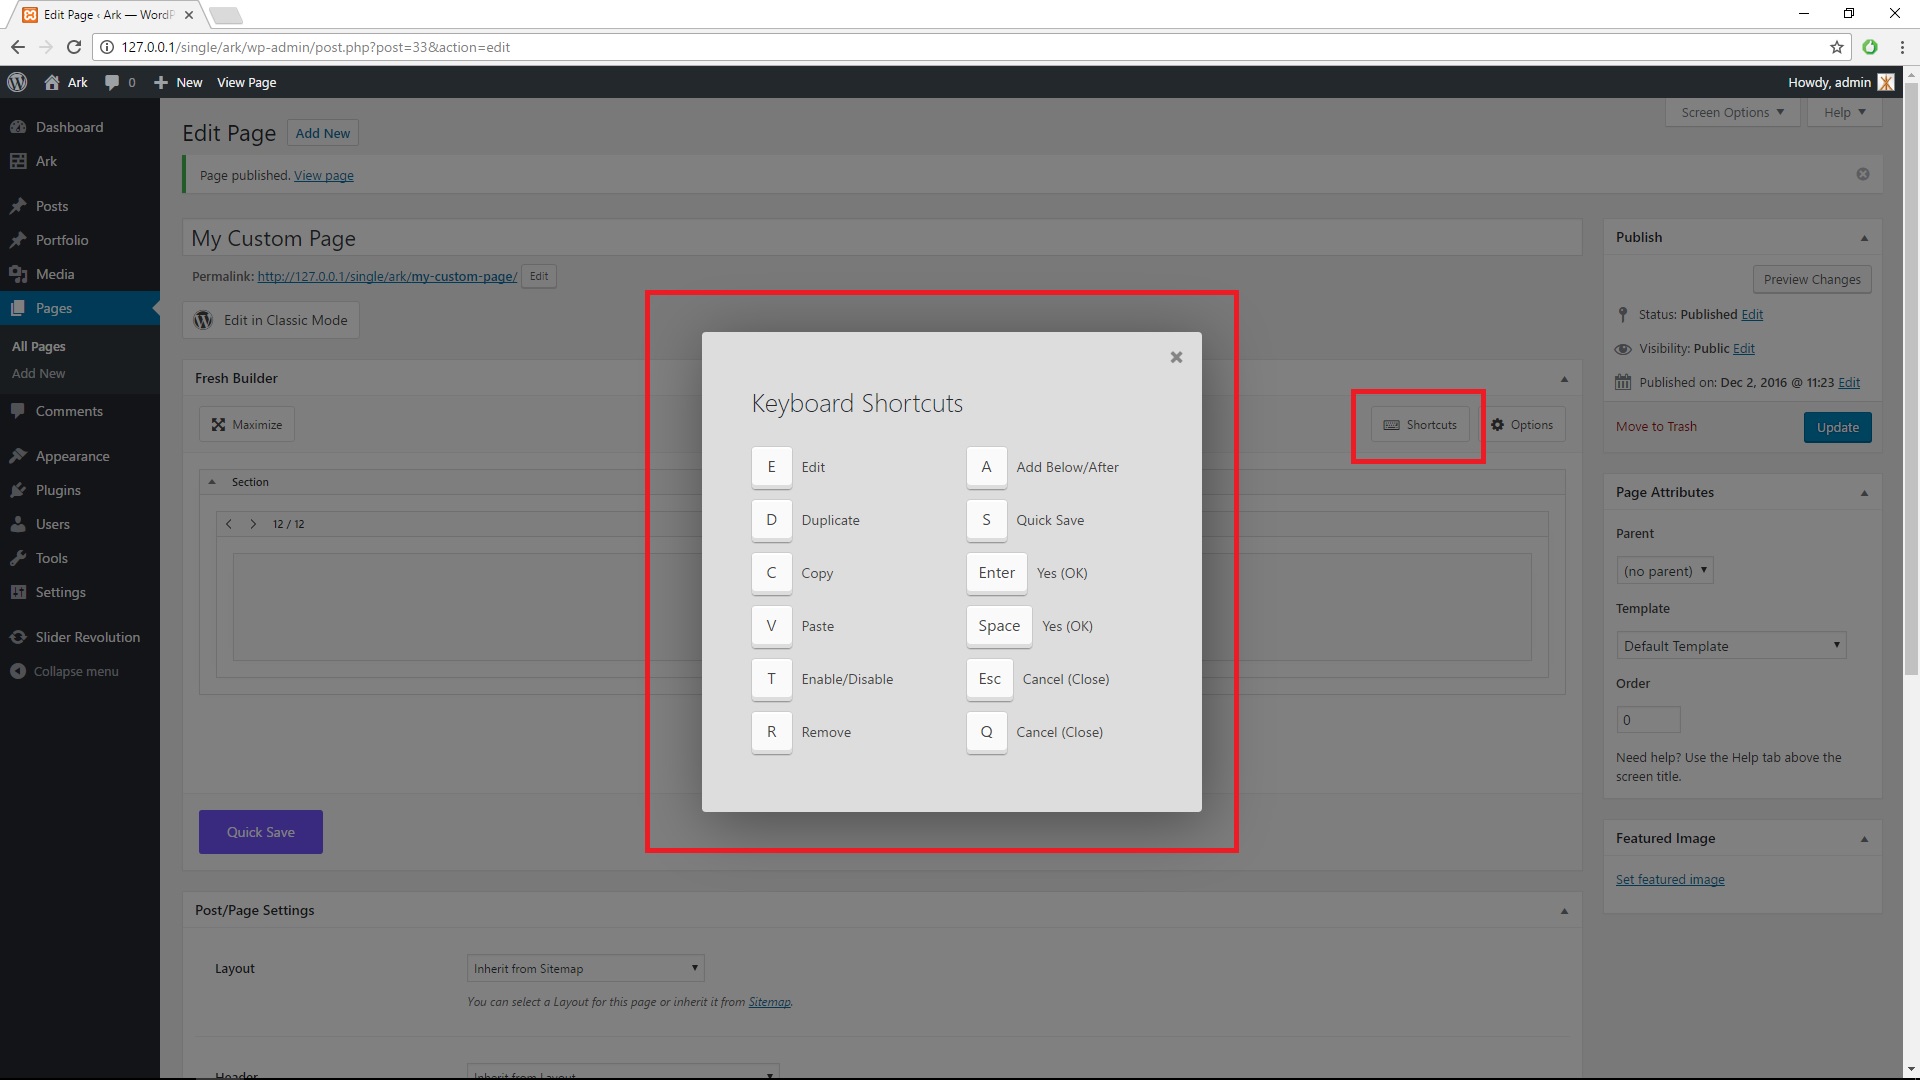
For your better comfort and faster usage, we implemented keyboard shortcuts
- Space or Return will confirm modal dialogs
- Esc or Q is canceling action
- D is for duplicate (when hovering on element)
- R is for remove (when hovering on element)
You can always click on the Shortcuts button to see all possible shortcuts
Context Menu (Right Click Menu)
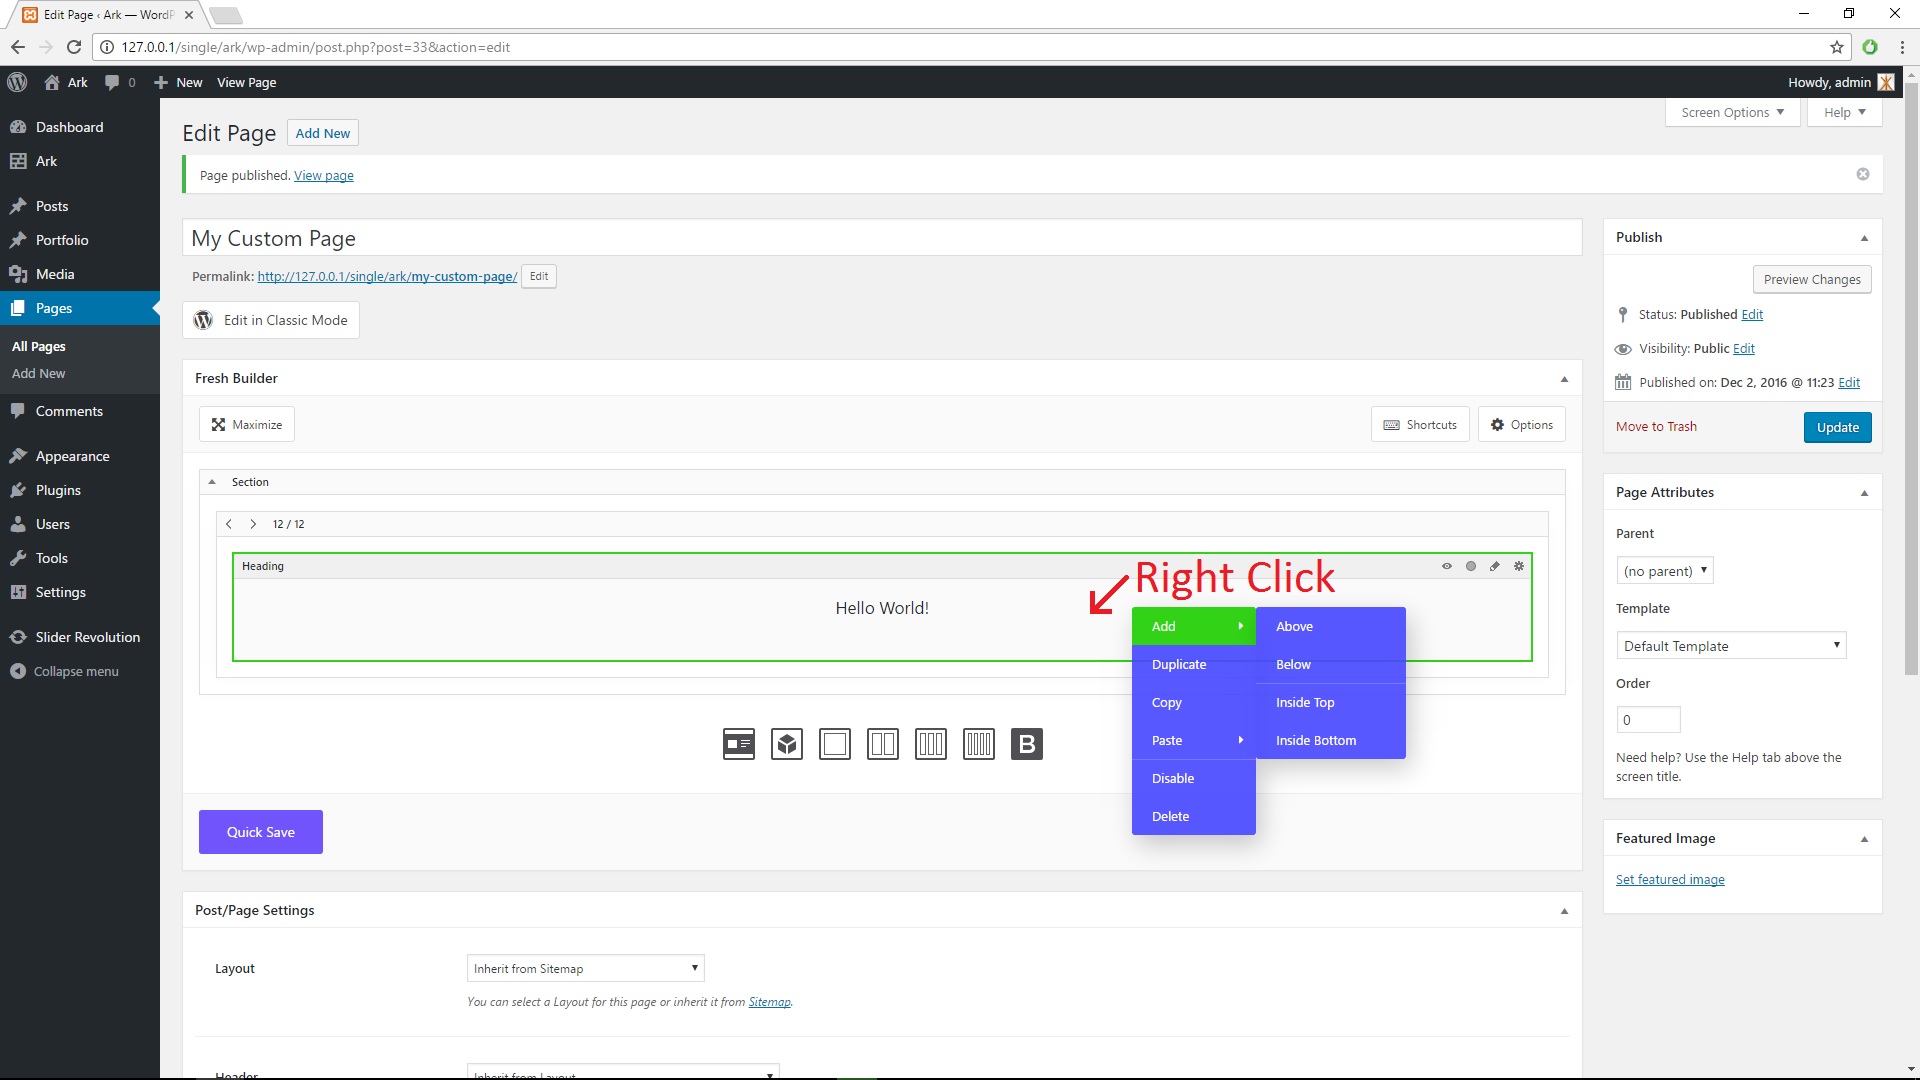
Just like you are used to from your favorite desktop-class applications, you can instantly bring up a list of available actions by right-clicking on any element.
Quick Save
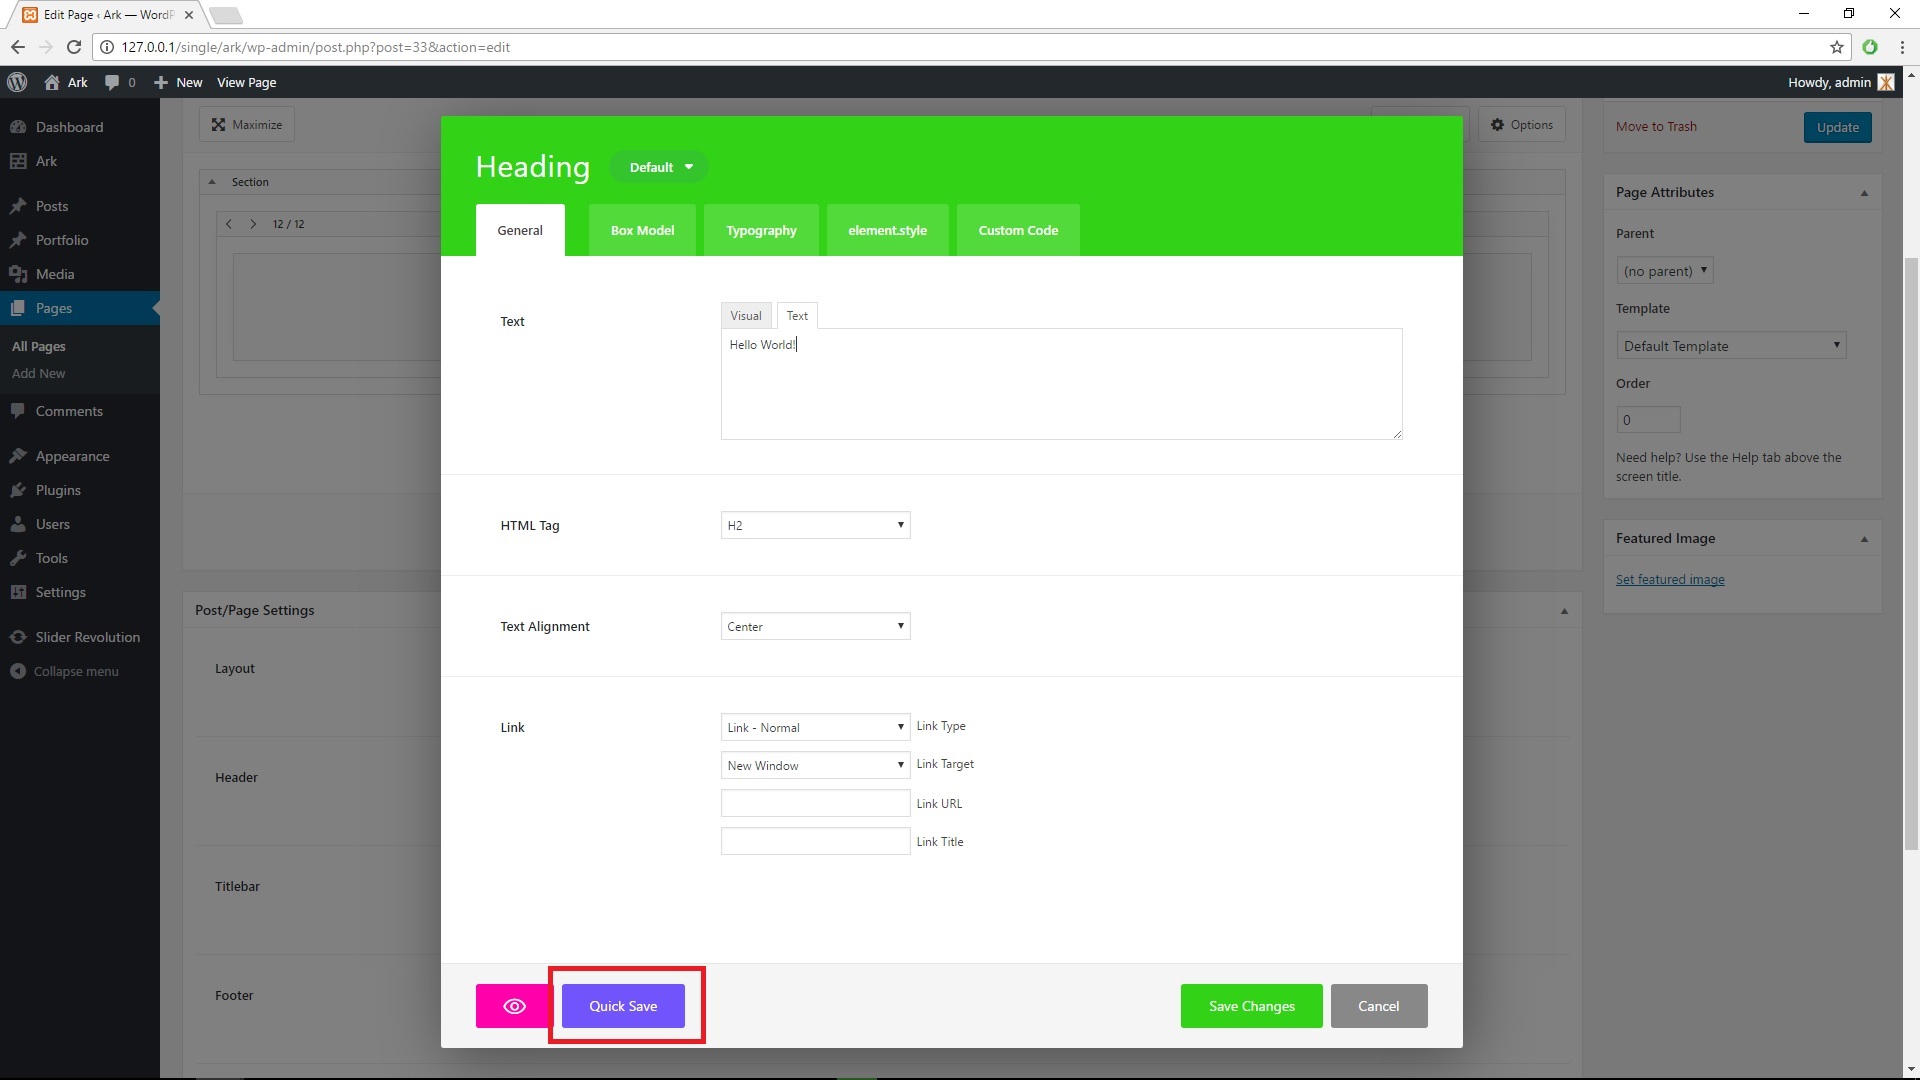
When you press Quick Save button, everything will be immediately saved in the background, without refreshing the editor page. If you have your website front-end opened in another tab/window, it will automatically refresh it.
If you use 2 monitors, we recommend you to have one WP Admin opened in one monitor and your site in the second monitor.
Repeatables
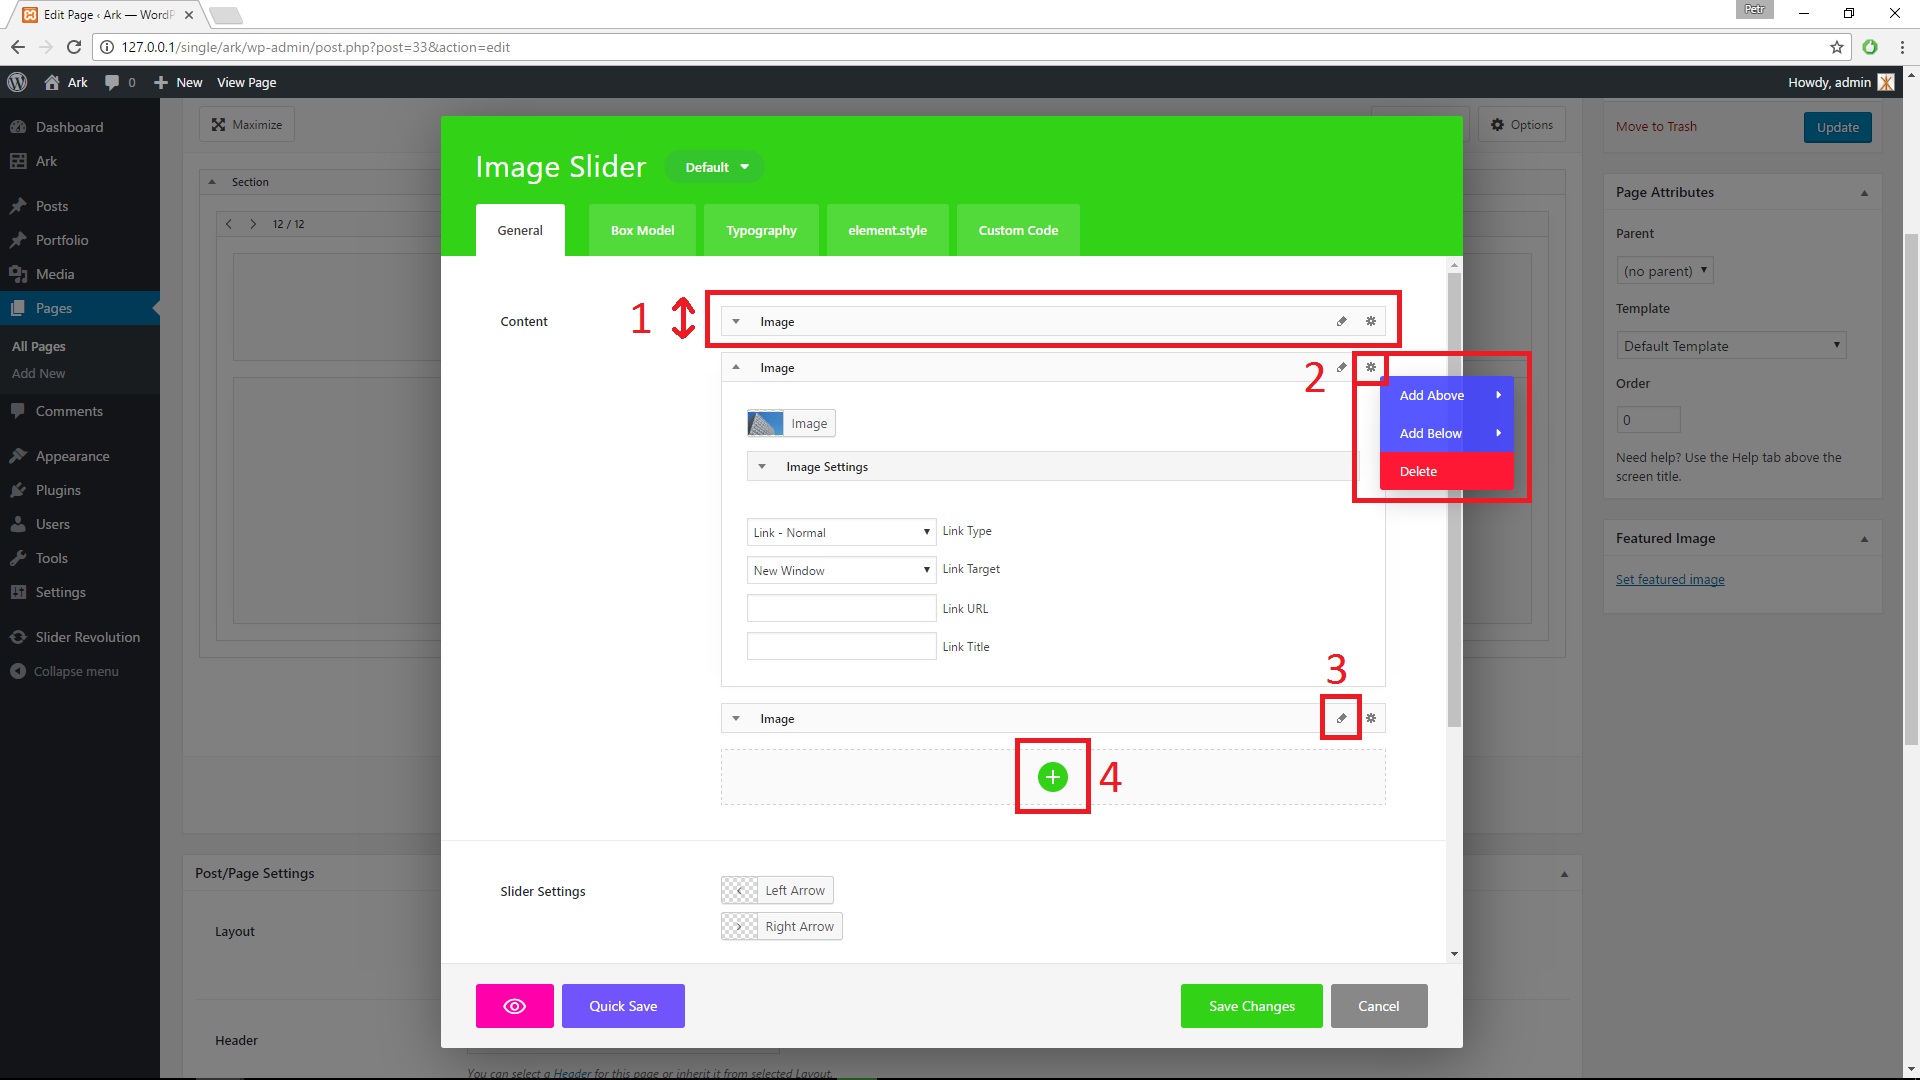
There are a lot of elements, that have something, we call Repeatables. For example images slider have images - that are in this case repeatable items. You can:
- Change order by dragging [1].
- remove [2]
- edit [3]
- add these repeatables [4].
Elements Tab Settings
Fresh builder allows you to fully customize any elements on your page. As you saw in previous chapter there are a lot of tabs ant these tabs contains a lot of settings for each element. Two tabs groups represent data and design settings.
Data Tabs
General
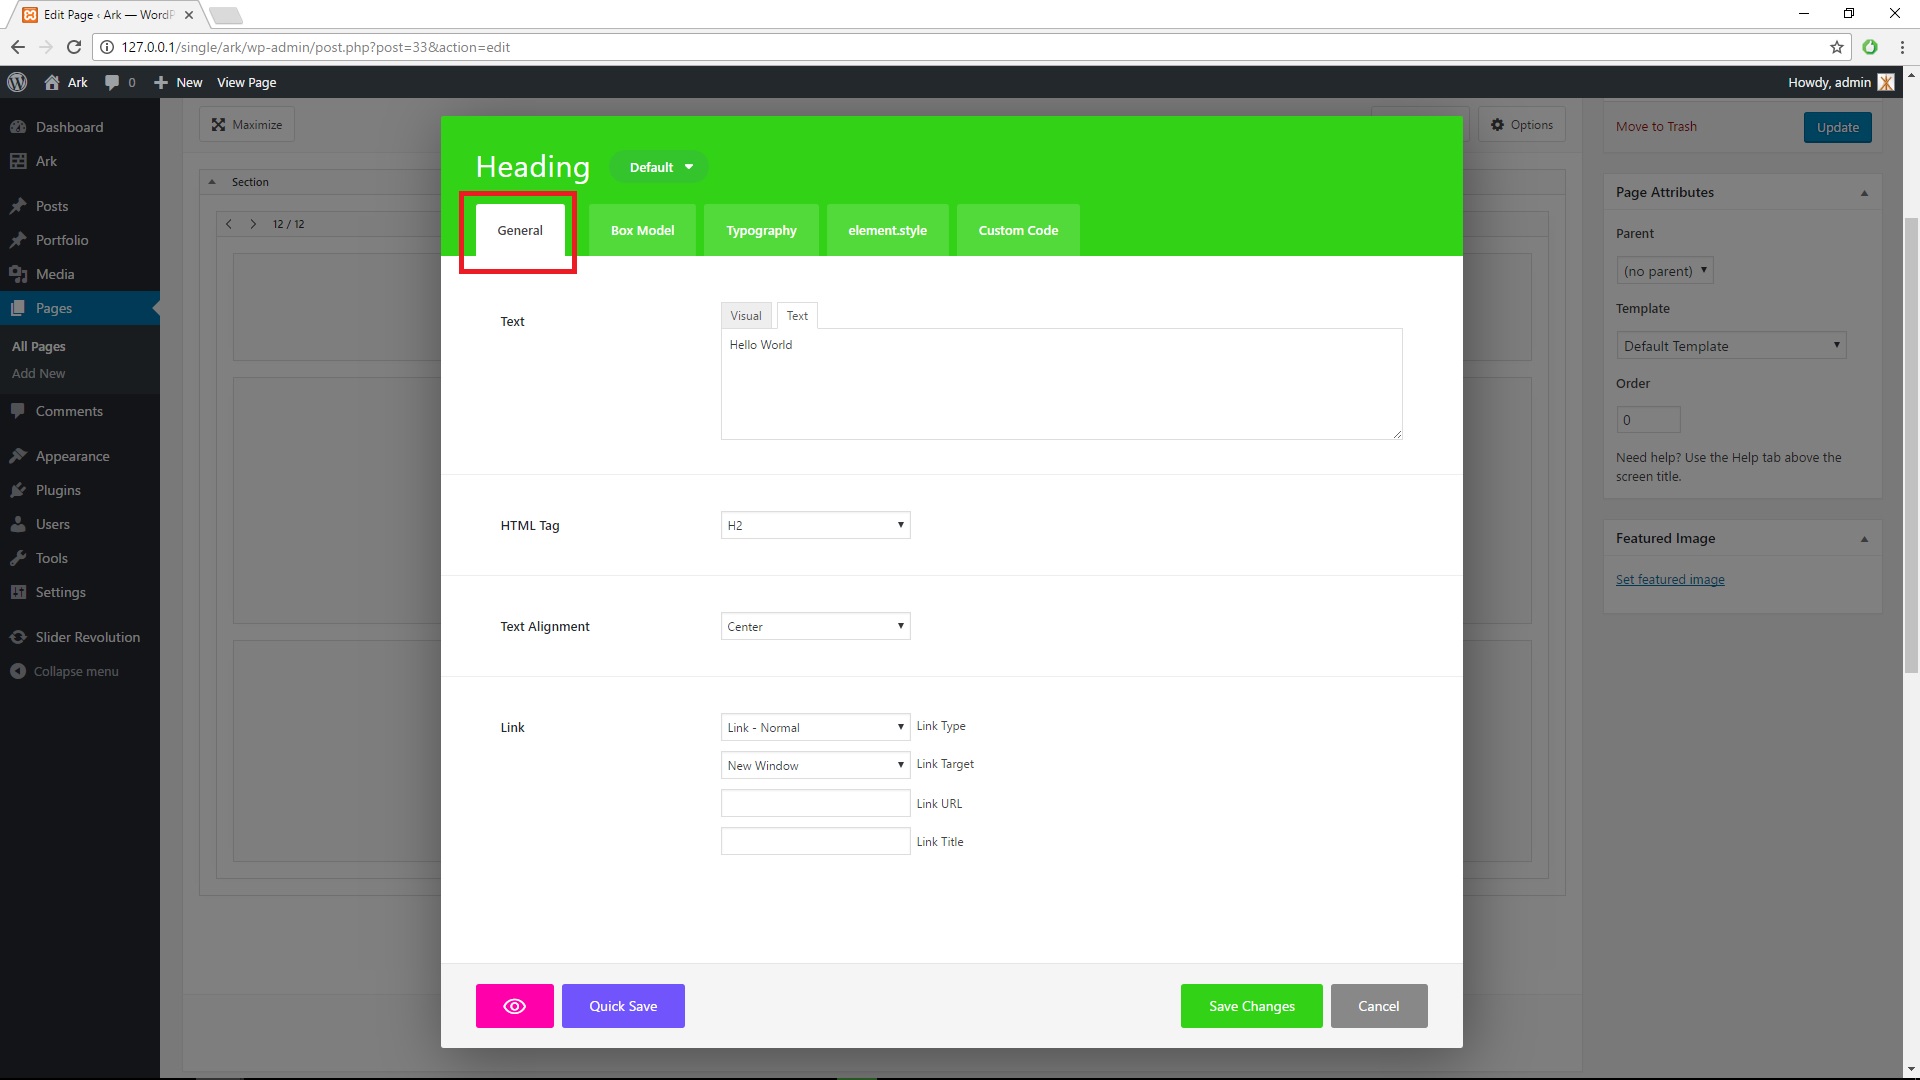
Options in the tab general are basic like text, images or icon. It may contain colors in specific cases like image slider, where you can set right and lift arrows colors.
Advanced
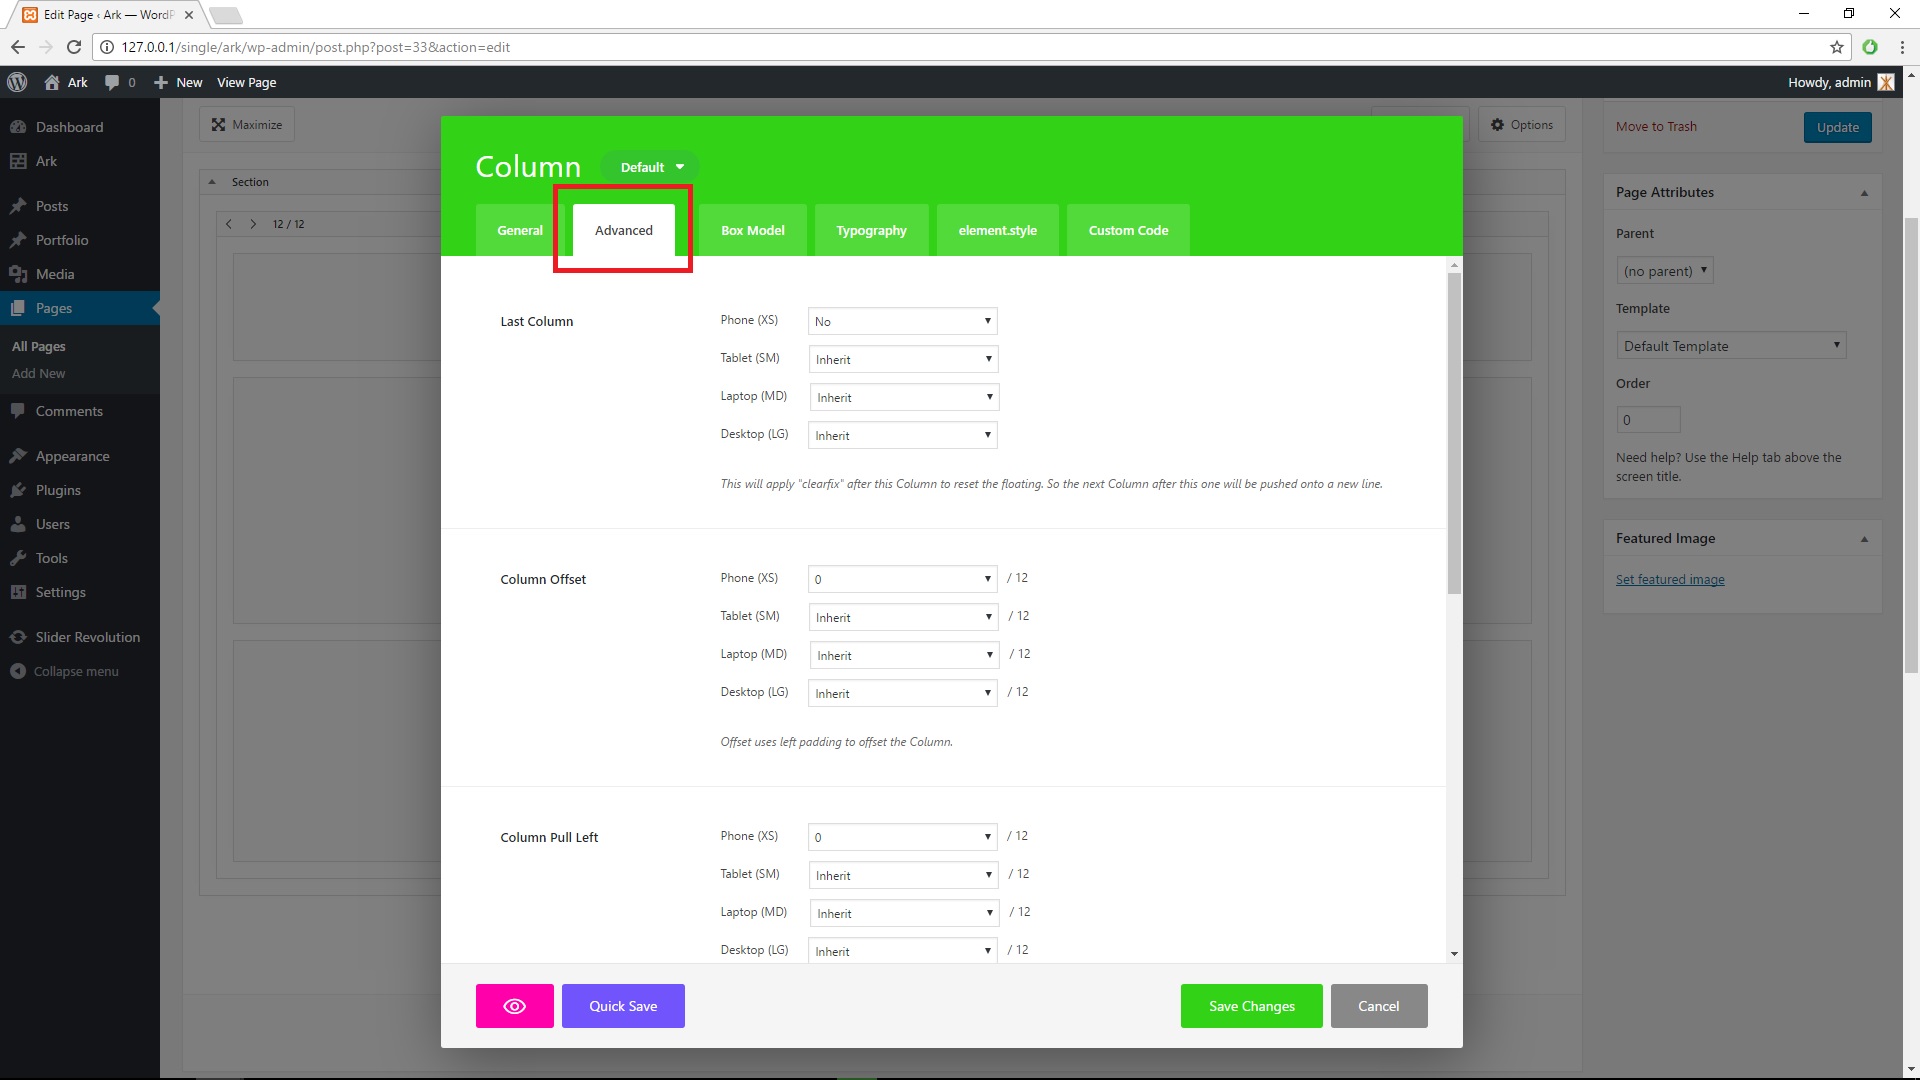
Advanced tab is almost same as General tab, but contains for advanced features. For example in columns advanced settings you will find bootstrap features like column push, pull and offset.
Loop and Pagination
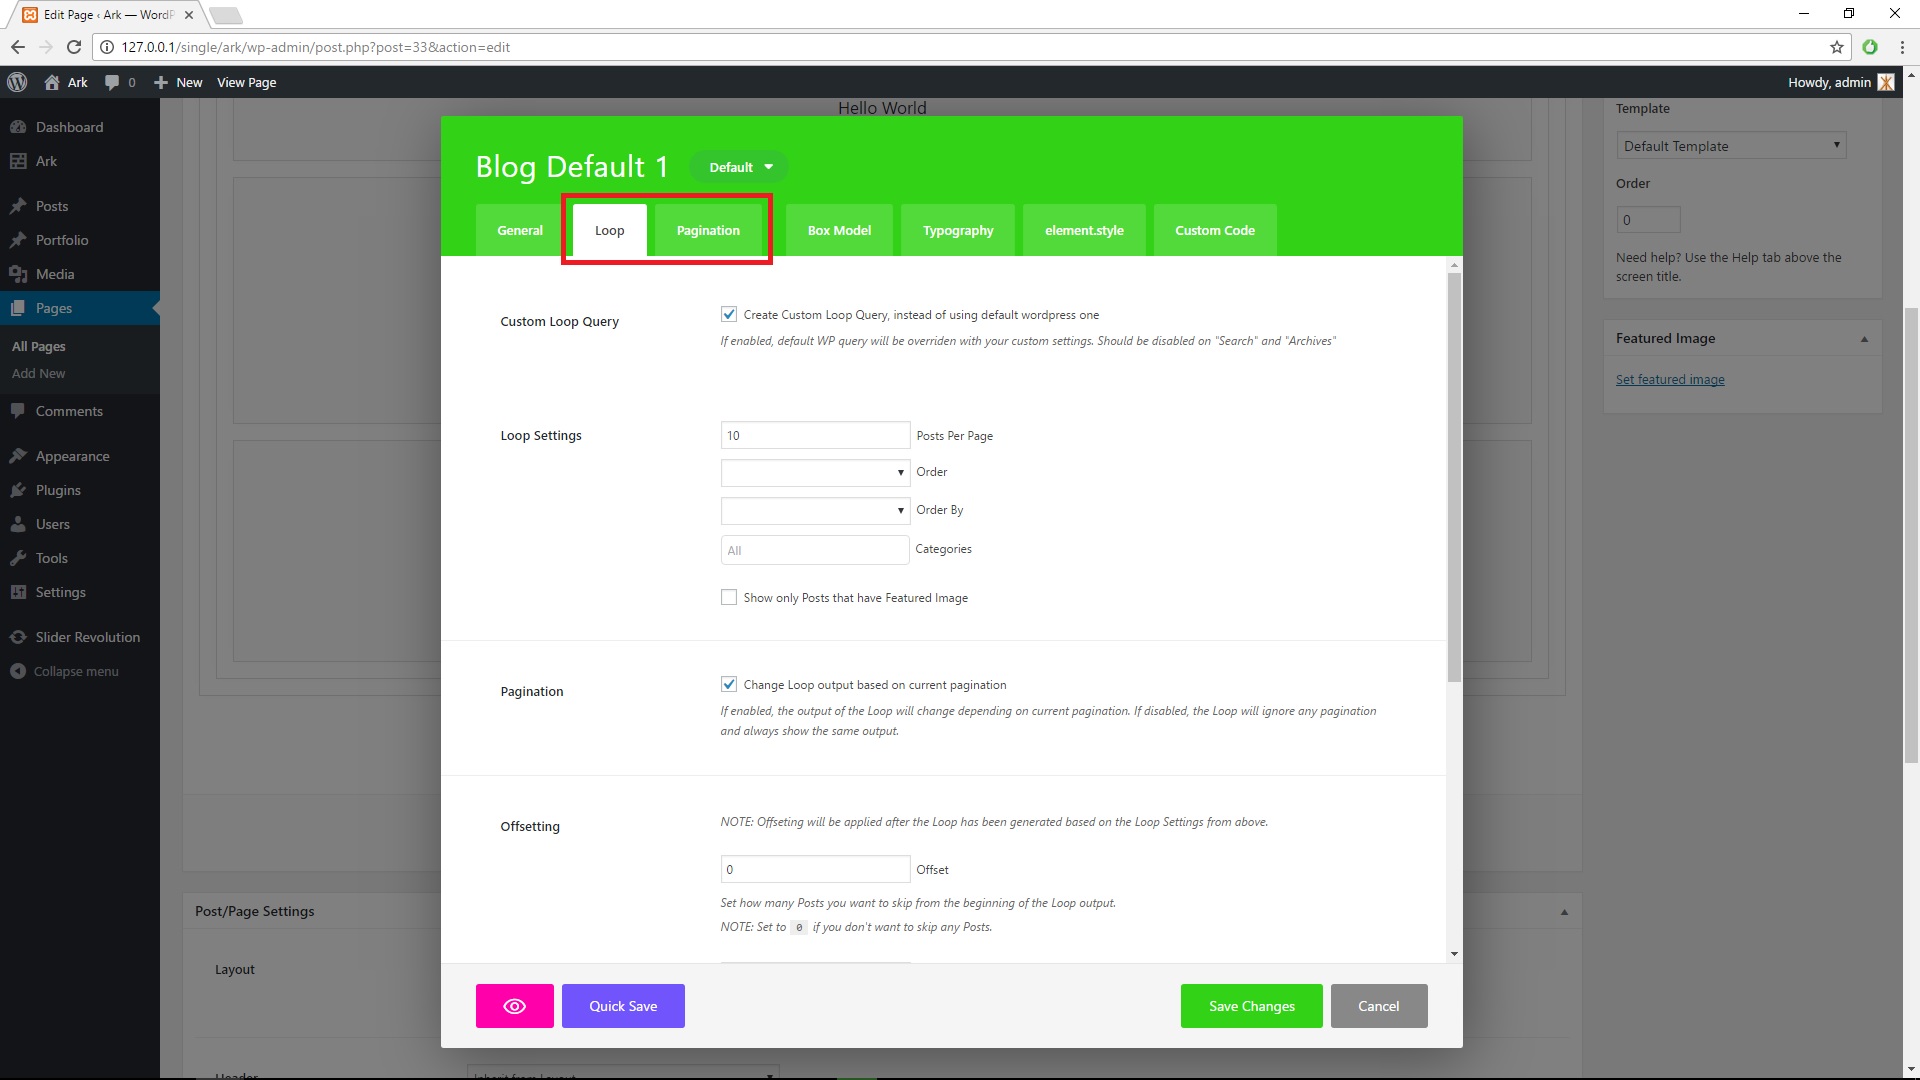
Loop and pagination tabs are for blog and portfolio. You can add with this feature sections like the latest portfolio into any page.
Design Tabs
Those tabs for element design, there is no content like texts.
Box Model
Box Model tab is for few element settings like Background Layers, Padding, Margin and other.
Background Layers
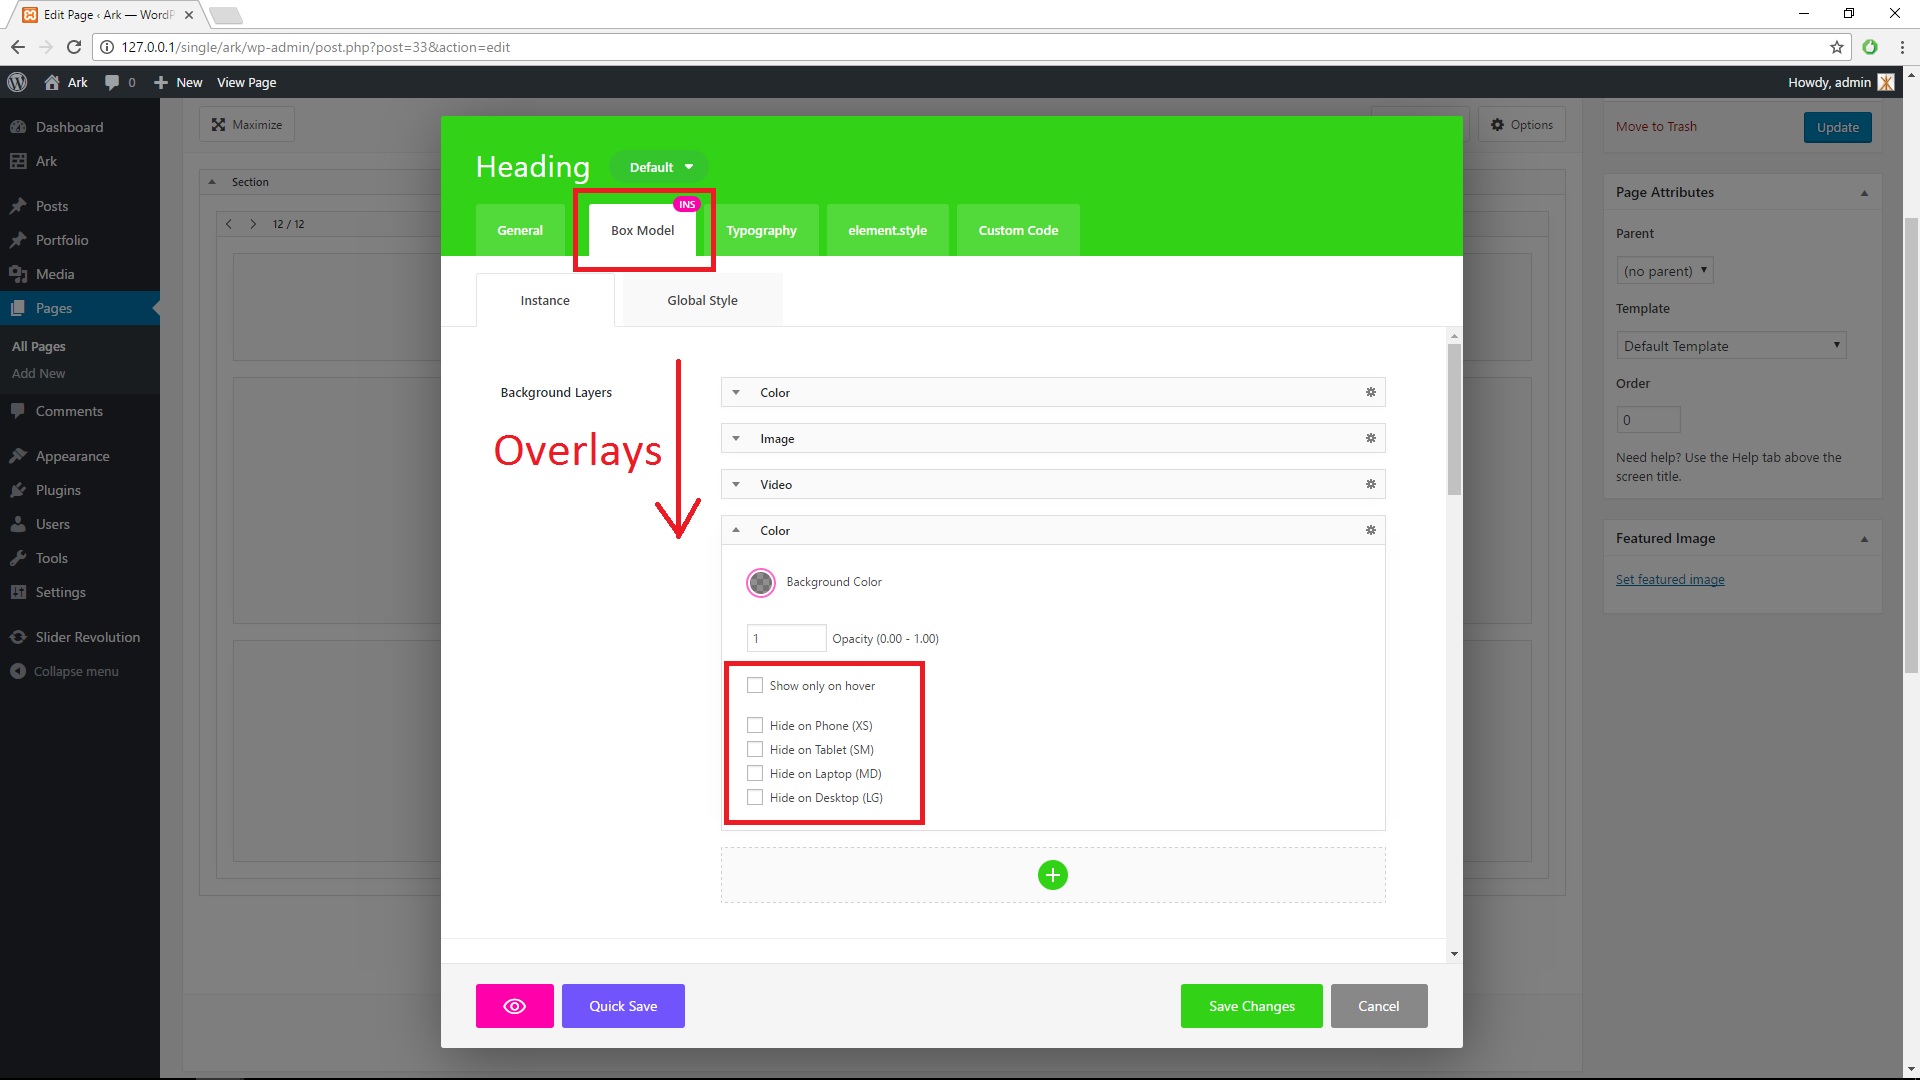
You can now add backgrounds almost anywhere. Lower layers overlays upper layers. Each layer allows you to show only it on hover or hide on different devices like mobile - for example - if you do not wish to show YouTube video background on mobile devices for better page performance.
Padding and Margin
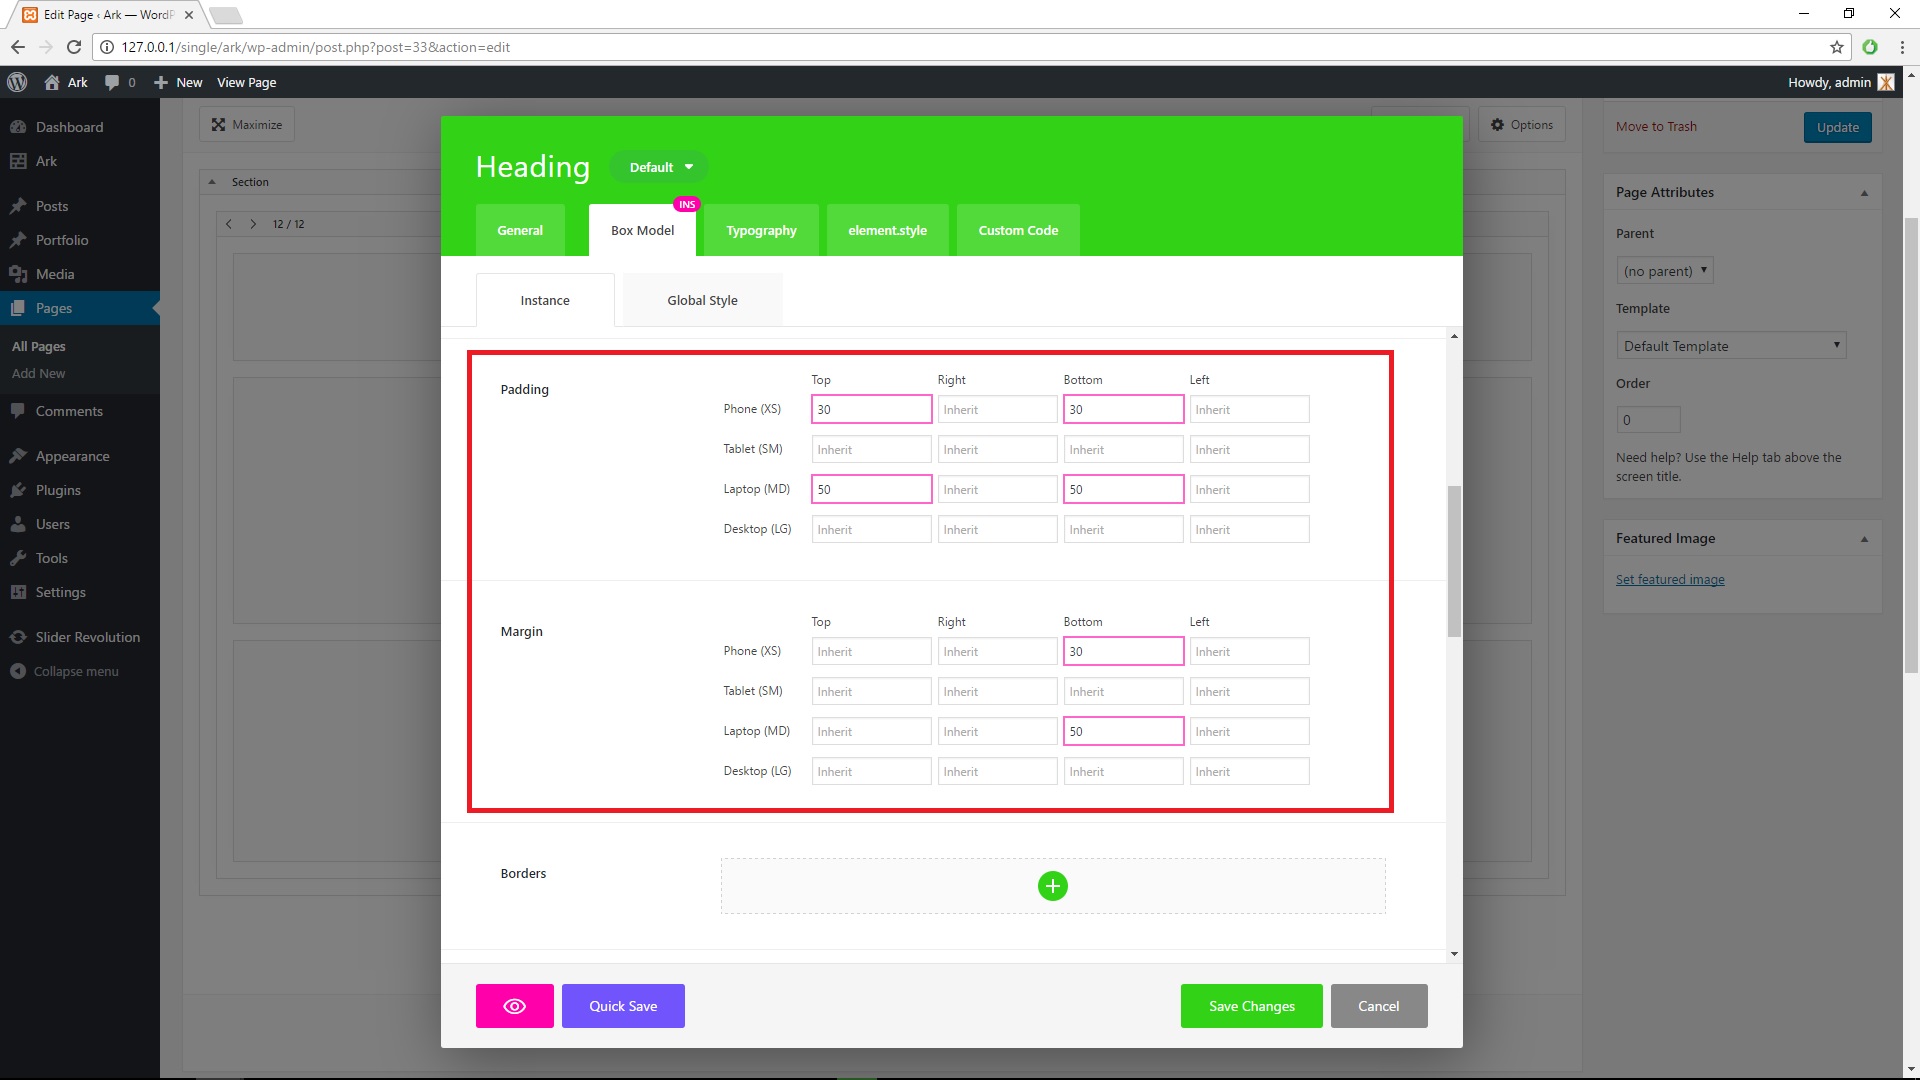
Padding and margin is there for setting space around edited elements. If you are not advanced user, just remember, that background are applied on padding - space, but not on margin - space. Borders are shadows are around padding - space.
Typography

Typography is about font settings for element and its children.
The most important option is Text Color Palette, which allows you to set dark, light or Inherited text color. This feature is useful, because it option is applied to all child element (in the case of section, row or column for example).
Text Color allow you to set different colors for text, links in it and hover or not-hover settings.
You can also Text Align, Font Size, Line Height and others options, where you can apply different setting for different devices.
element.style

element.style is about font settings for element, not its children - that is main difference between it and Typography tab.
You can set there ID and additonal CLASS html attribute. If you wish to add more clases, just put space between them, for example "class-1 class-2 class-3".
Typography section in element.style is connected only with element, not its childrens.
Custom code
You can add your custom CSS and JavaScript code here. Every element has it's own unique CSS class that will help you target it. Custom CSS and JavaScript code will be printed at the end of the page.
Custom CSS
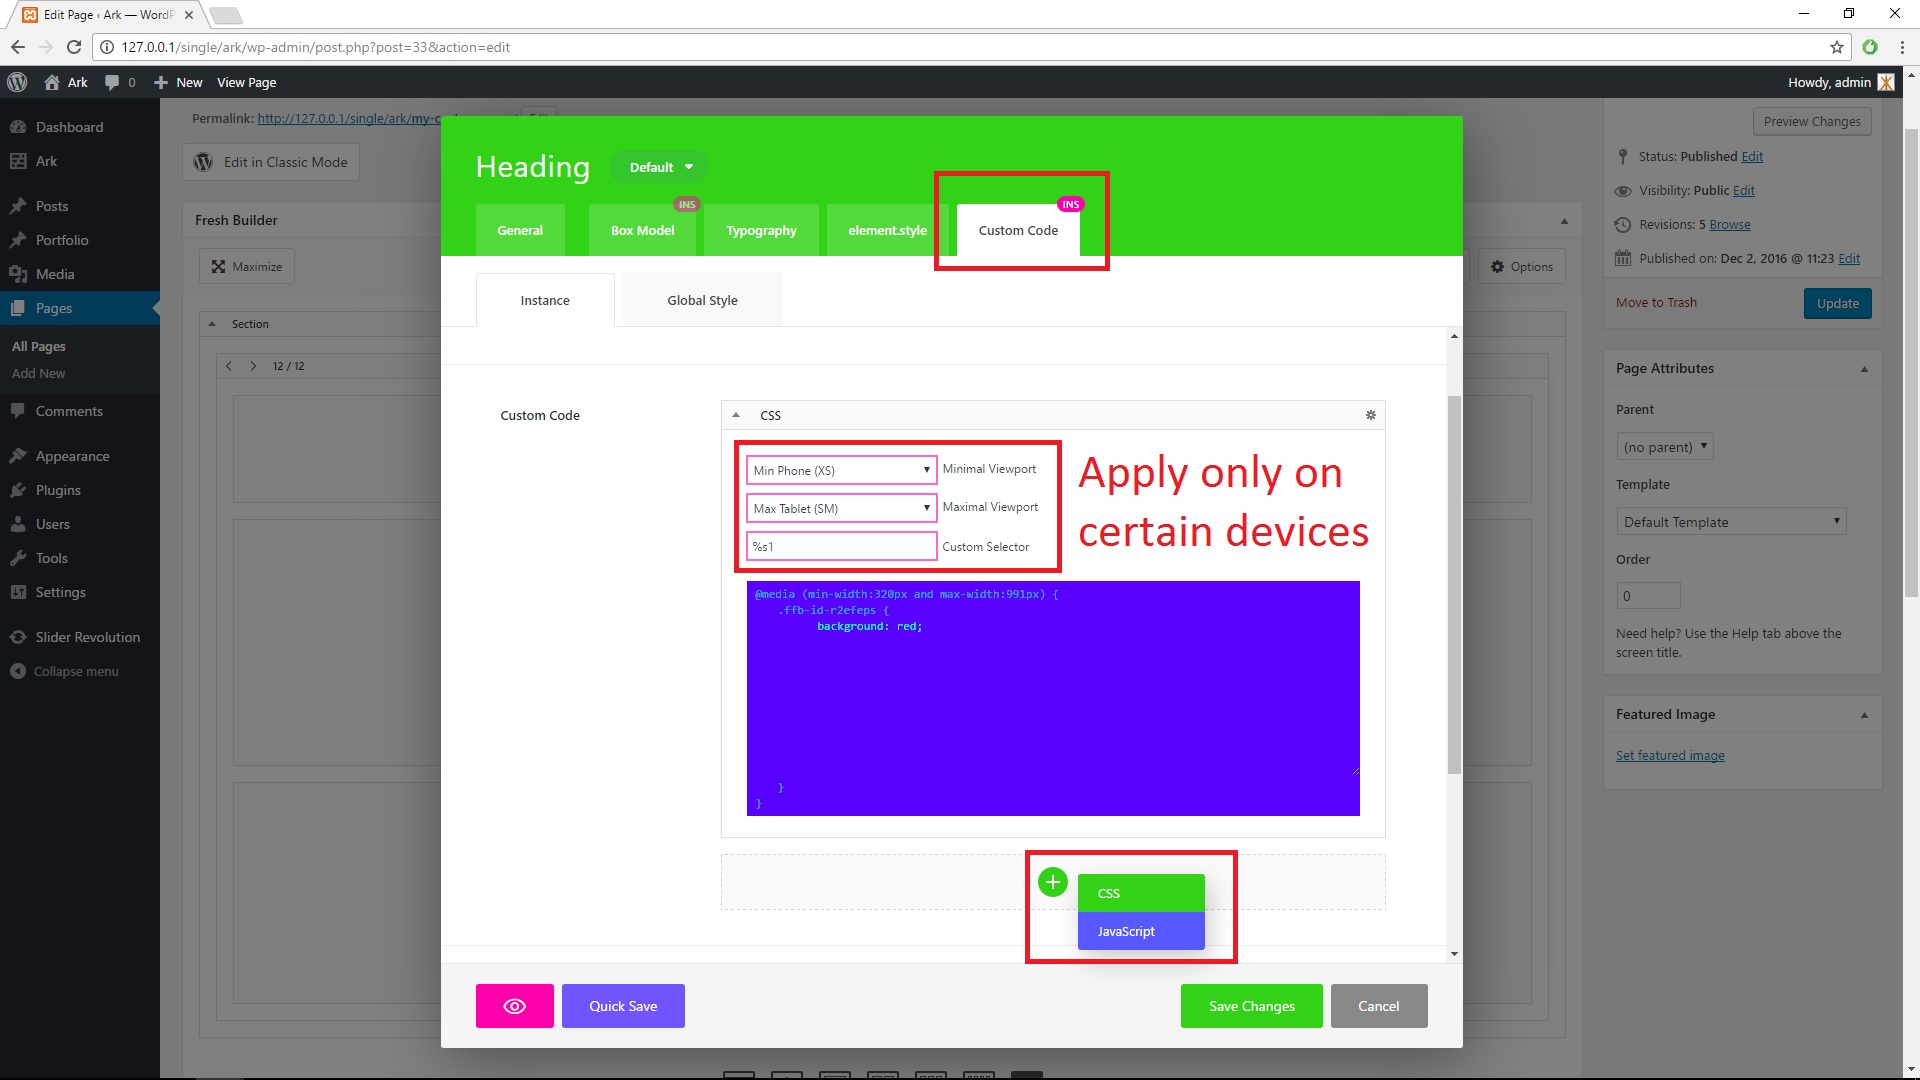
You can add custom CSS for edited element by clicking big green plus (+) button. Custom CSS may be applied only for choosen devices (mobiles, tablets, laptops, desktop cumputes).
Custom JavaScript
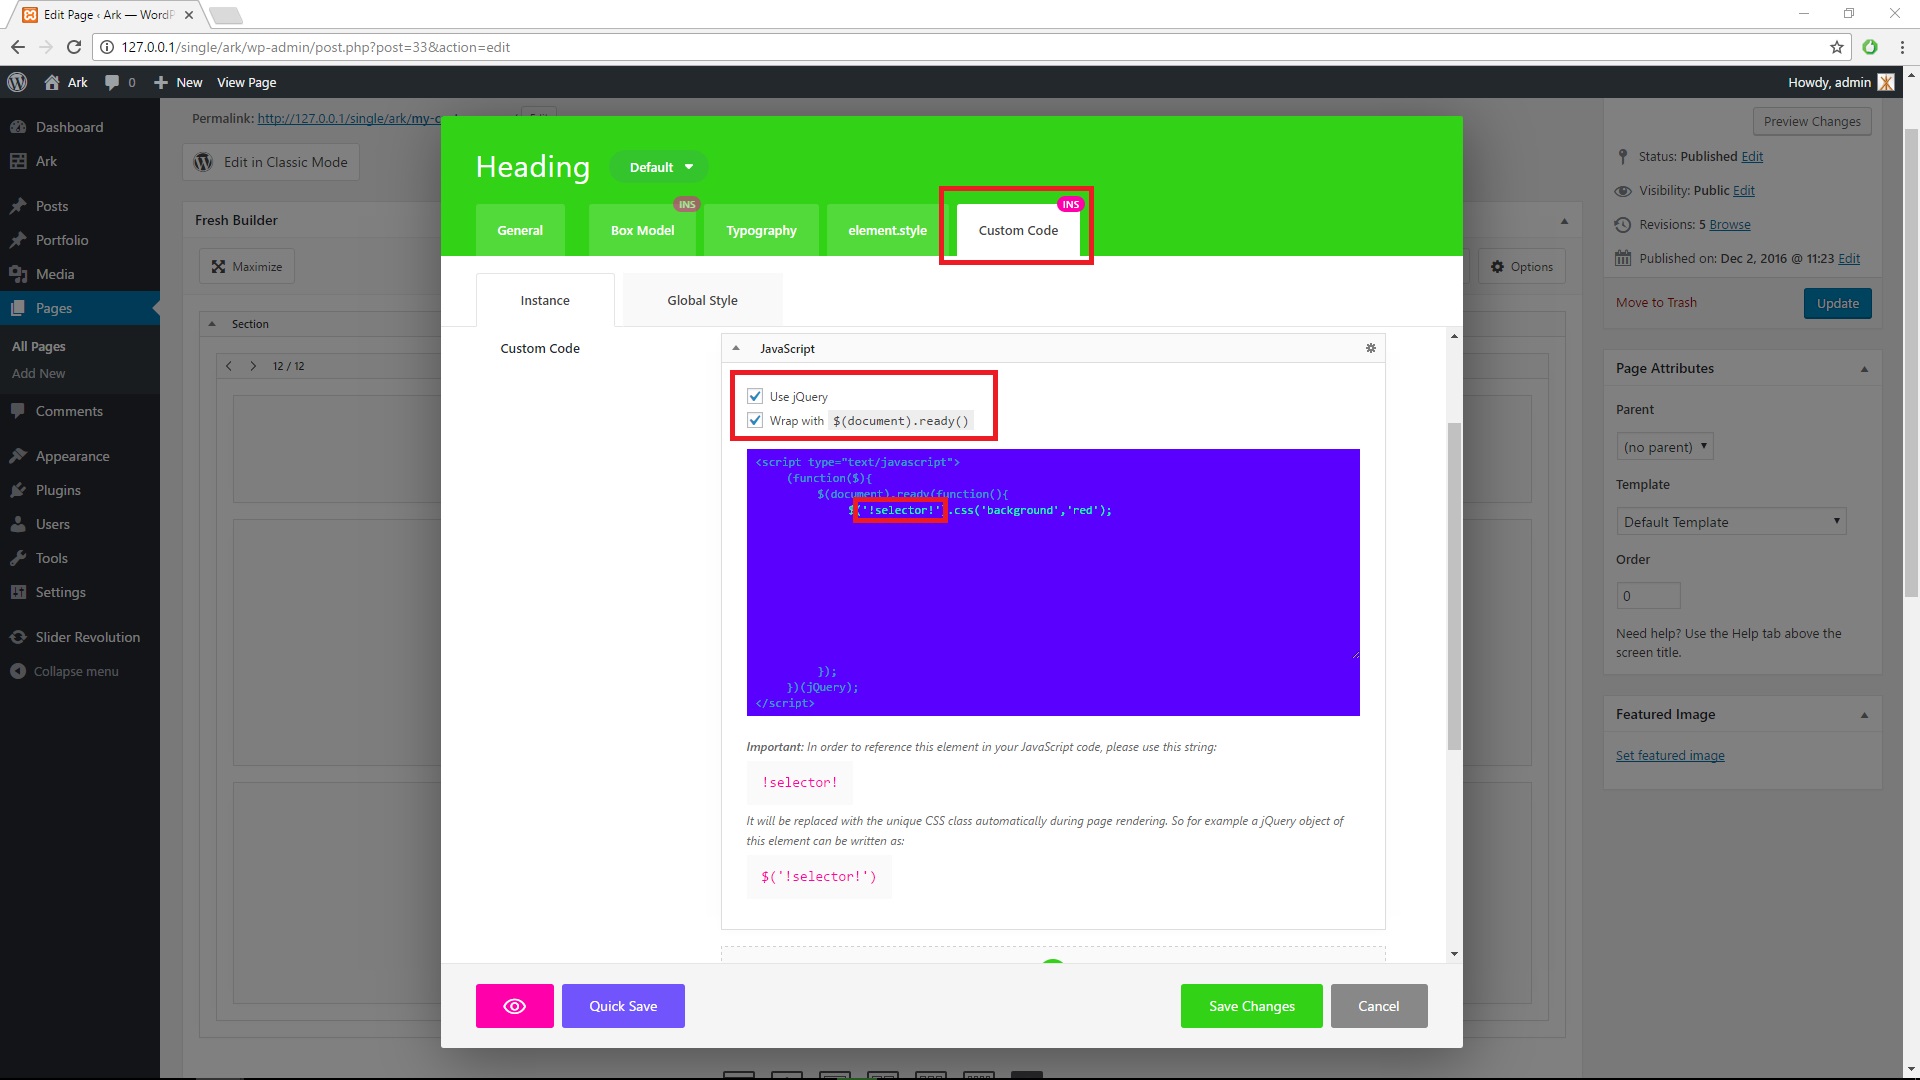
You can add custom JS (Javascript) by clicking big green plus (+) button.You can choose, that JS will be wrapped by jQuery and $(document).ready() function.
In order to reference this element in your JavaScript code, please use this string !selector! - It will be replaced with the unique CSS class automatically during page rendering. So for example a jQuery object of this element can be written as $('!selector!')
Theme Options and Sitemap Settings
All Settings for Ark theme are in WP Admin Menu > Ark. There is whole magic, that allows you to set up your site as you like.
Theme Options
Layouts
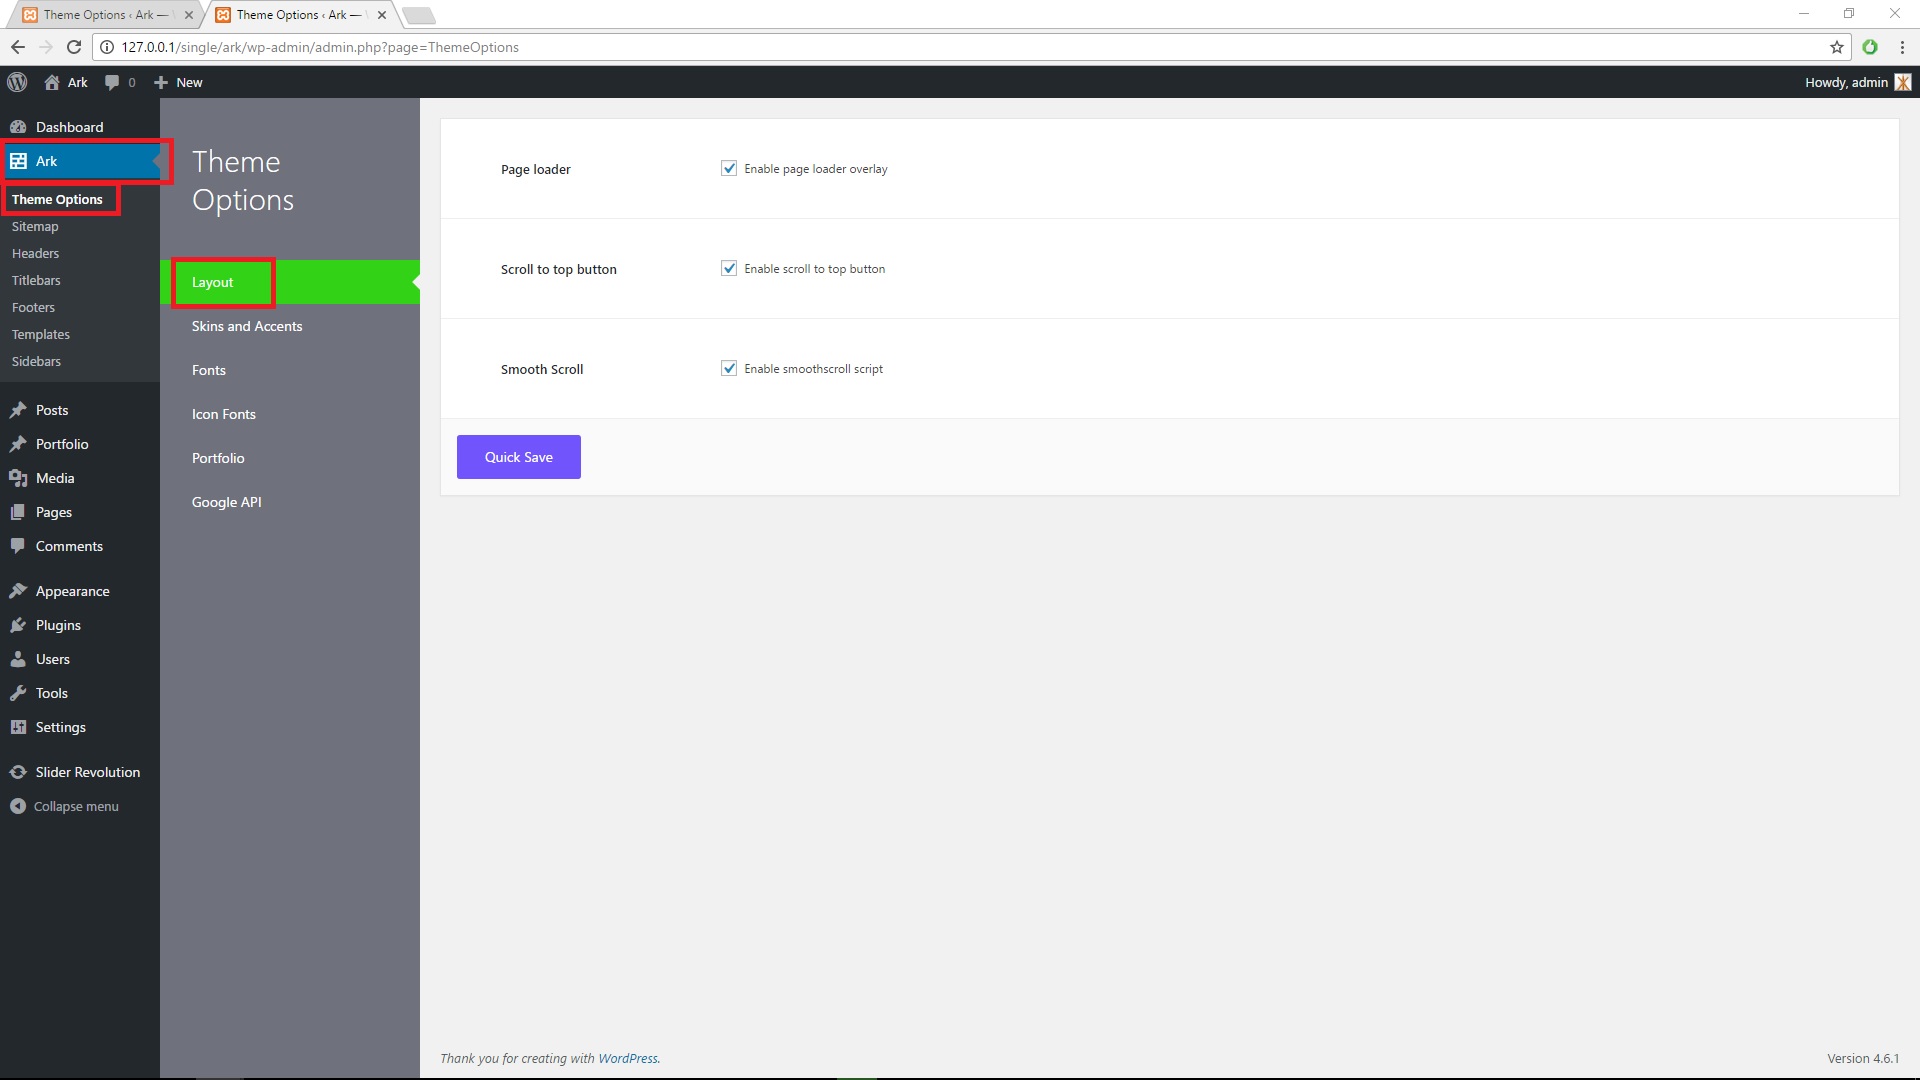
You can enable or disable Page loader, Scroll to top button and Smooth Scroll.
Skins and Accents
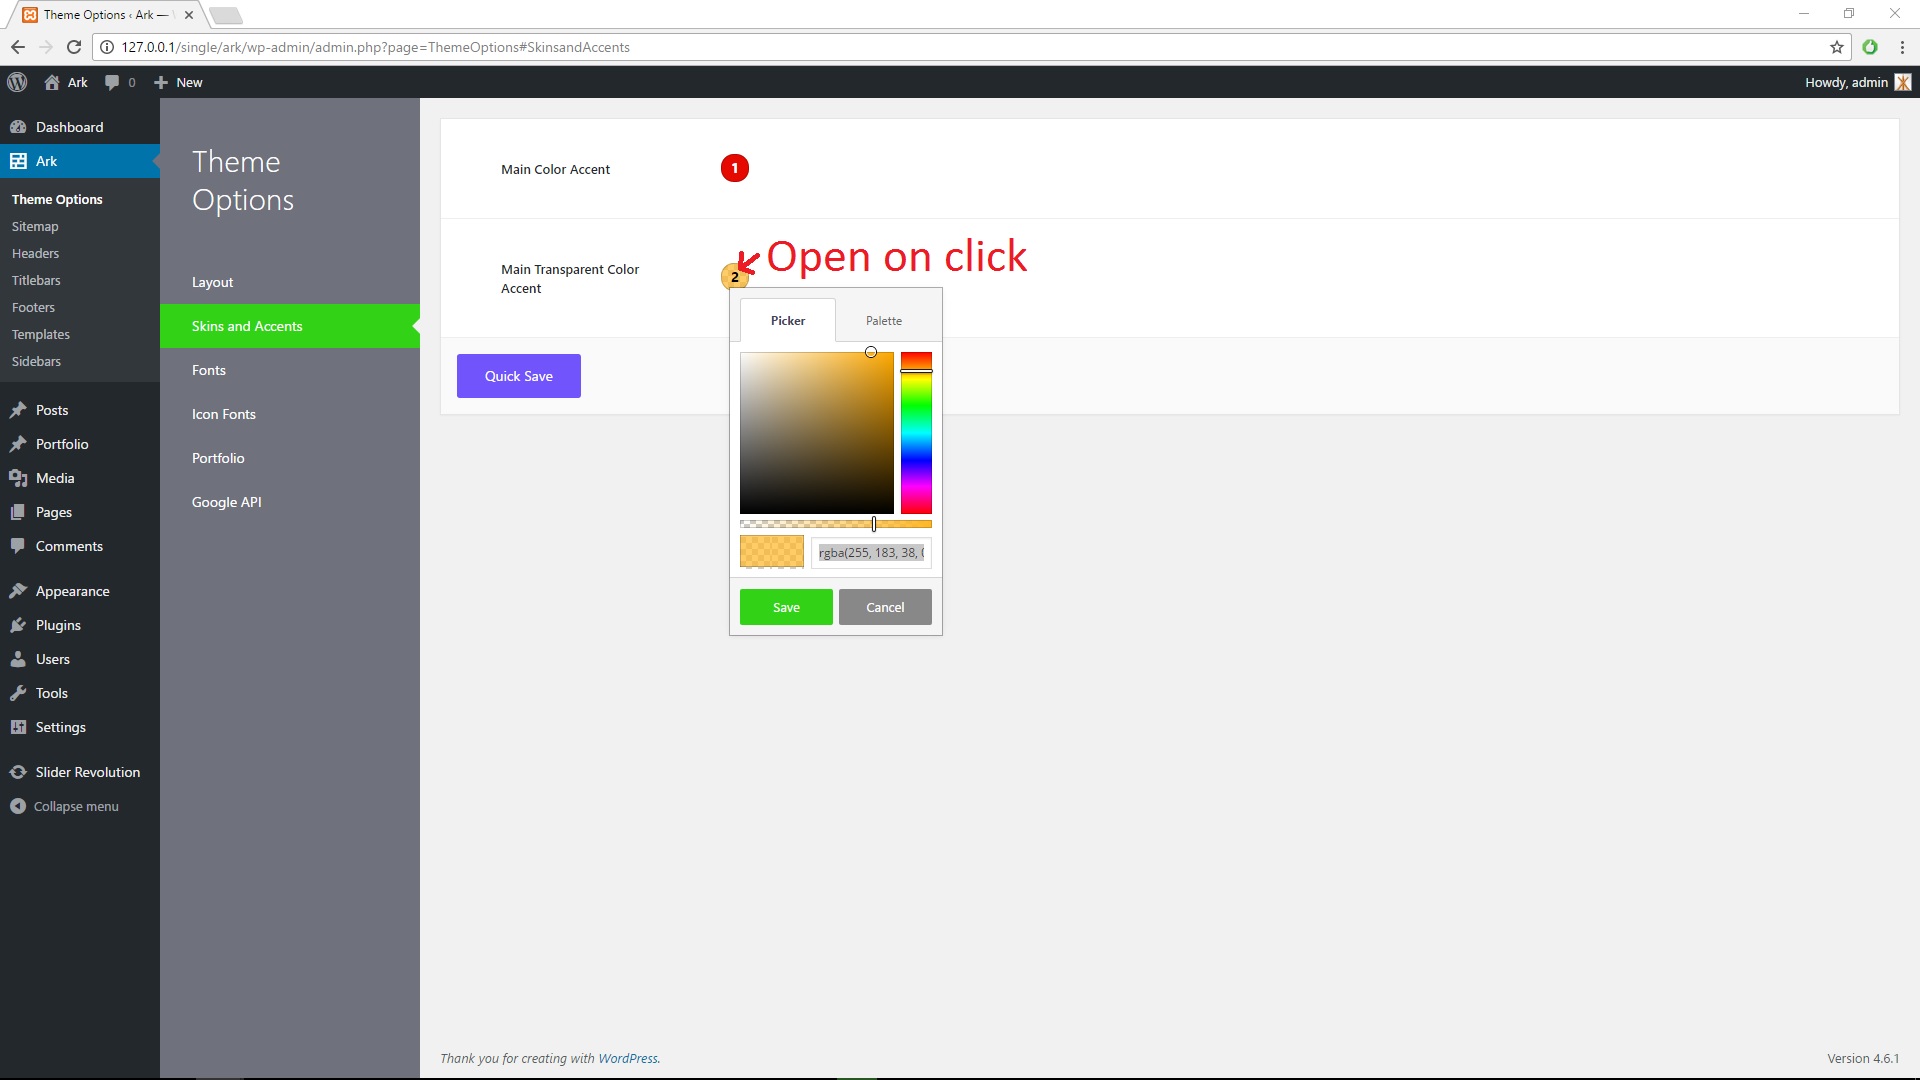
Skins and Accent Tabs allows you change the colors of the elements, that are not in the page builder - for example scroll to top button.
Fonts
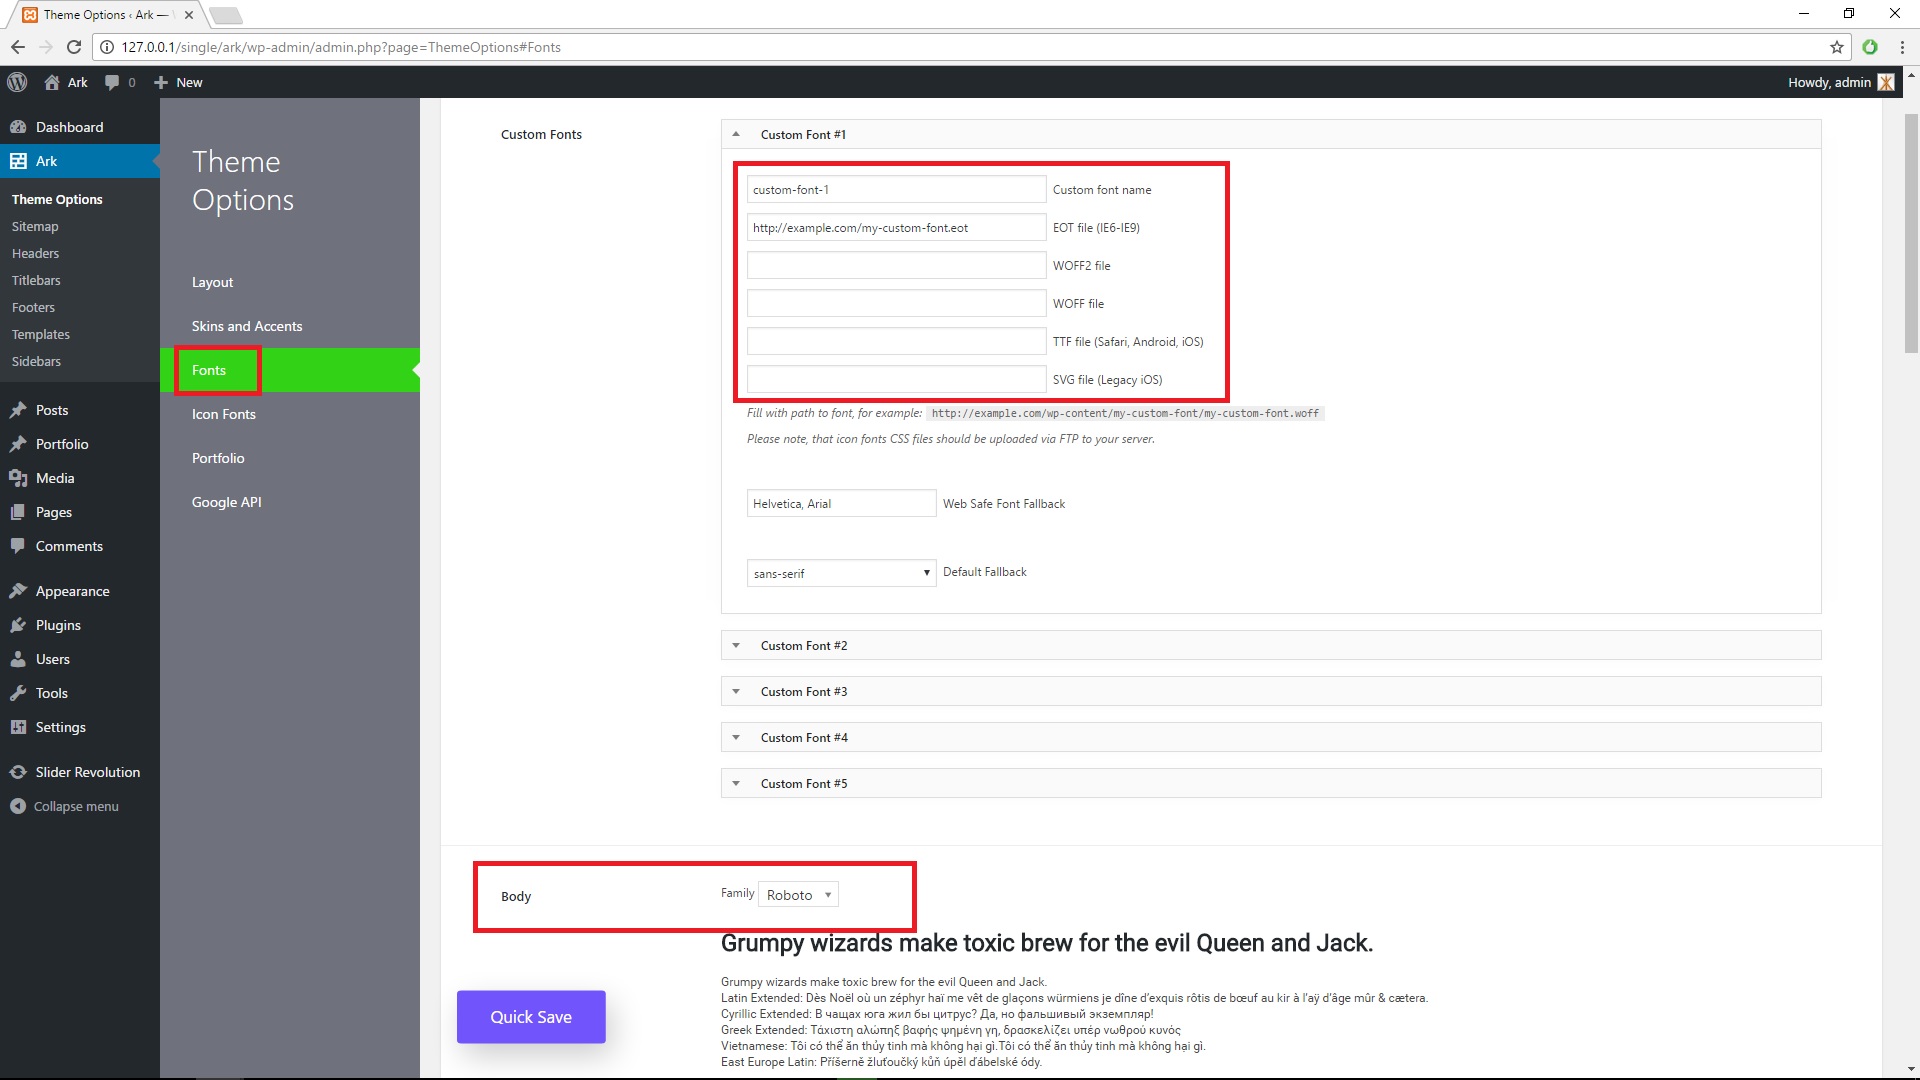
This Tab allows you to set up your site fonts, it enables you to use Google Fonts or your uploaded fonts.
You can use even your own custom fonts, but in that case you should upload EOT, WOFF, WOFF2 and other fonts via FTP. Please note, that you must have filled at least one path to font.
There are Body, Body Alt and others section under under the Custom Fonts section. These are here to set up font for page. You can change the fonts in the elements in typograpty and element.style section.
Icon Fonts
This Tab allows you to enable or add icon fonts to your site.
You can use even your own custom icon fonts, but in that case you should upload CSS fand font files via FTP and fill the path to this CSS file.
There is also a lot of predefined fonts for you, which you can enable.
Be sure, that your icon font style does not contain selectors like [class*=icon-] - if it contains, please replace in the the string "icon" with the string "my-custom-icon" or something similar.
Please note, that you will probably need to modify the icon font CSS file. This file should look similar to for example this file.
Portfolio
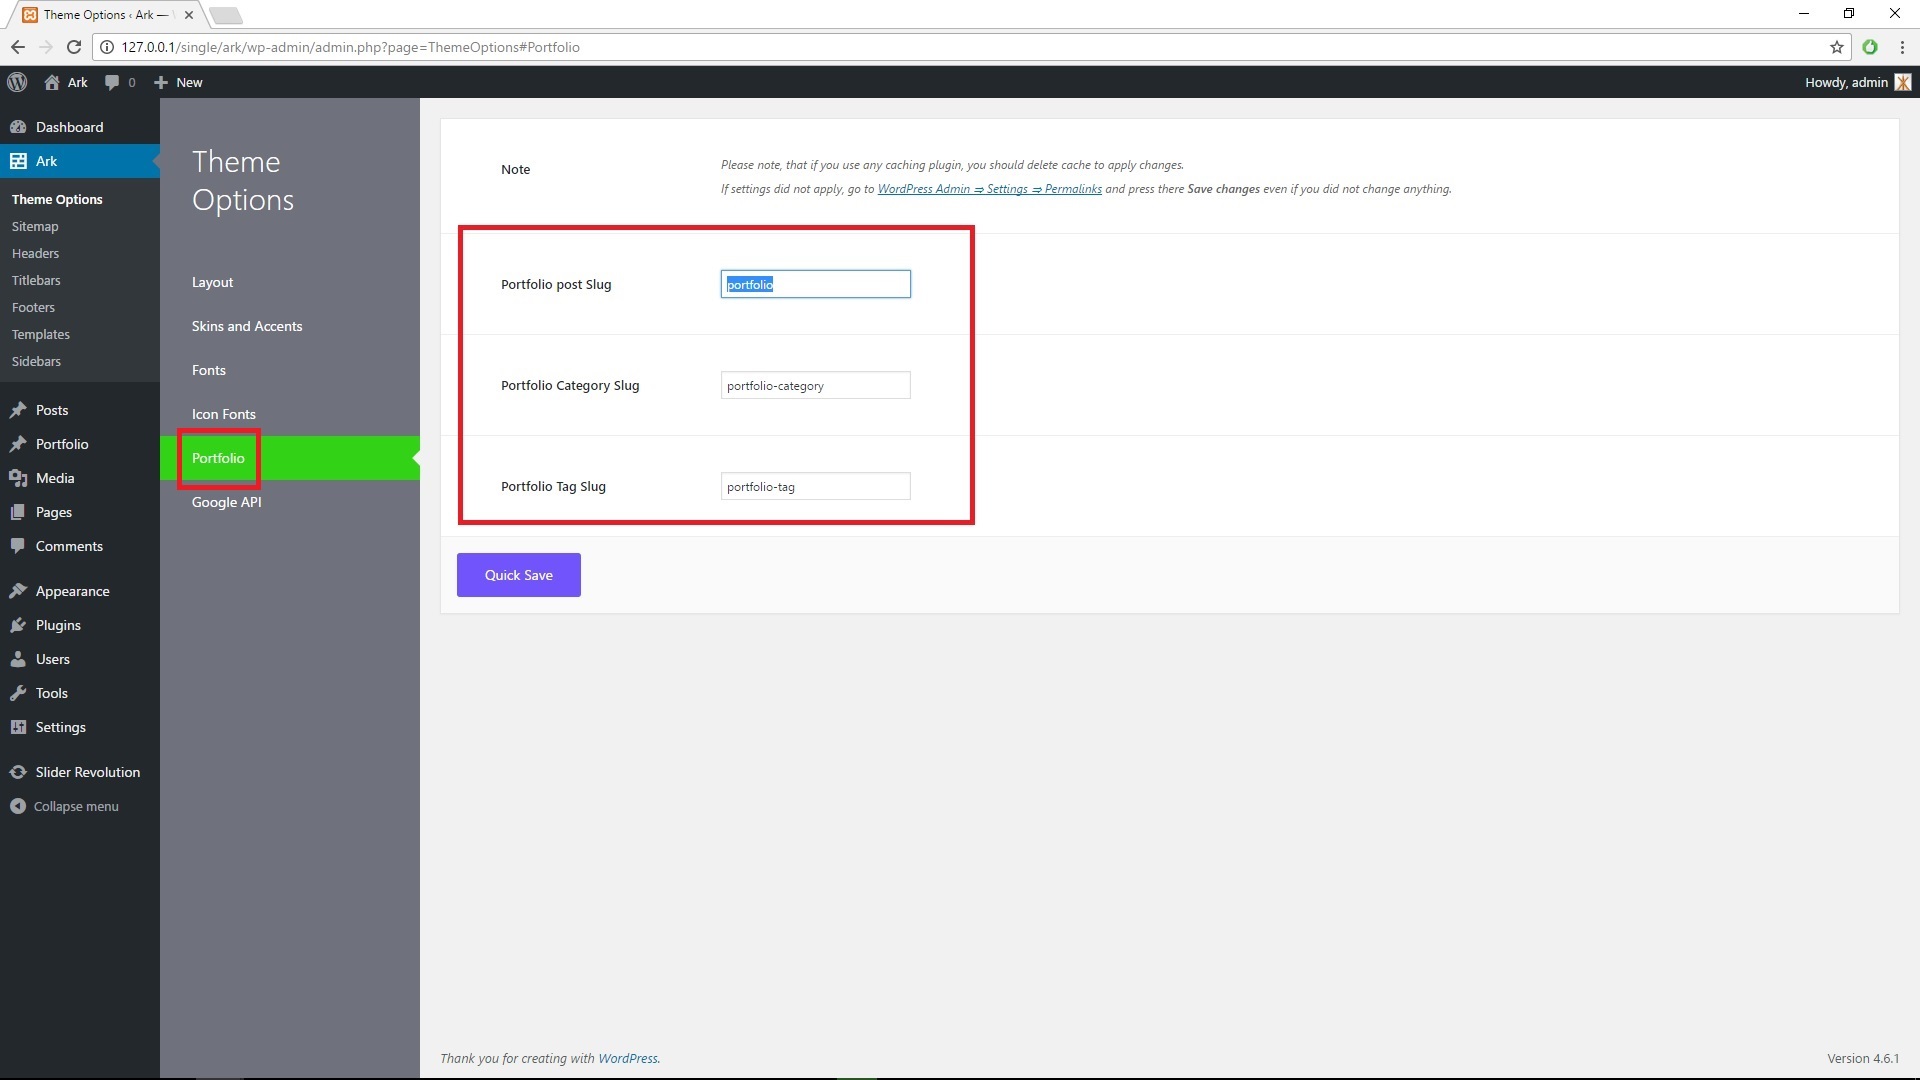
Portfolio Tab allows you to change slugs (part of URLs) for portfolio post type, portfolio categories and tags.
Google API
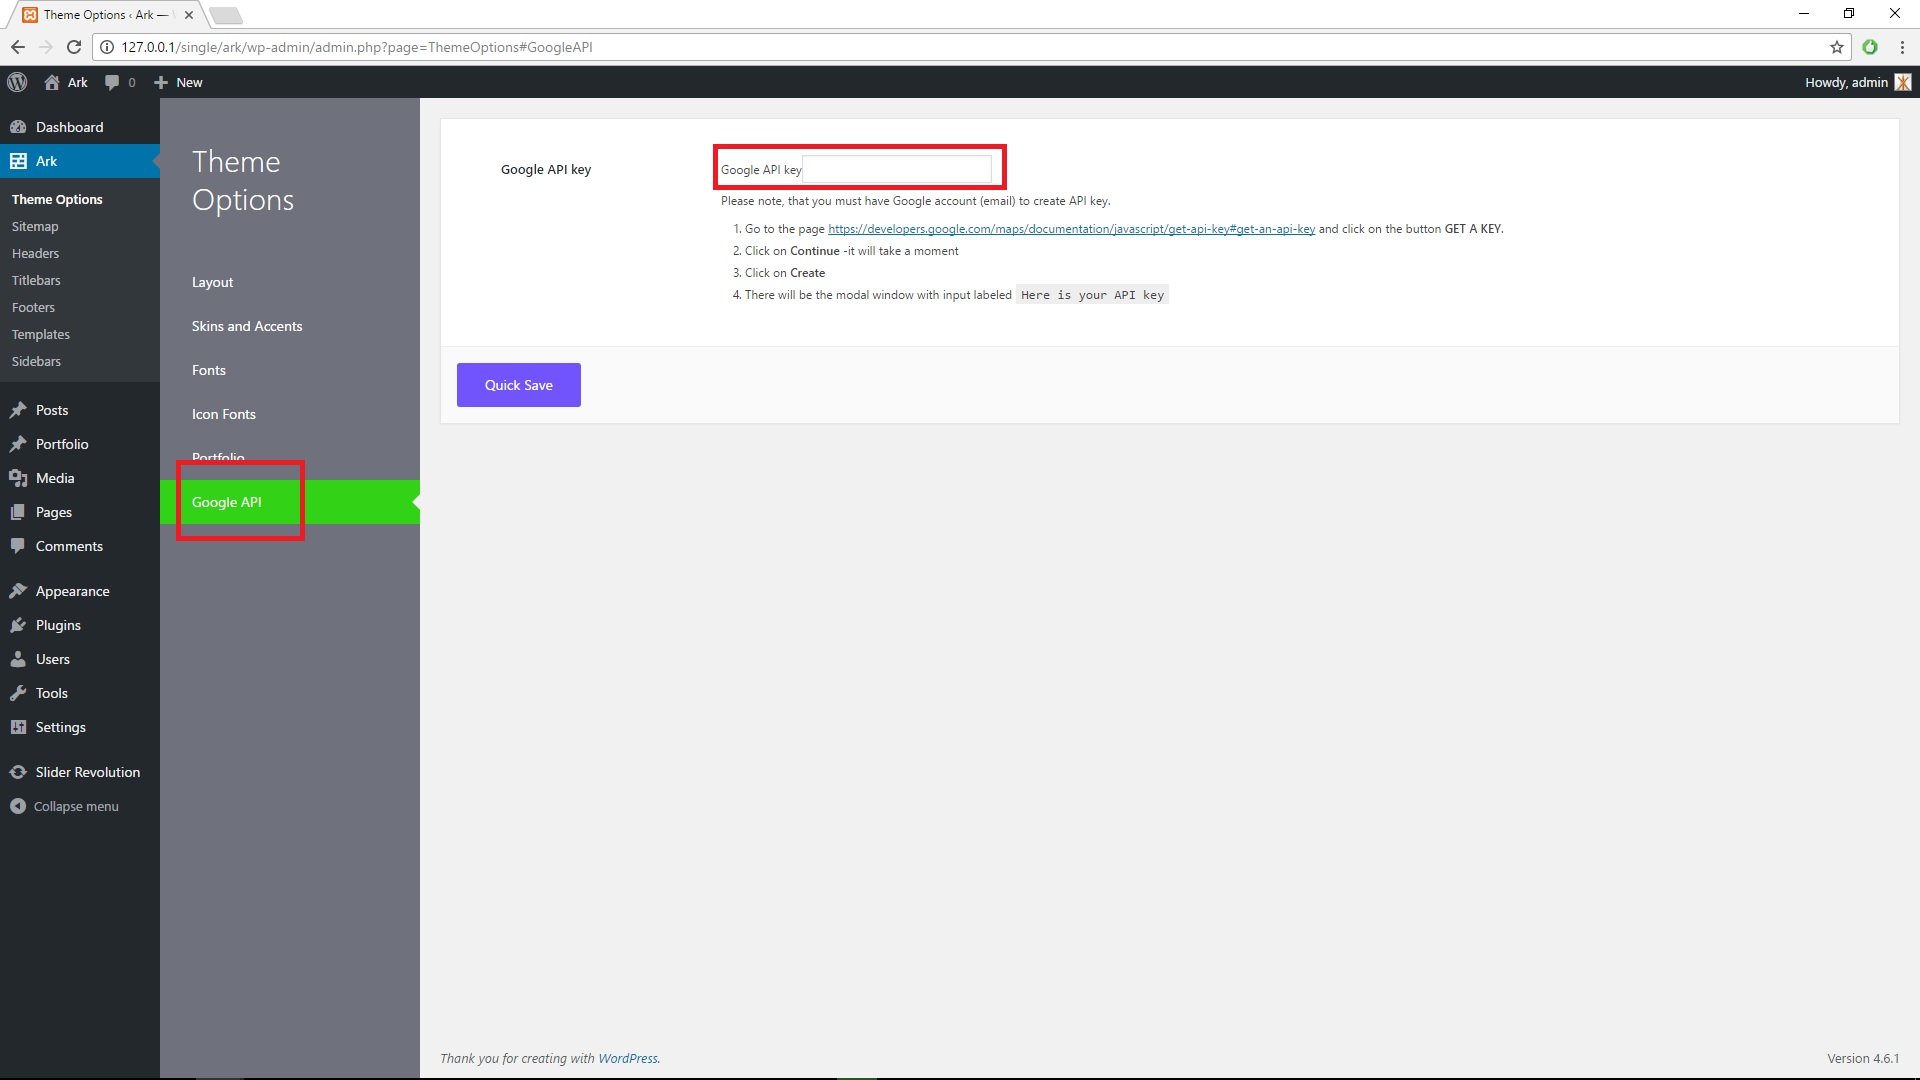
Because Google Maps needs API key, there is Google API tab is for it.
Please note, that you must have Google account (email) to create API key. To create your API key:
- Go to the page https://developers.google.com/maps/documentation/javascript/get-api-key#get-an-api-key and click on the button GET A KEY.
- Click on Continue -it will take a moment
- Click on Create
- There will be the modal window with input labeled
Here is your API key
Sitemap
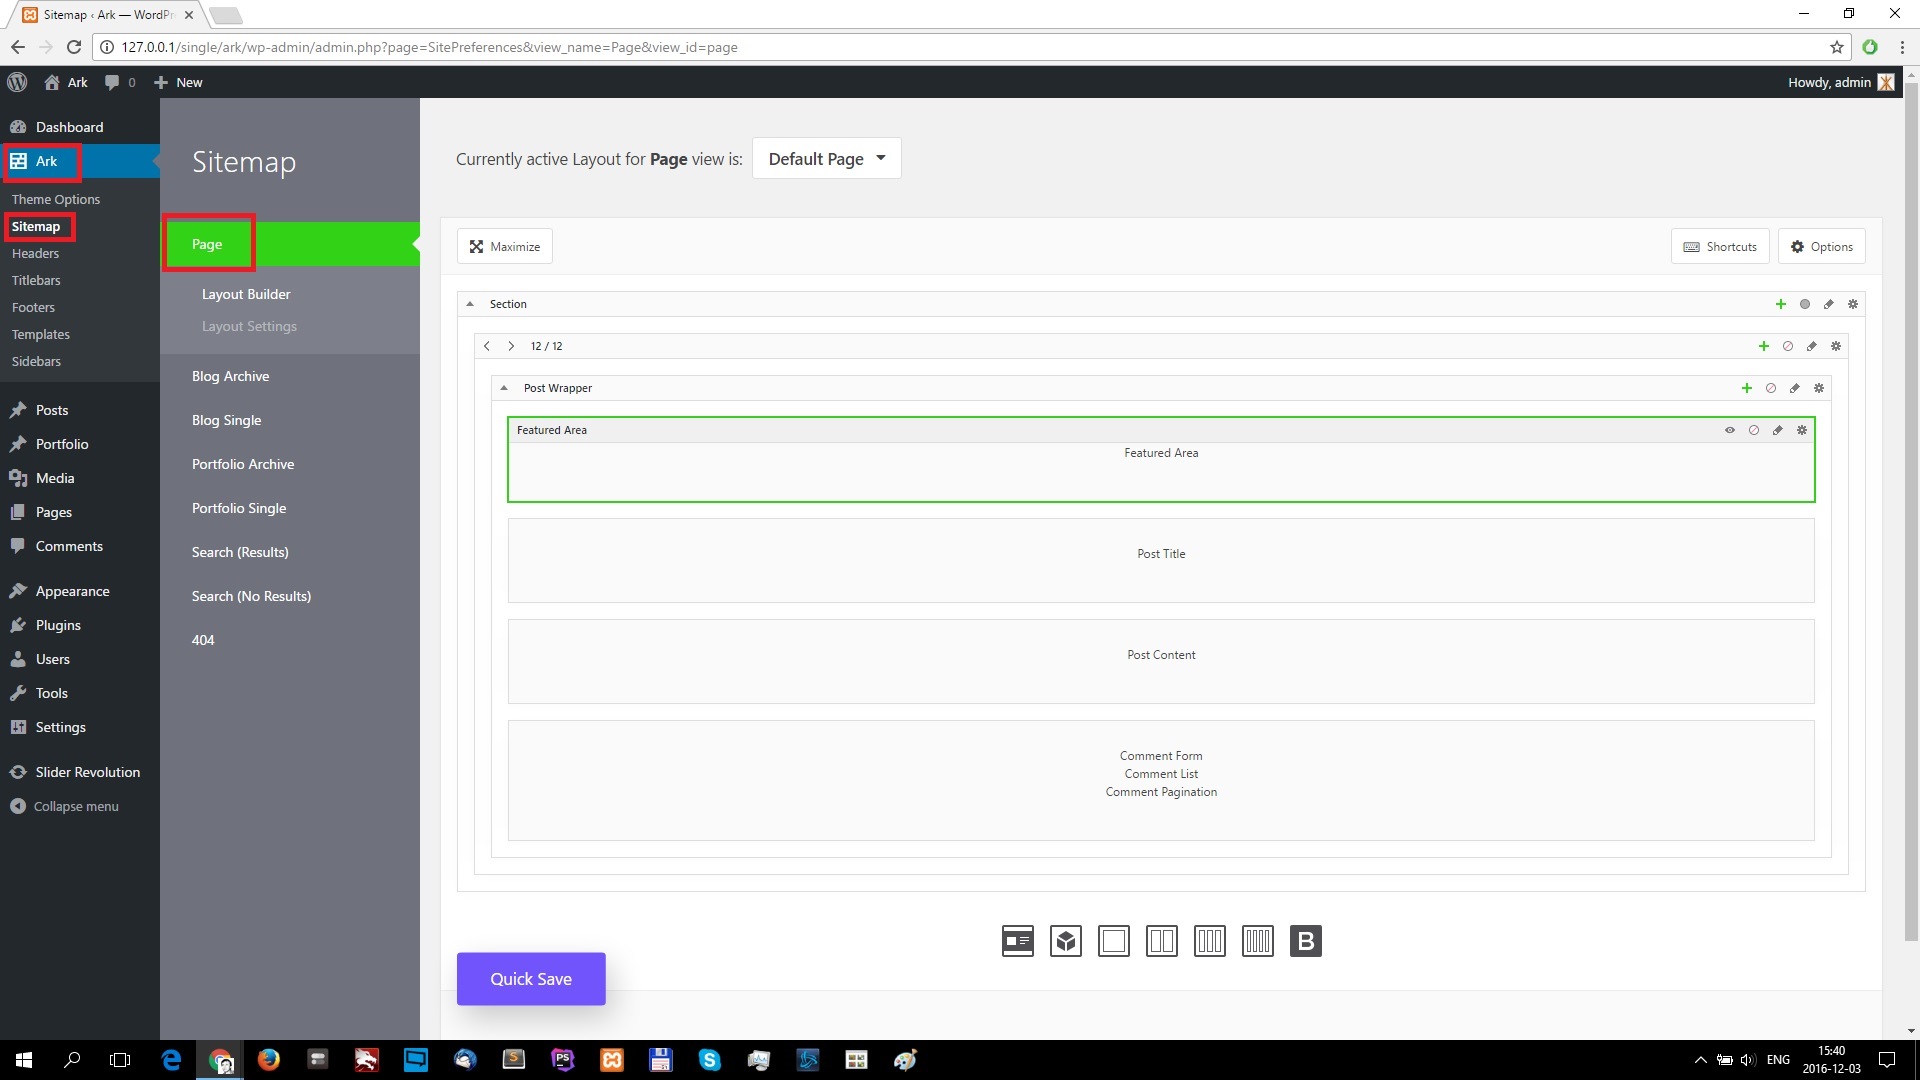
You can change in the WP Admin Menu > Ark > Sitemaps the layout of the pages, blog pagess, portfolio pages, search results and 404 page.
Each page type has its own pagebuilder.
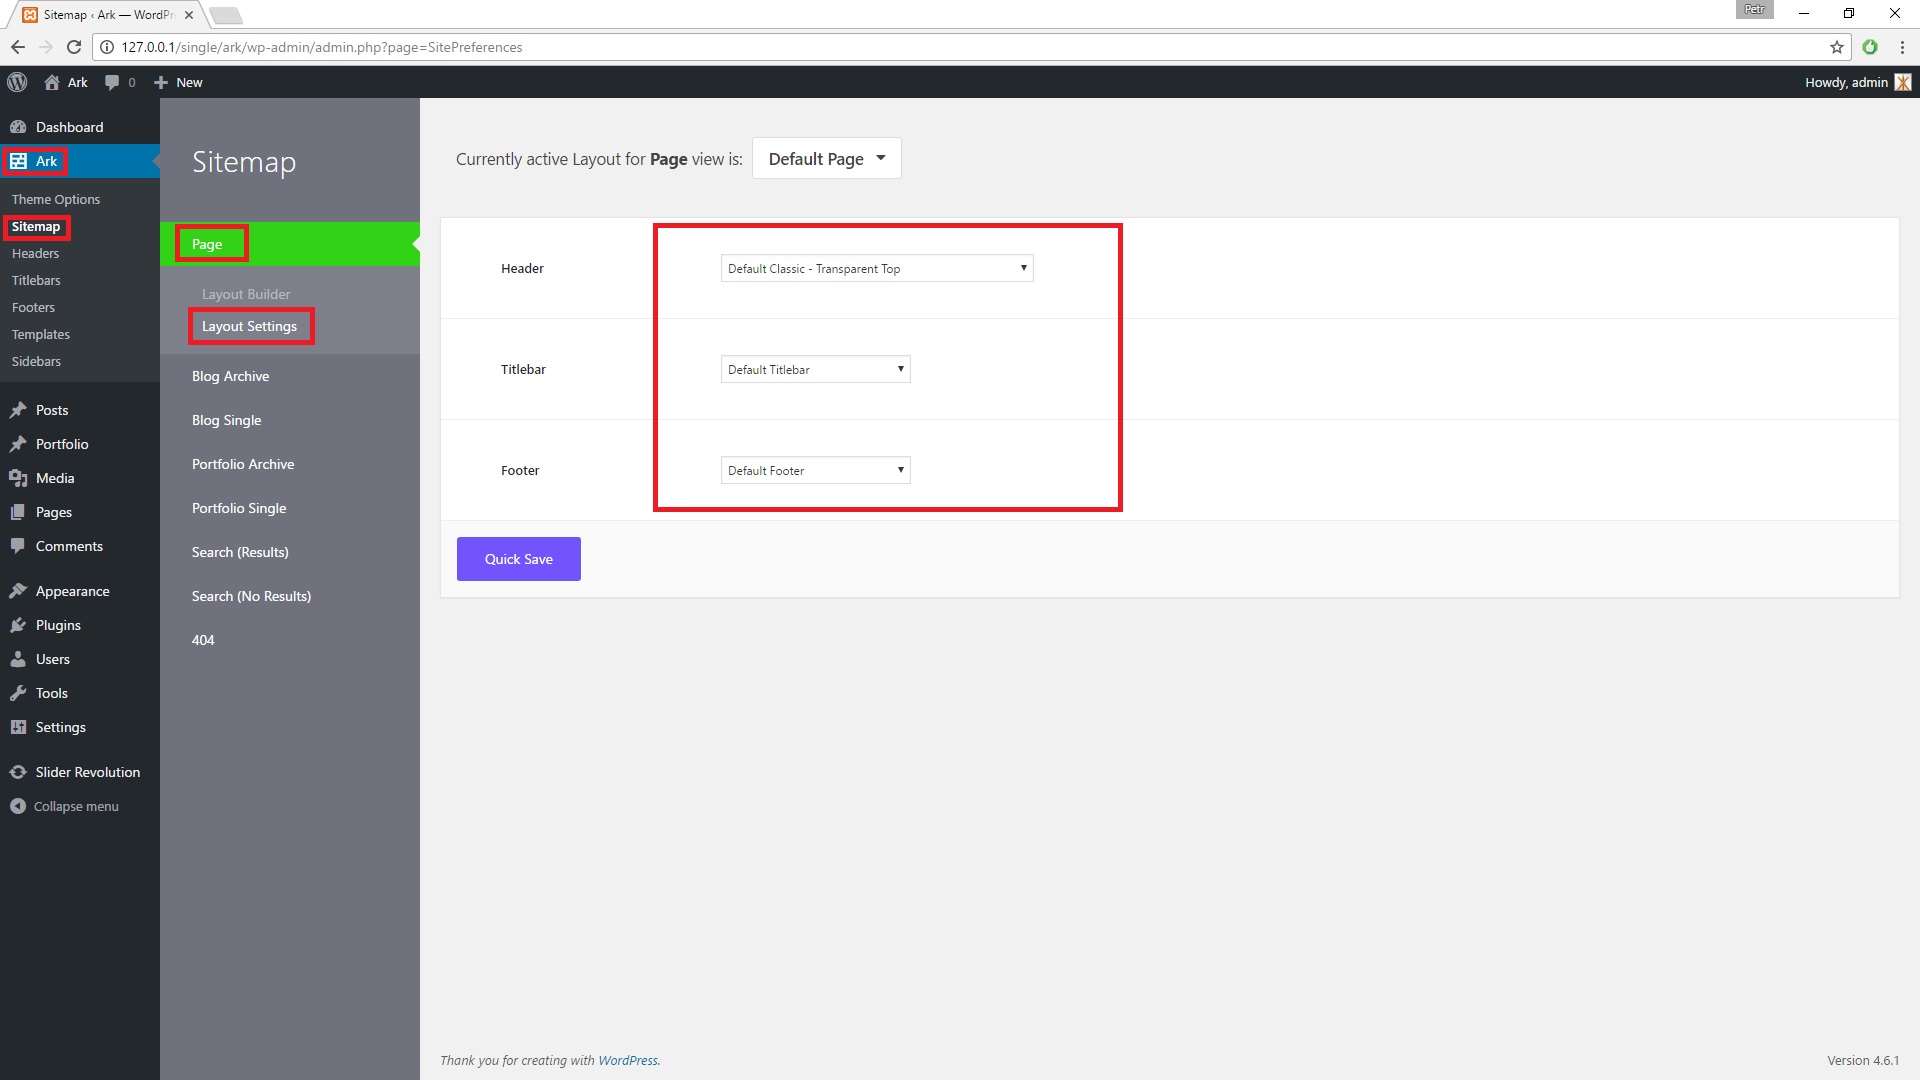
Each page type has also Layout Settings, where you can set Header, Titlebar and Footer.
Headers
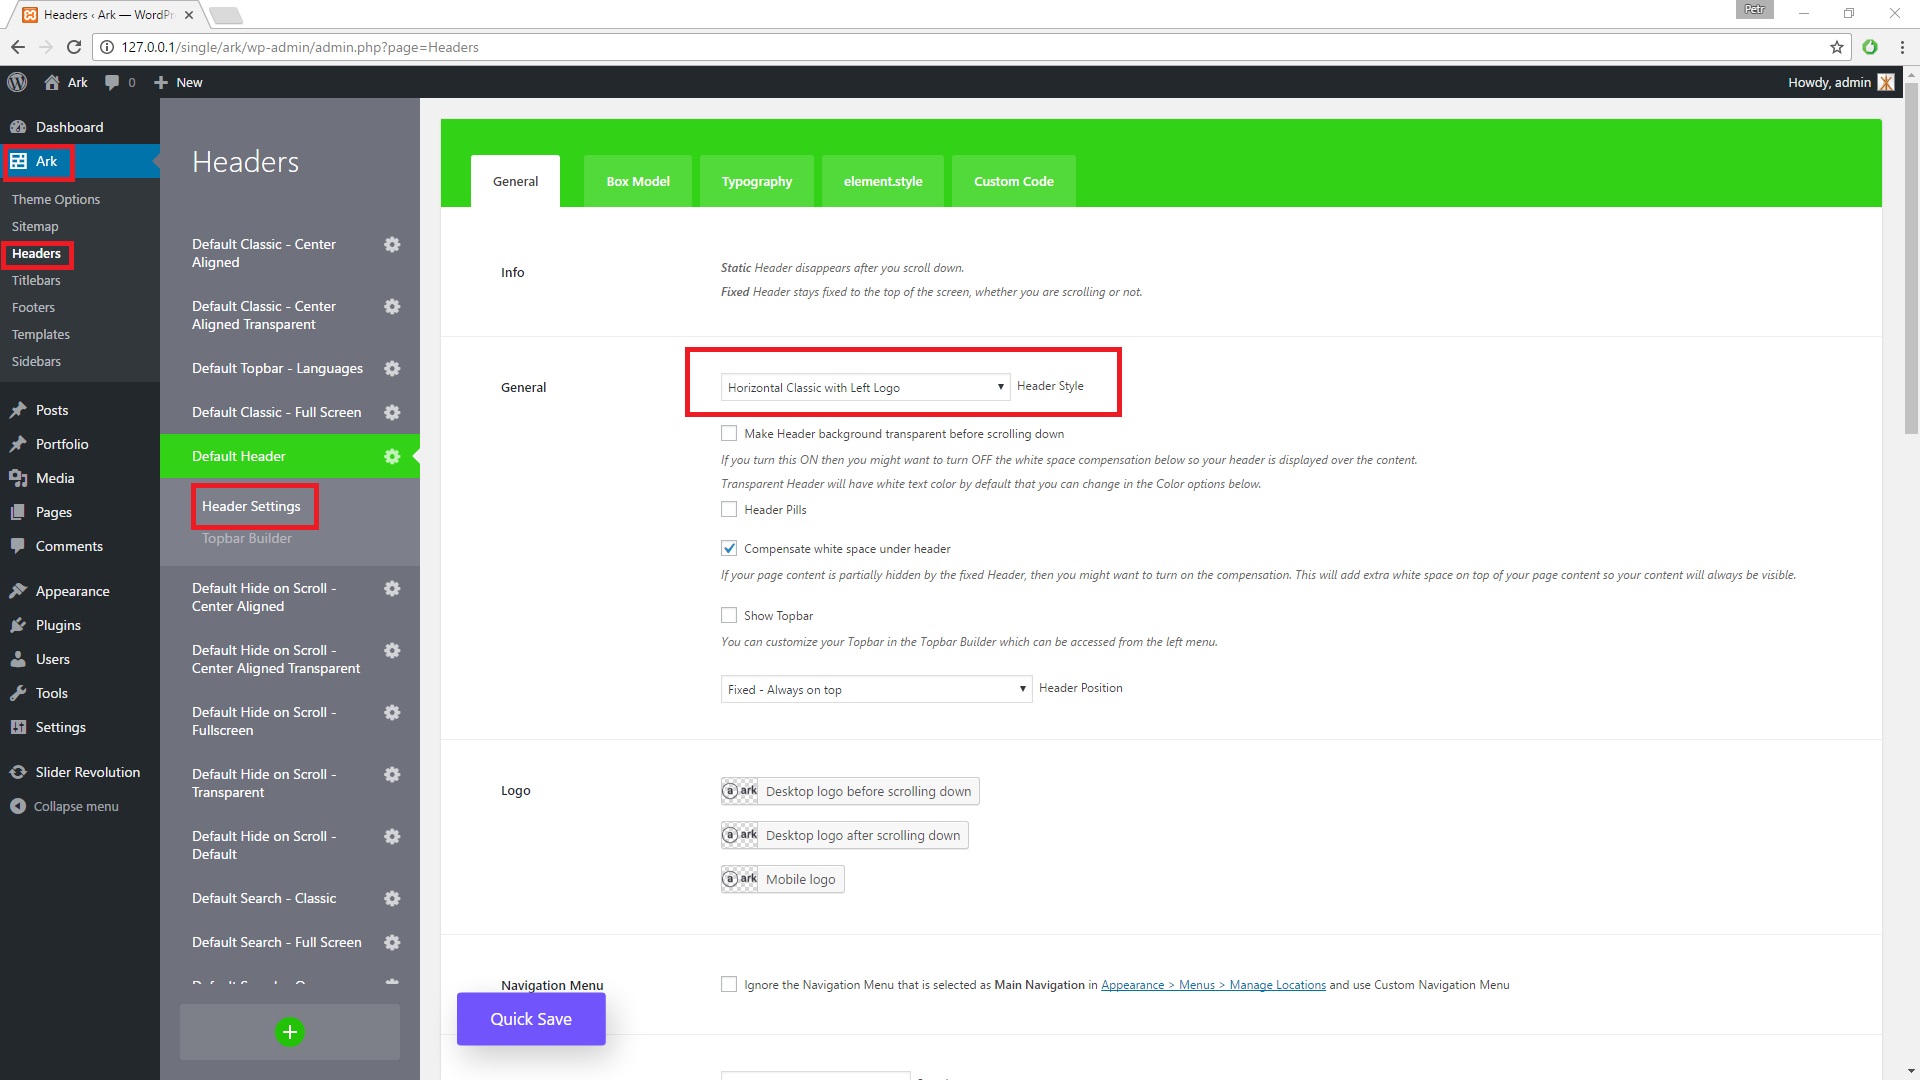
There are a lot of header types in the Ark. You can few of them in http://main.arktheme.com/ in the menu features. You can edit Headers in WP Admin Menu > Ark > Headers. There are notes and description under each option.
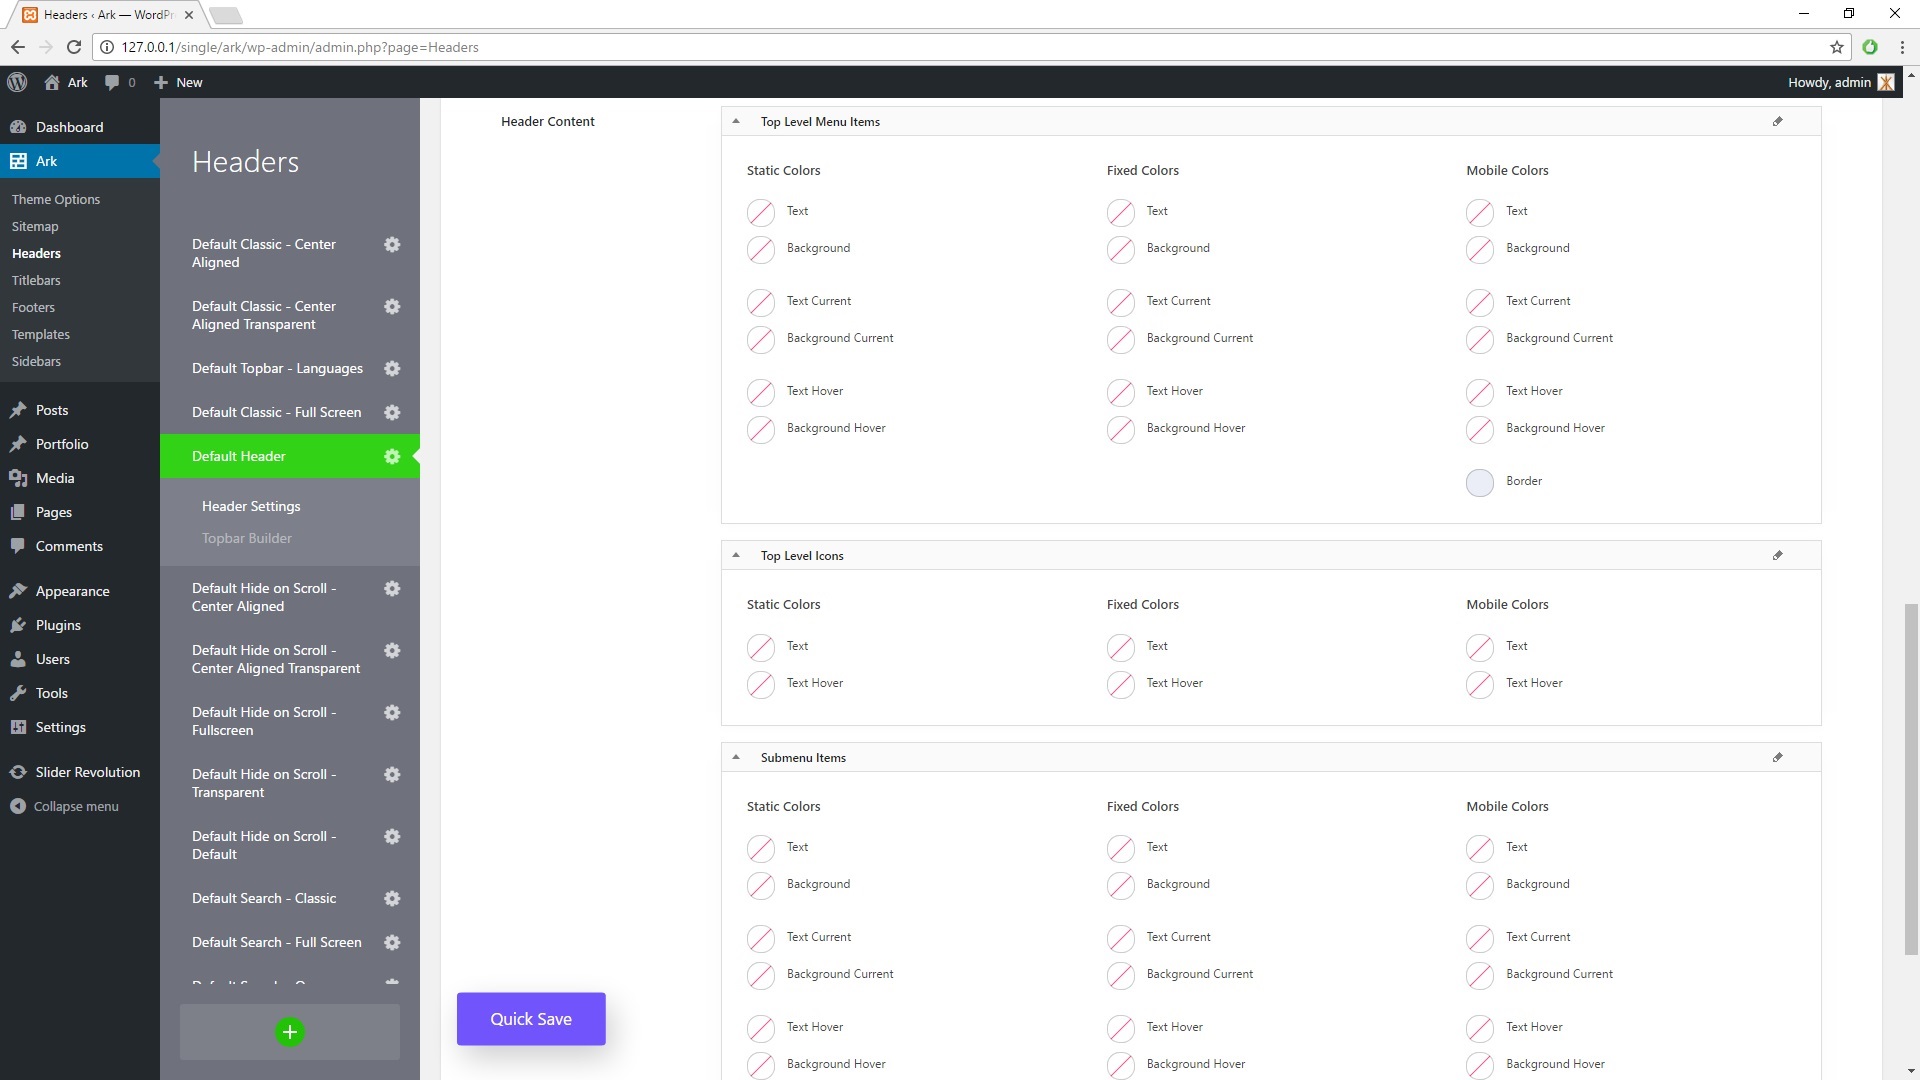
There are tons of color settings for the Ark Headers.
Side Menu
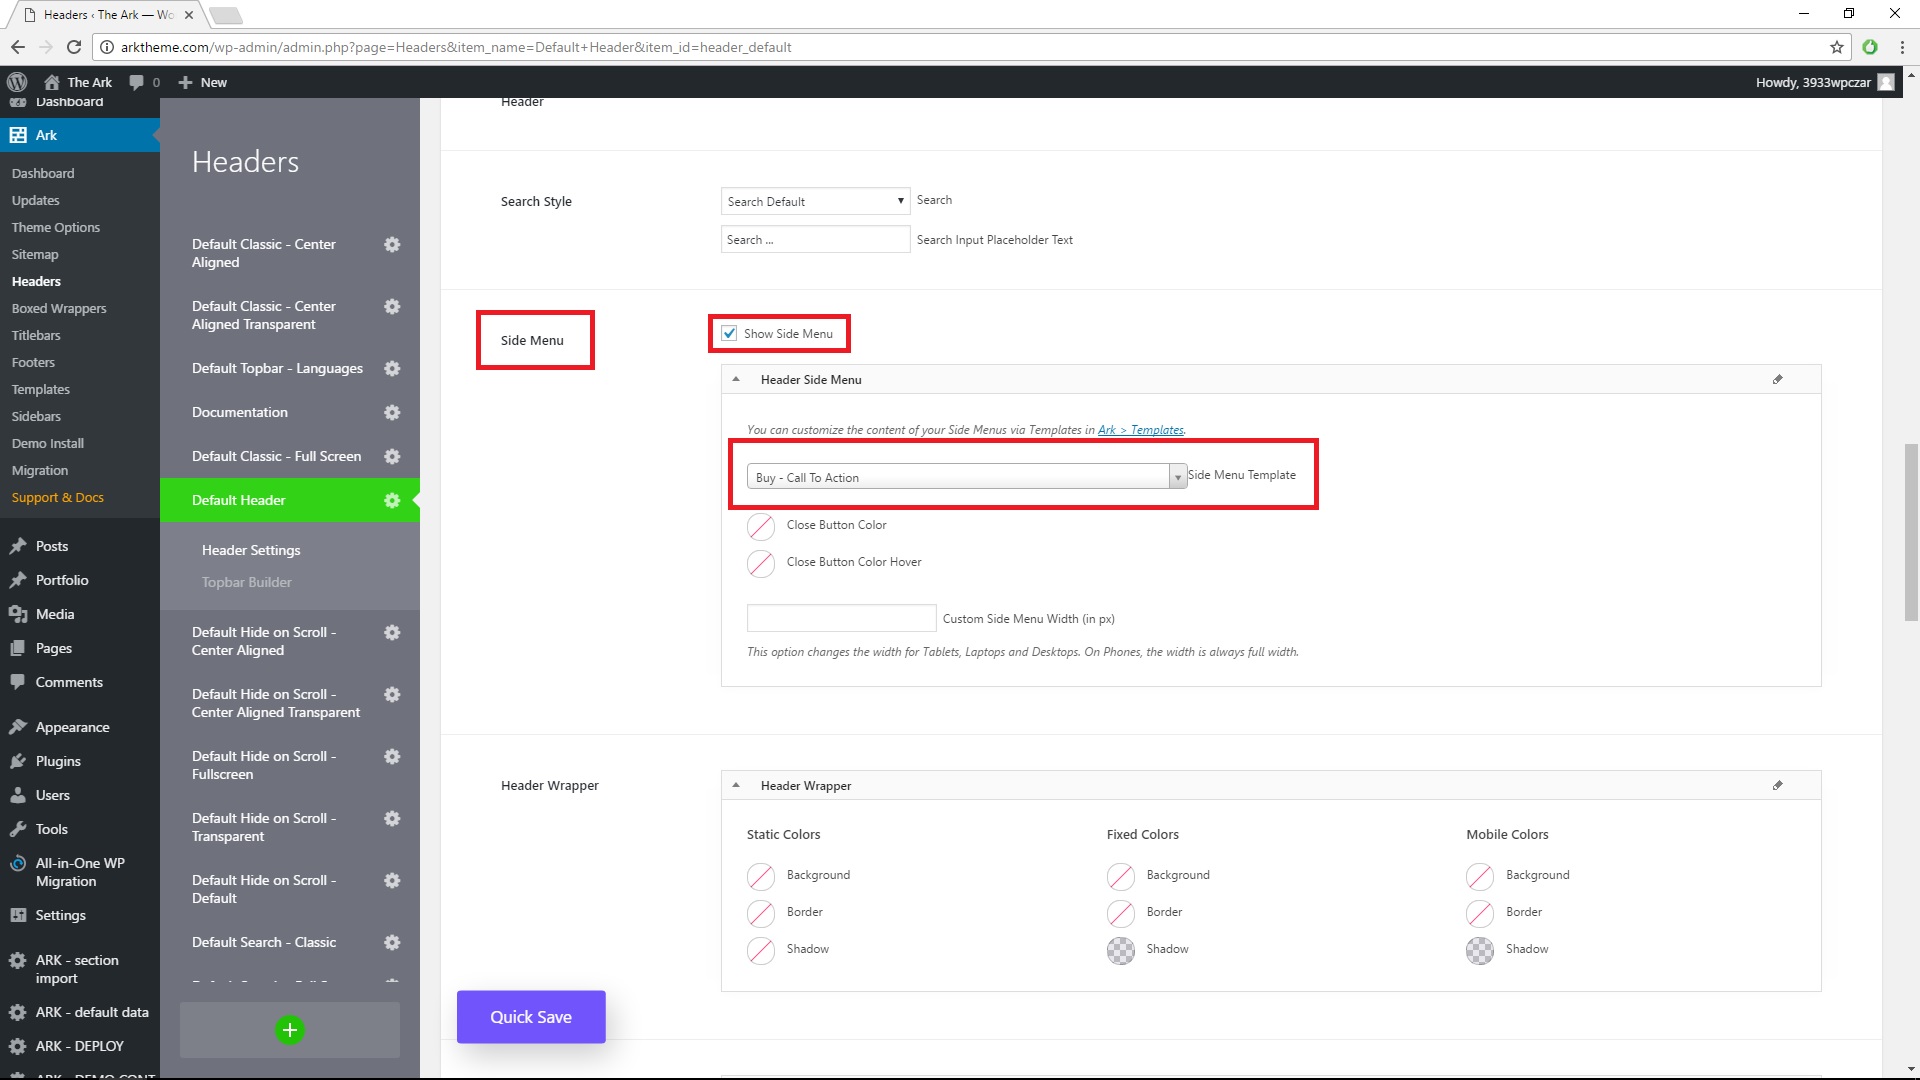
If you wish to have extra side menu, you need to check Show Side Menu option. You can pick the content in Side Menu Template option.
If you have not any template, you can create it in the WP Admin Menu > Ark > Templates.
Titlebars
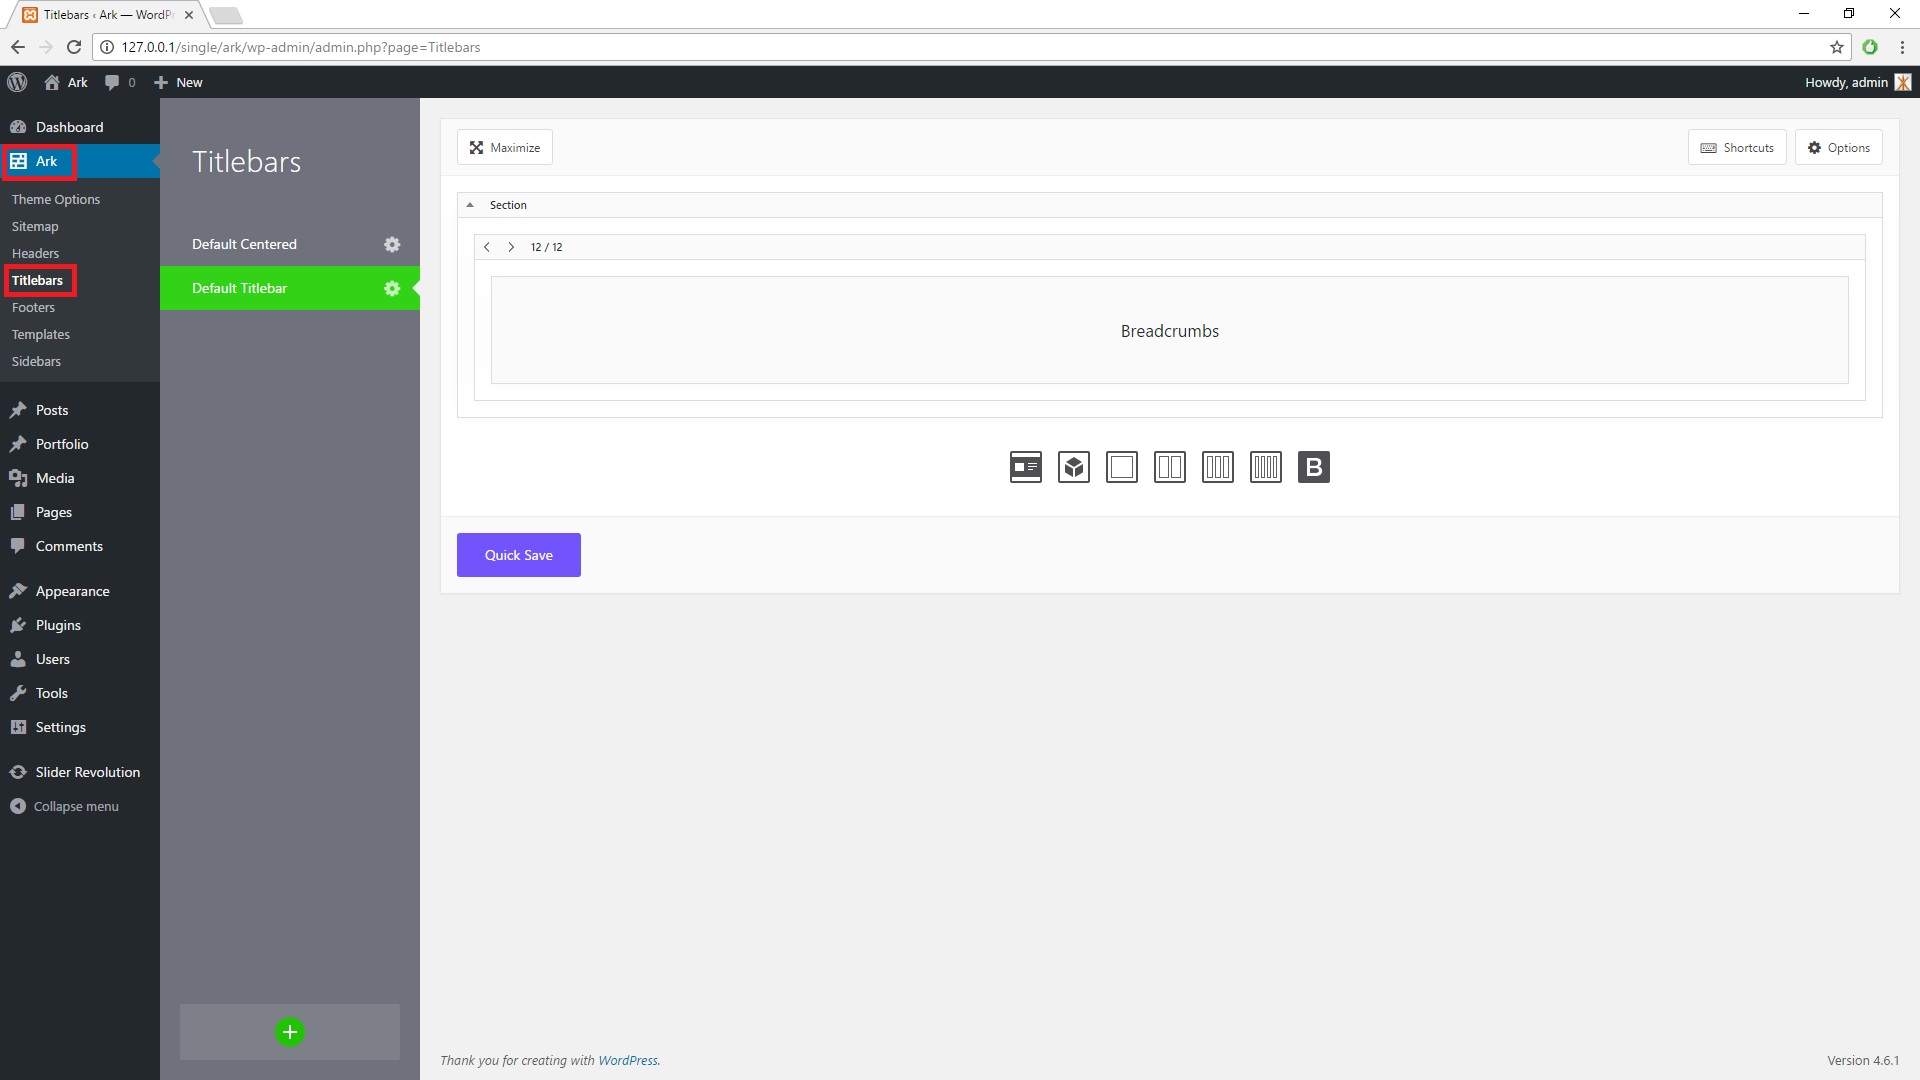
Titlebars represents the area under the header and before the page content. Each Titlebar has page builder area.
Footers
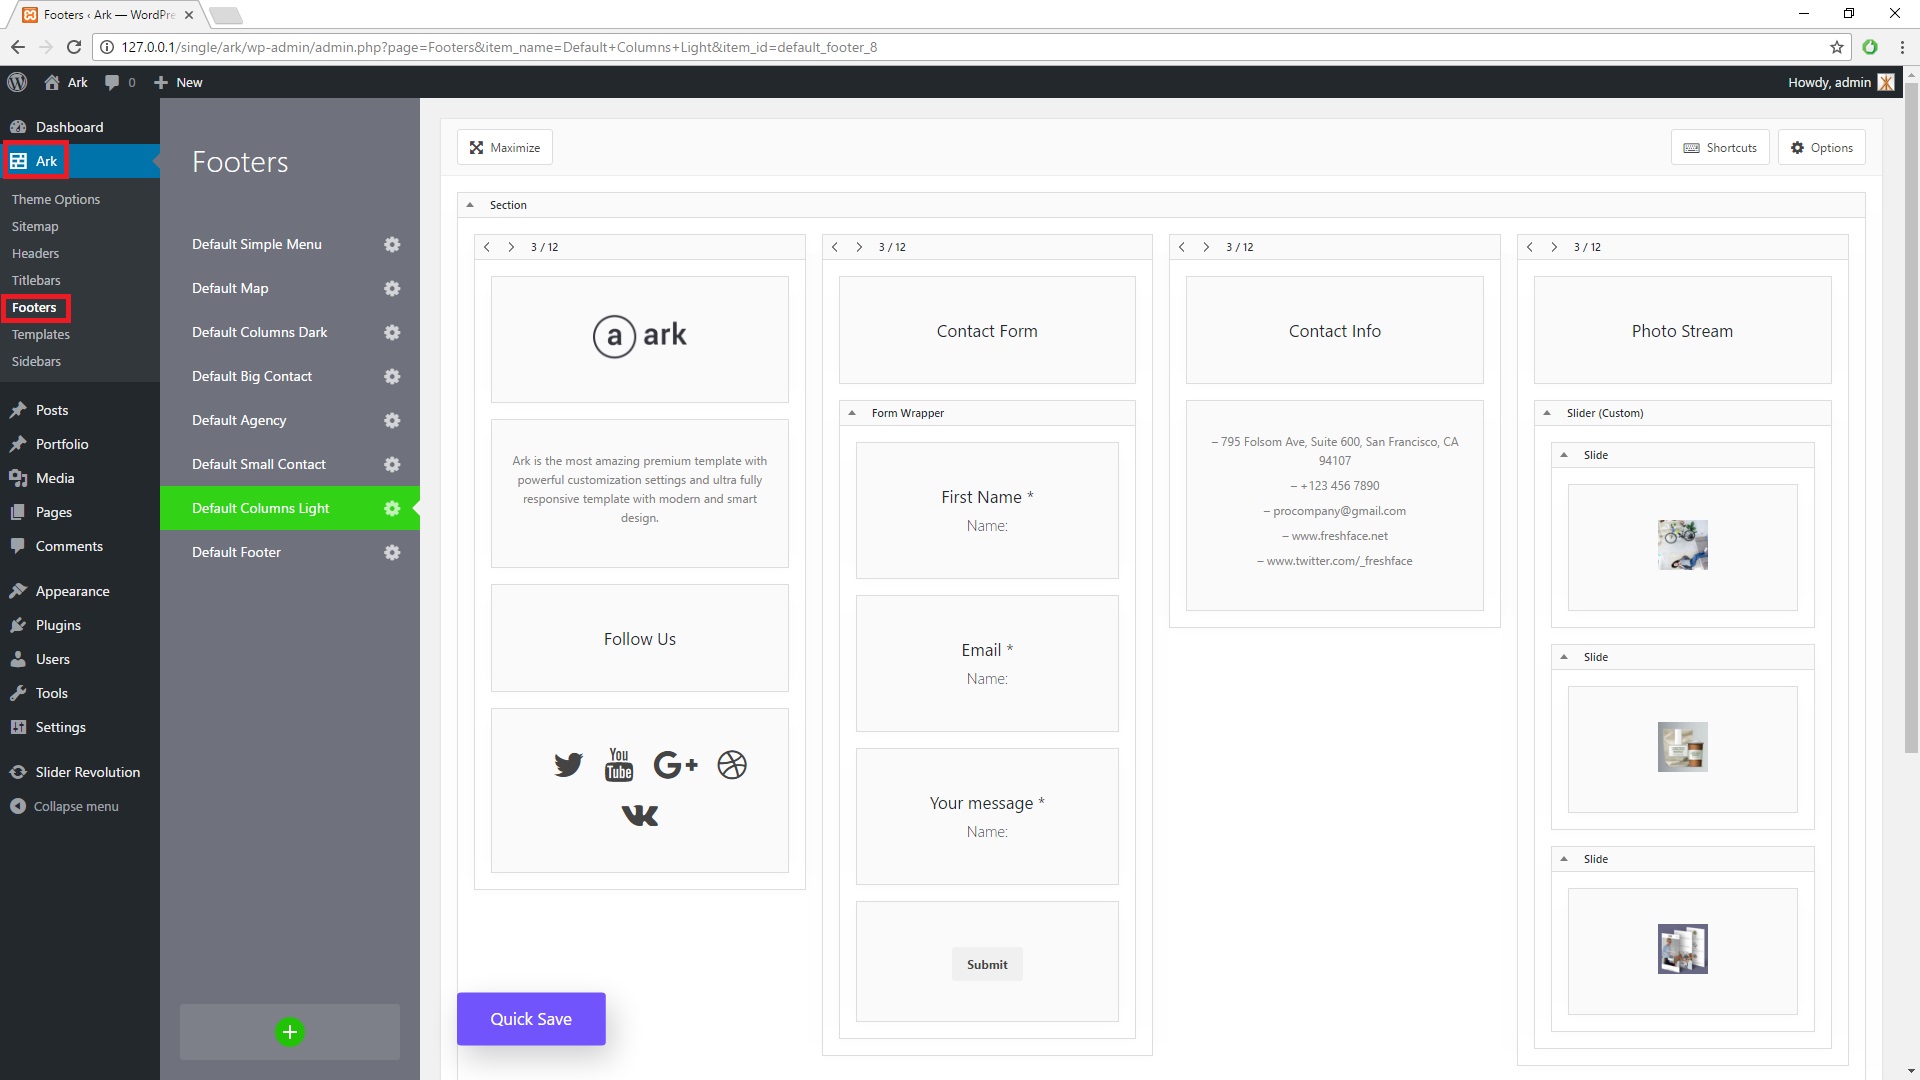
Footers is the area after the page content. Each Footer has page builder area.
Templates
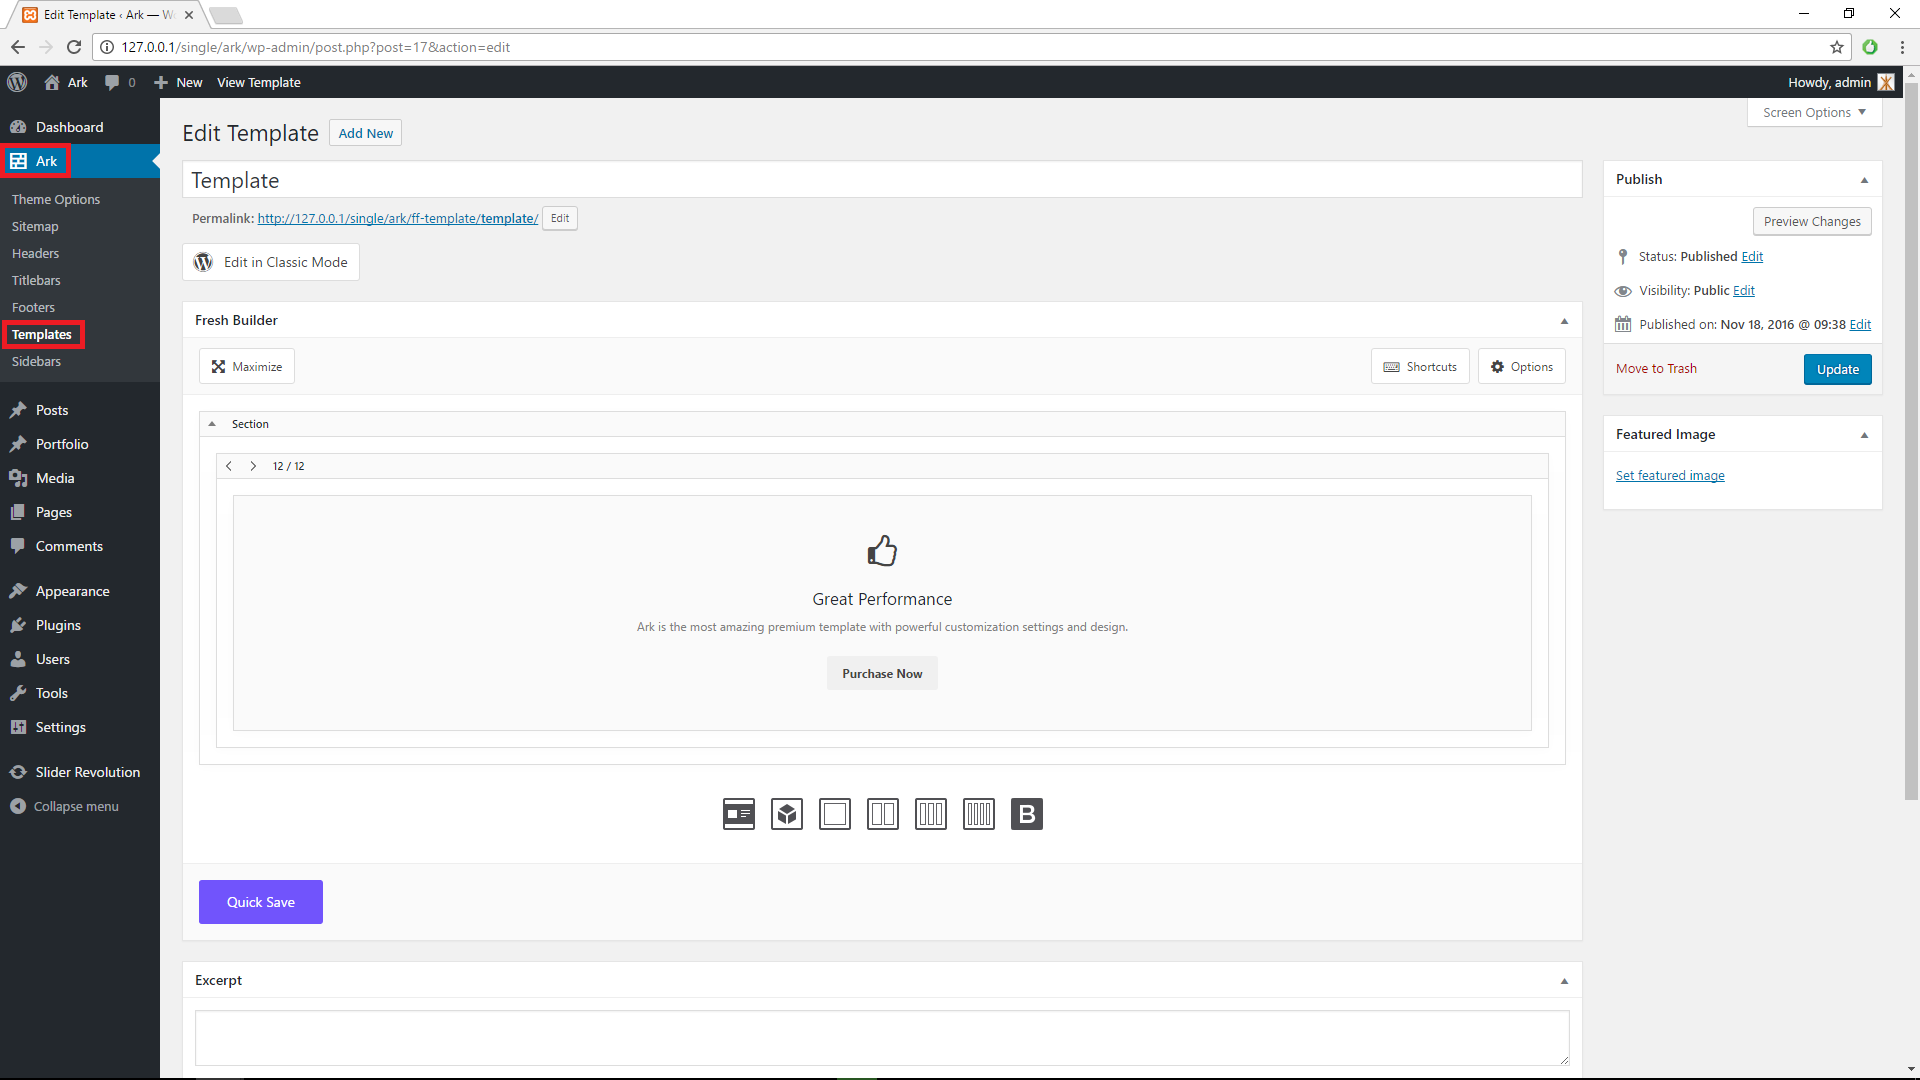
Templates is custom post type for including page parts, which are in more pages. For example - if you have call to action, that is same on 10 pages and you know, that you will change it in the future, then use template. You can change template in one place and every page, that contains element Template that points to that call to action will be changed.
Sidebars
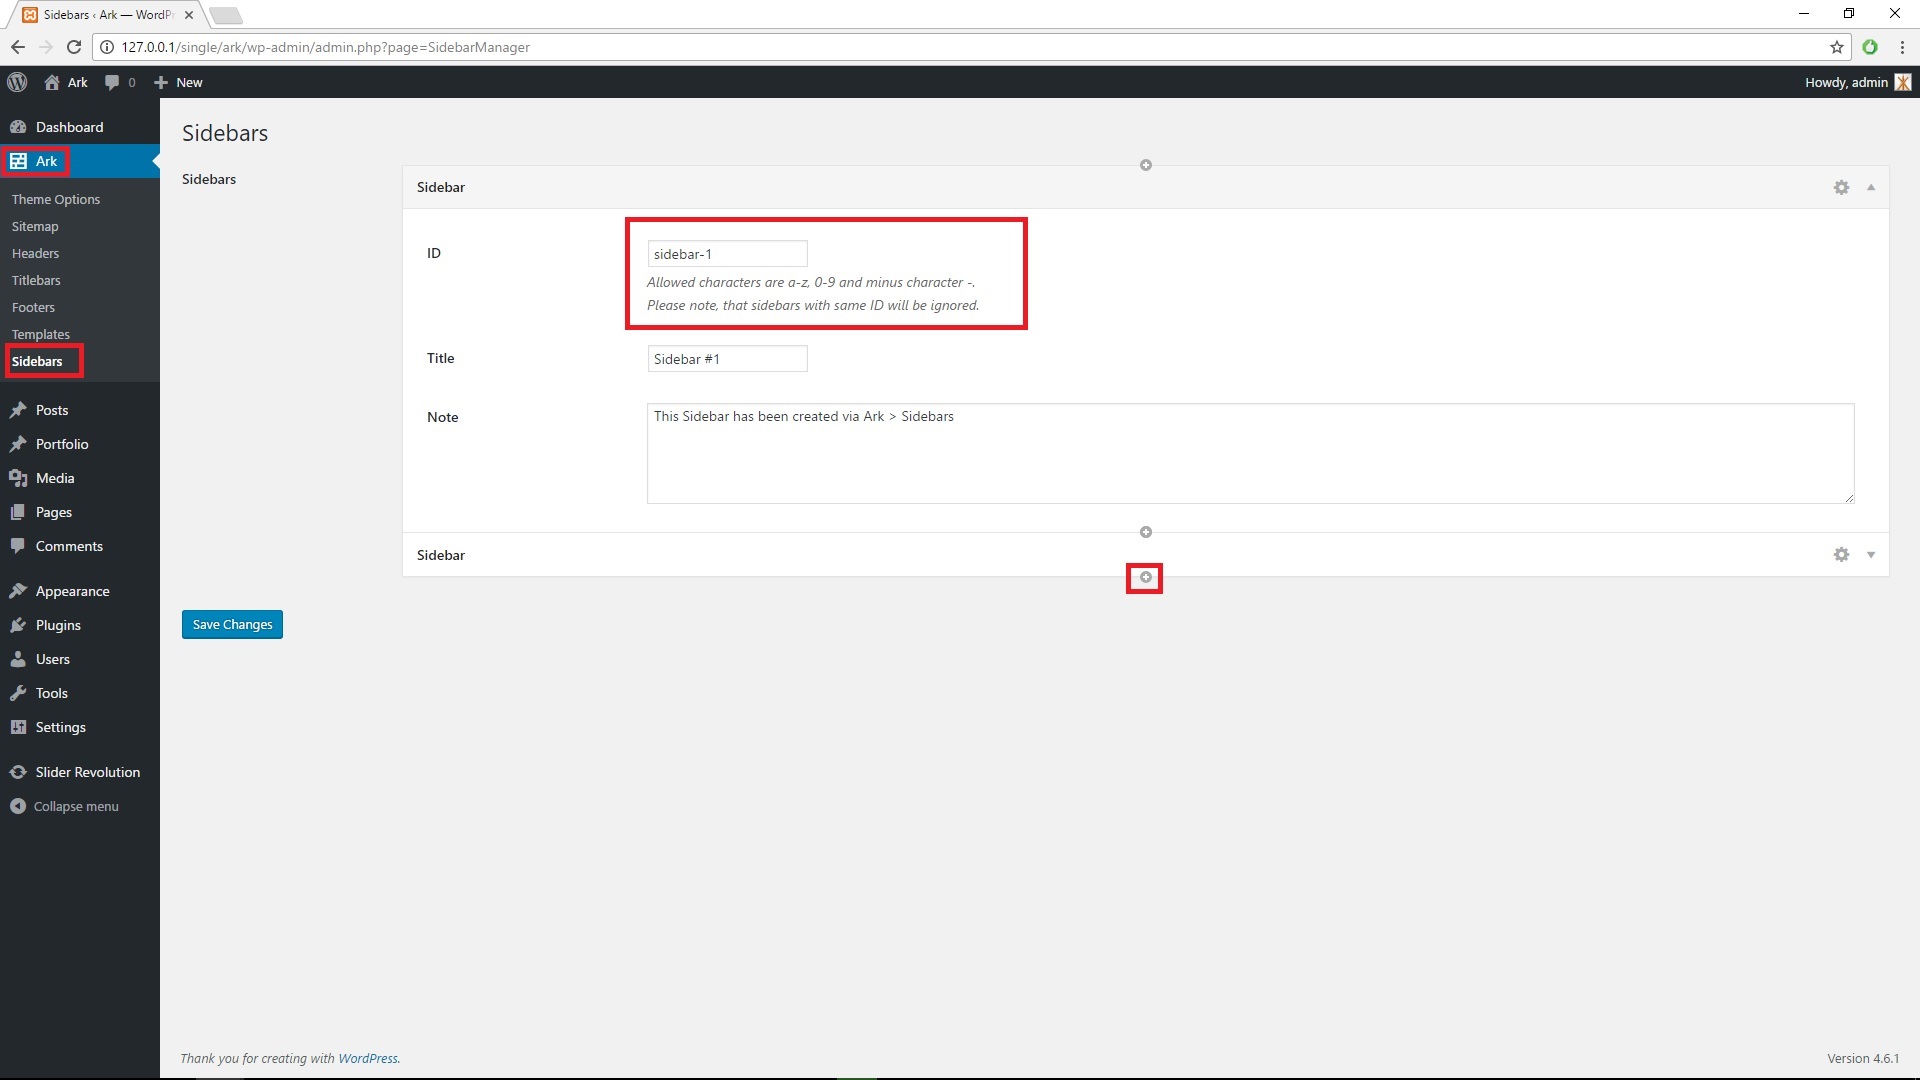
Sidebars are for adding your custom sidebars. You can use them in the Sidebar element in the page builder. Please note, that you need to fill sidebar ID - Allowed characters are a-z, 0-9 and minus character -. Also note, that sidebars with same ID will be ignored.
Onepage Menu
One Page menu is used for small sites, where almost every information is on home page. One-page menu consists of few menu items with link like #services which points to element or section with ID attribute like services.
How to set the links in one-page menu
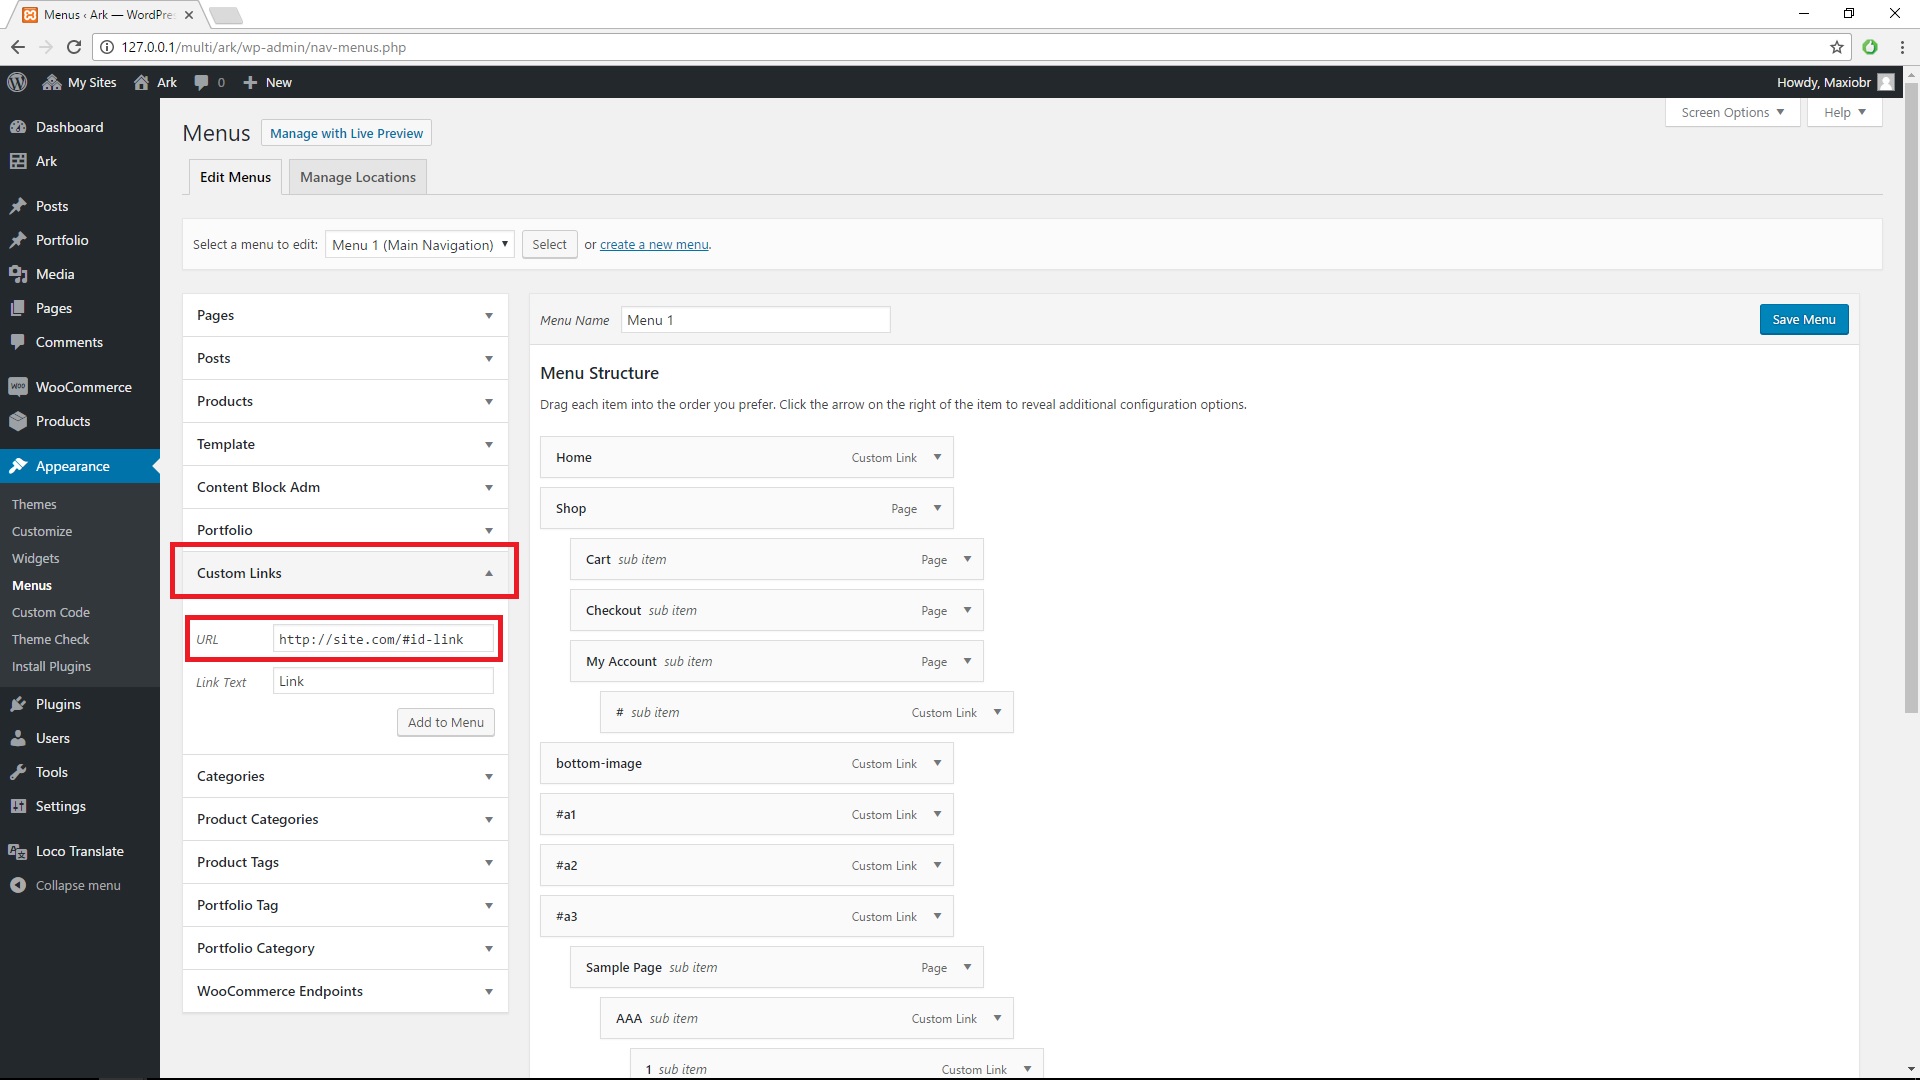
You can edit the menu links in the WP Admin Menu > Appearance > Menus. There you should edit or create new menu.
You need to use Custom Links menu type in the left columns. Edit the single menu custom link and into the field URL put the link in the format: http://example.com/#id-link , where you need to replace http://example.com/ with your site URL and id-link with ID of the section.
How to set the ID of the section

Edit the section or any other element, where you wish to menu scroll. Click on tab element.style and fill the field ID (attribute) . Please note, that there should not be any # sharp character as it is in the menu.
Animation on #links
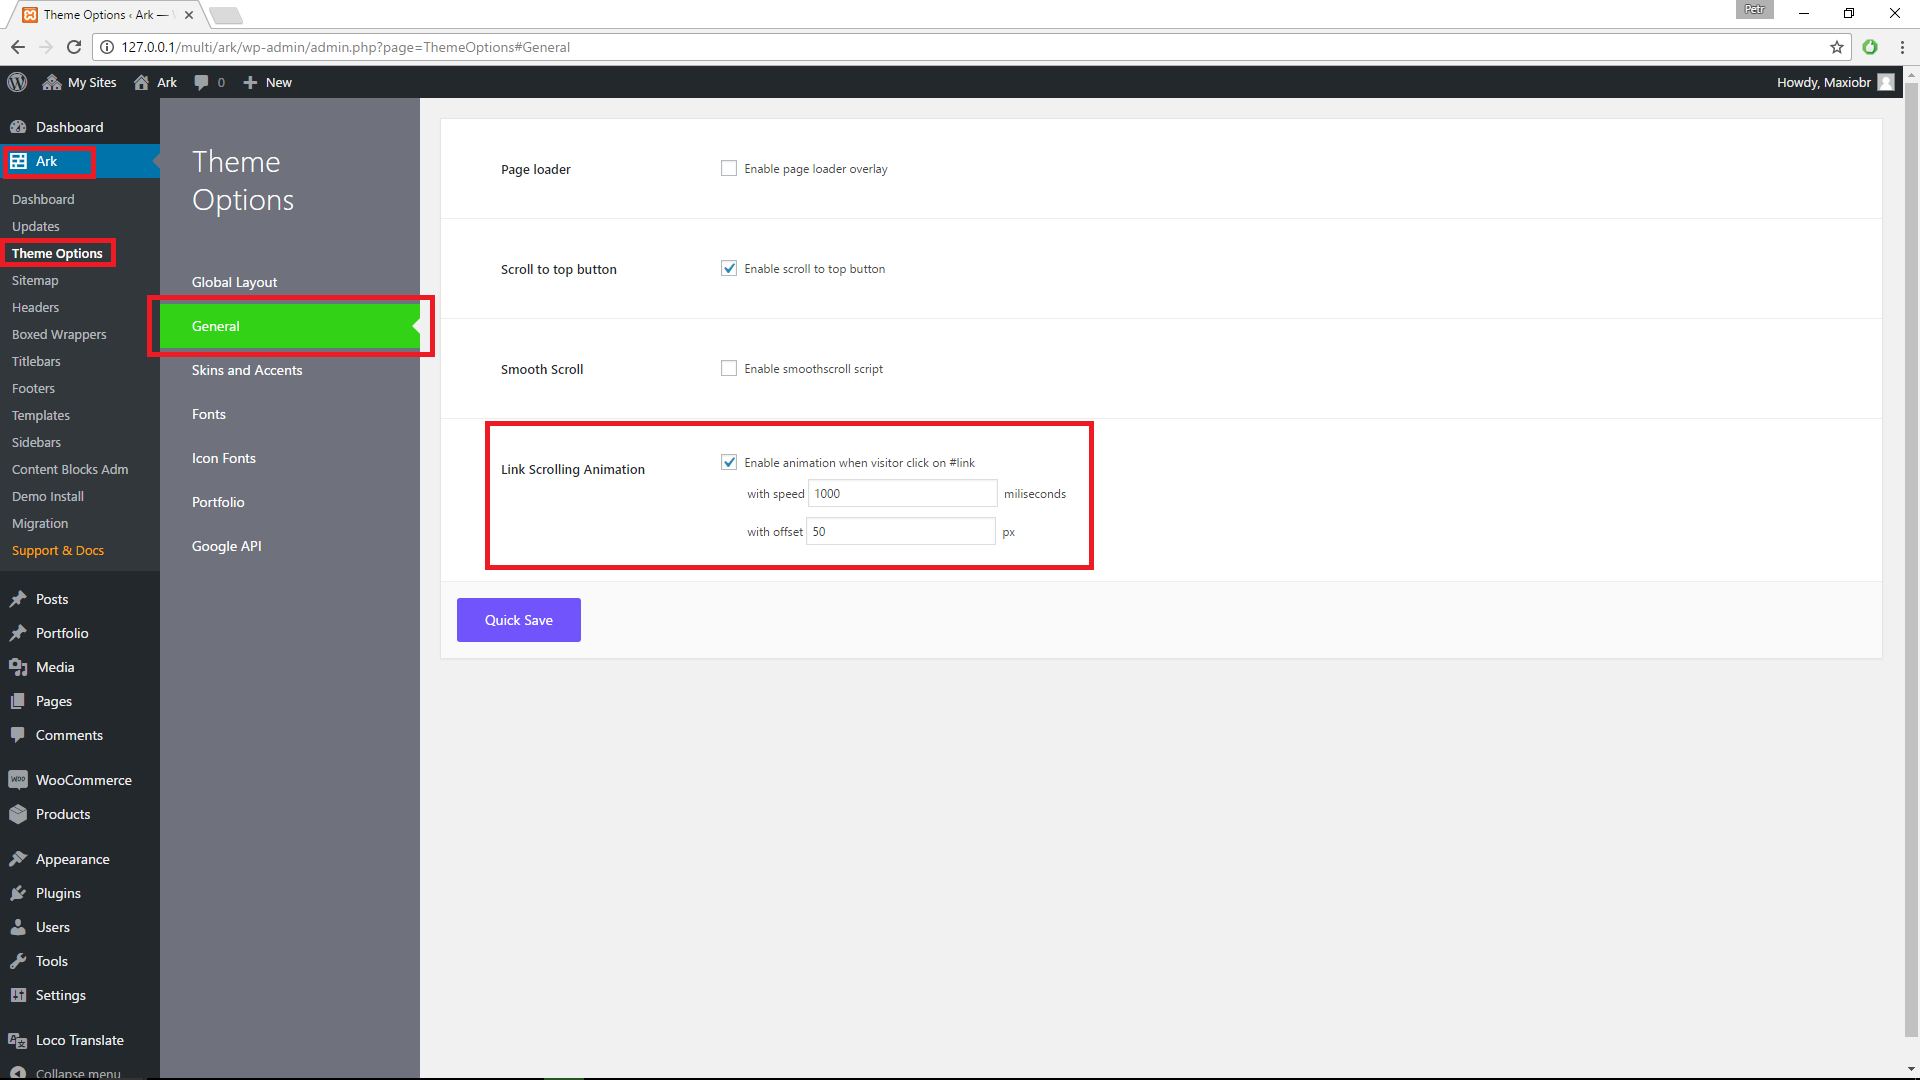
There are options in the WP Admin Menu > Ark > Theme Options > General. There are settings with speed and with offset. It serves for better adjusting to your needs.
Posts Format
Posts Format allows you to change post behavior in the blog elements. Ark theme supports these post formats: standard, image, gallery, quote, video and audio.
Standart and Image Post Format
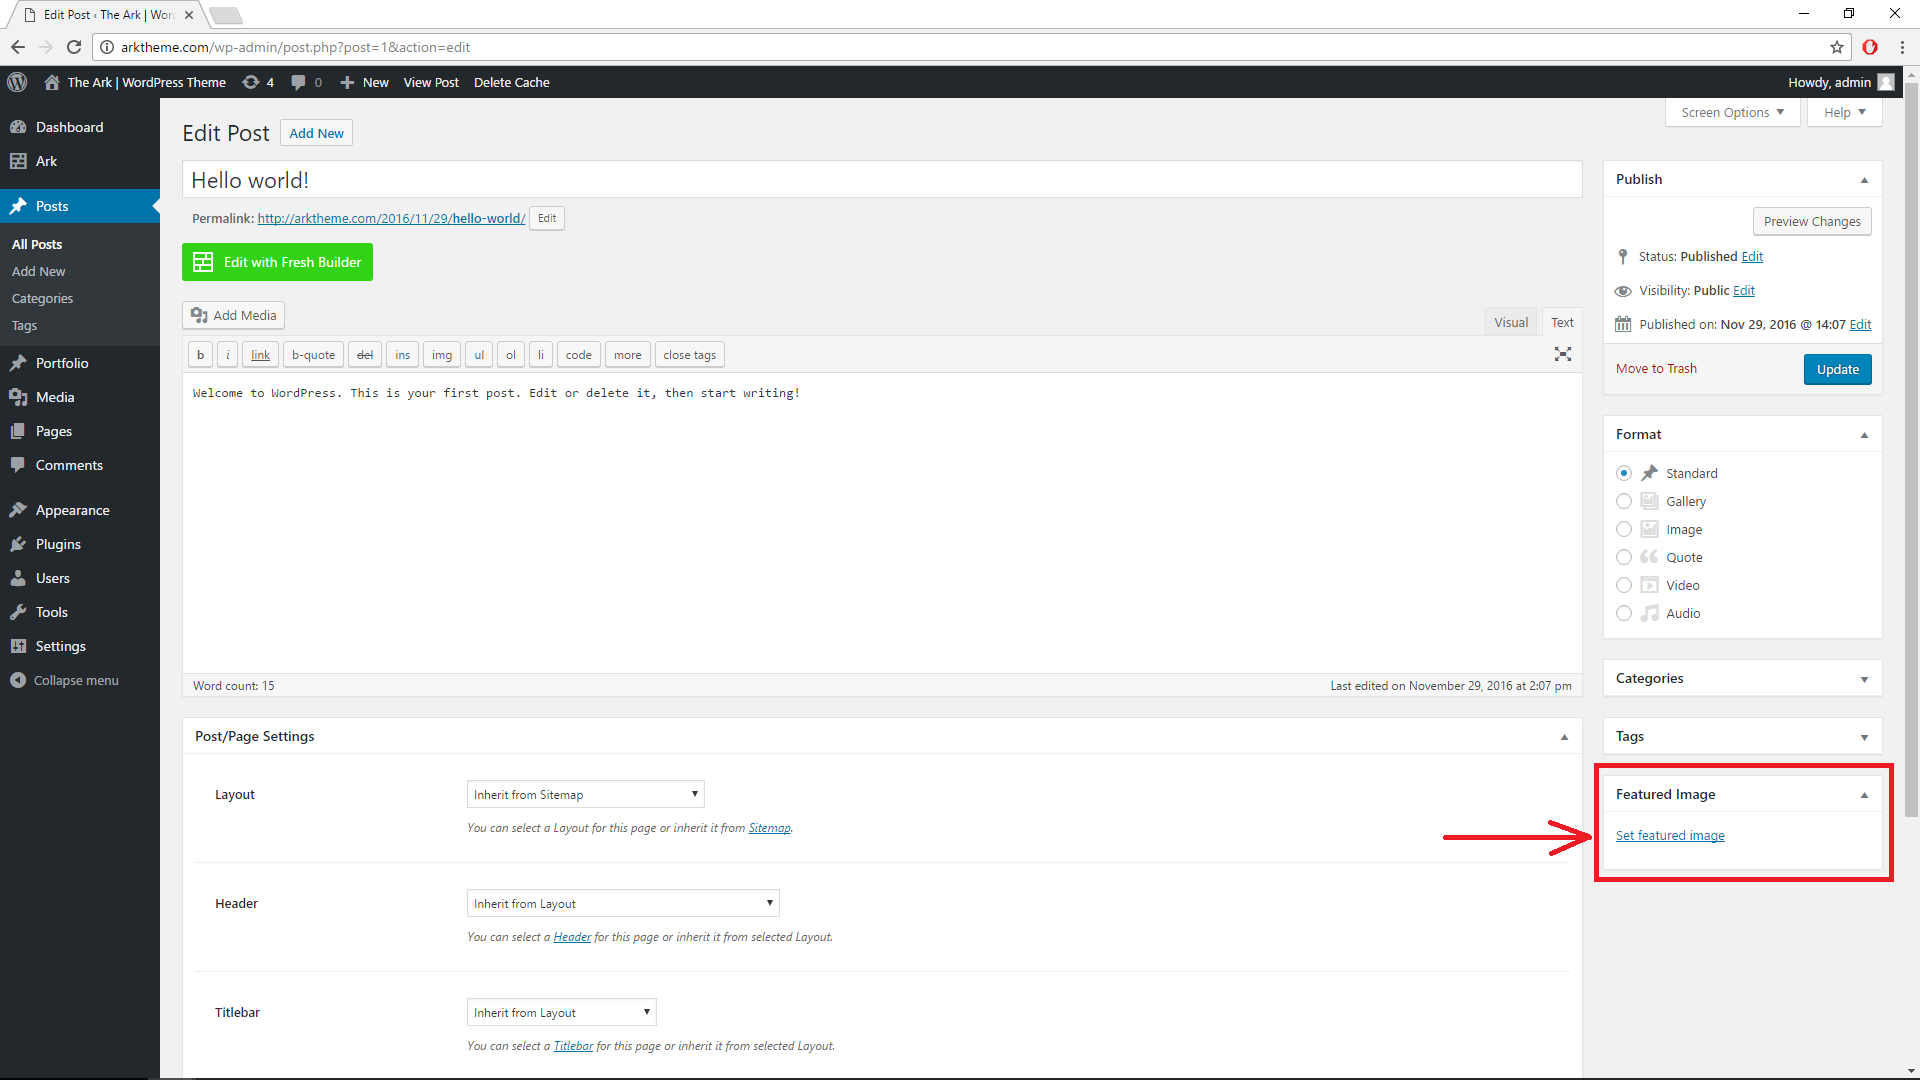
Standart and Image Post Format use featured image for its featured area. You can set it in the Featured Image Writepanel (Post Meta box) by clicking on link Set featured image.
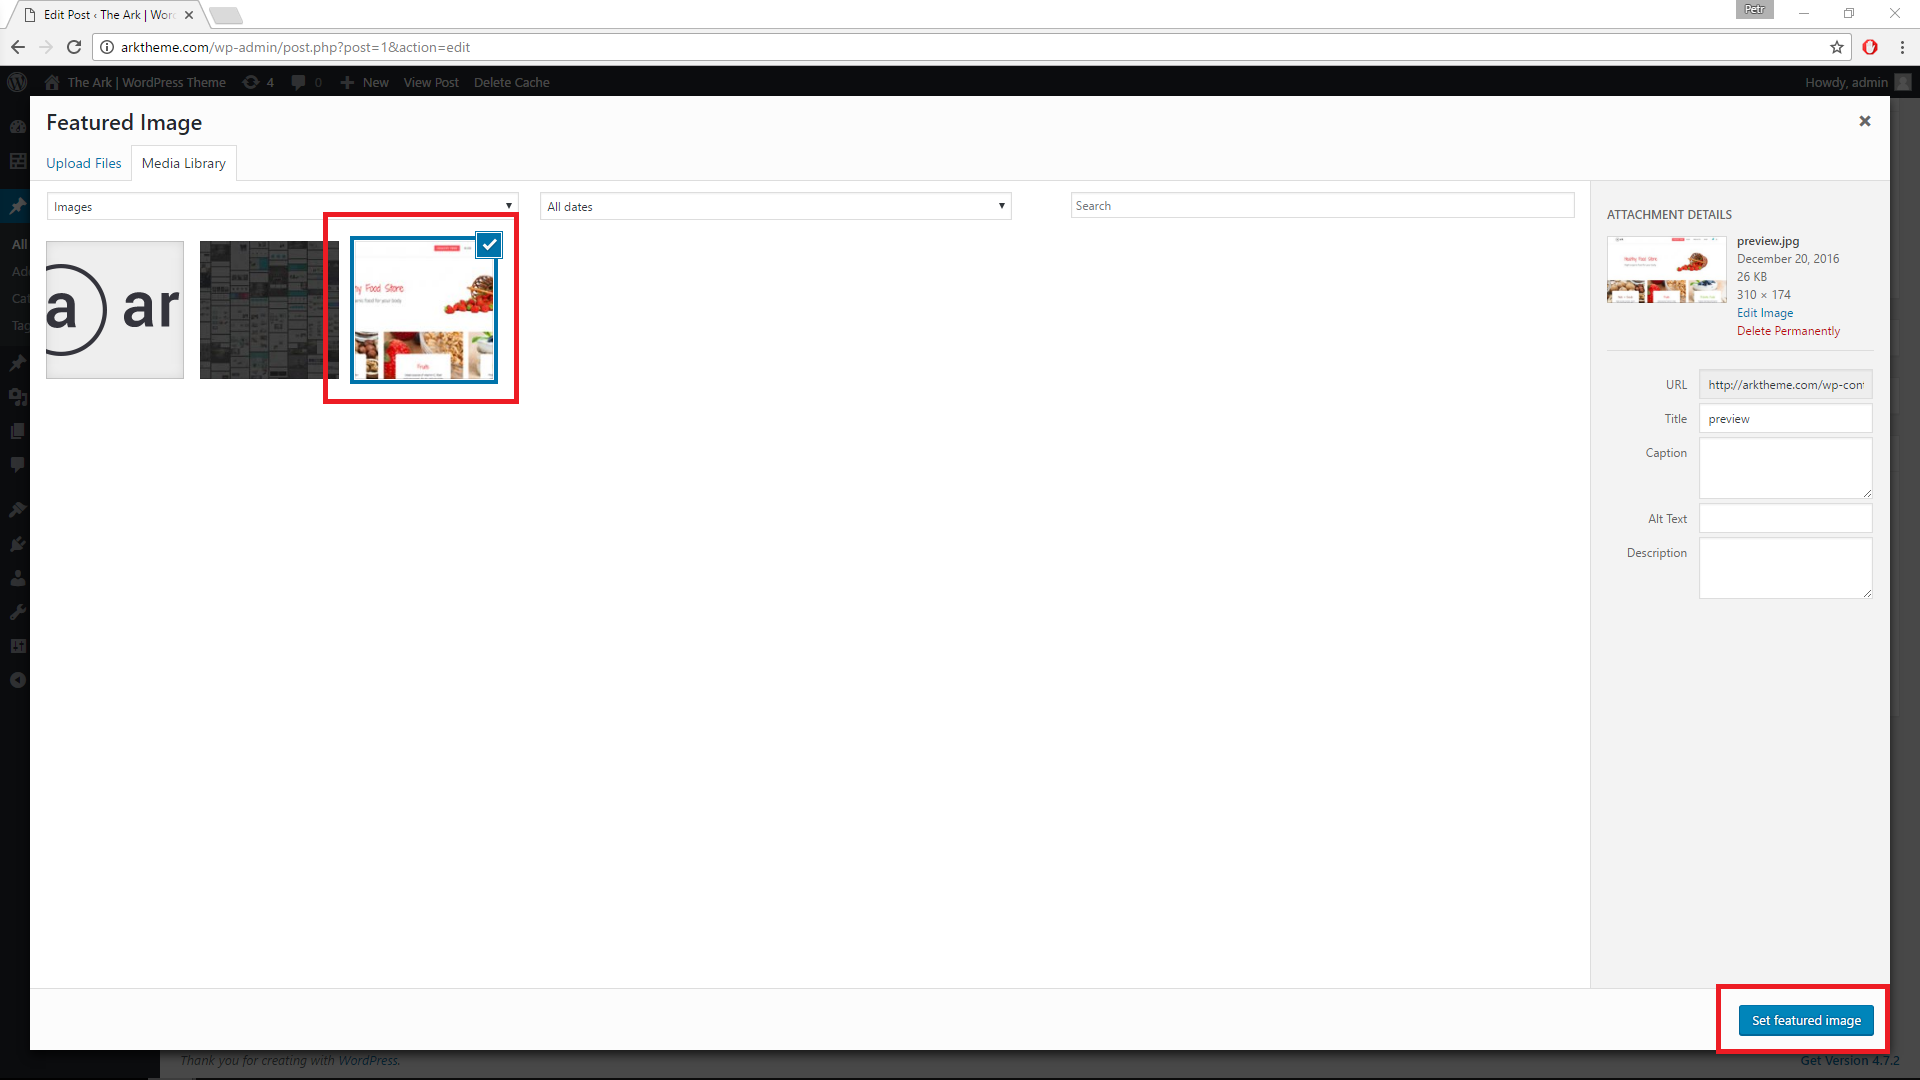
You can click on the chosen image and submit it button Set Featured Image.
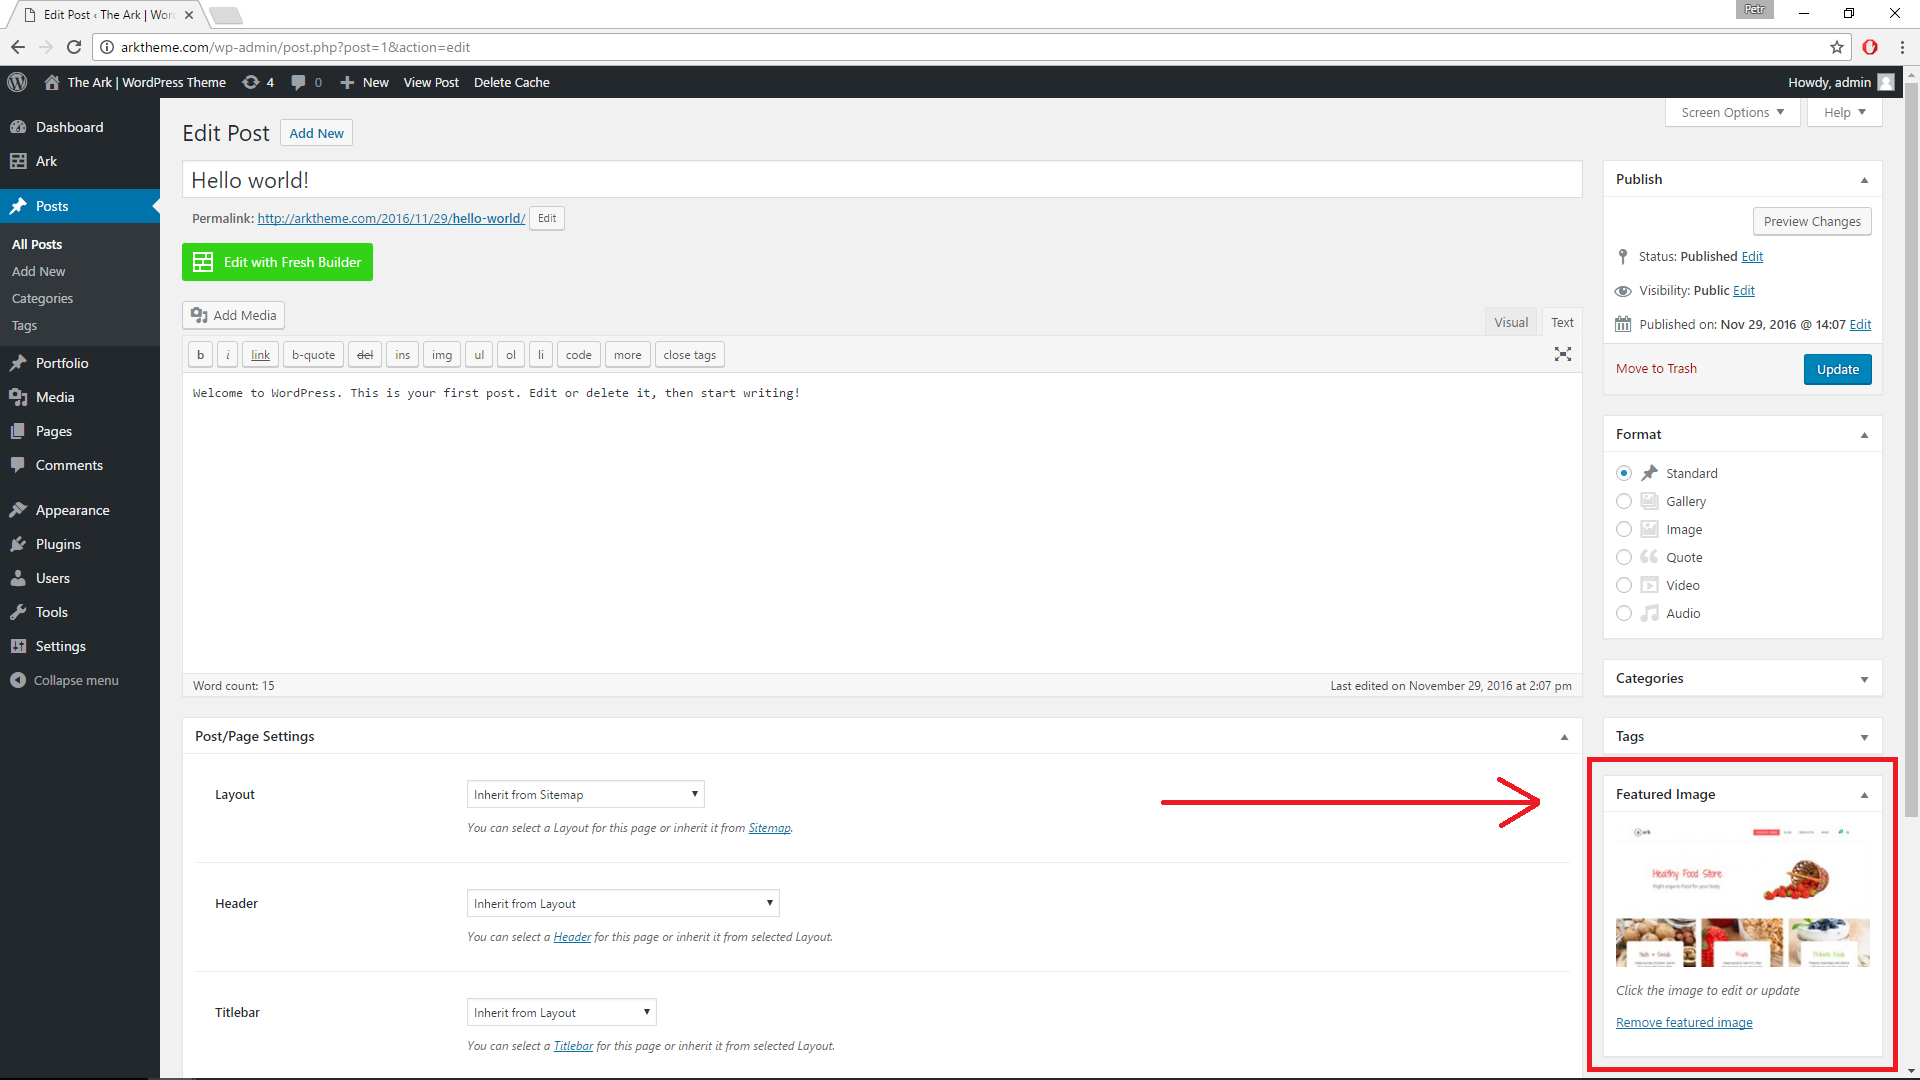
You can scroll down until you find the box with Title Featured Image. There you can change or remove featured image.
Gallery Post Format
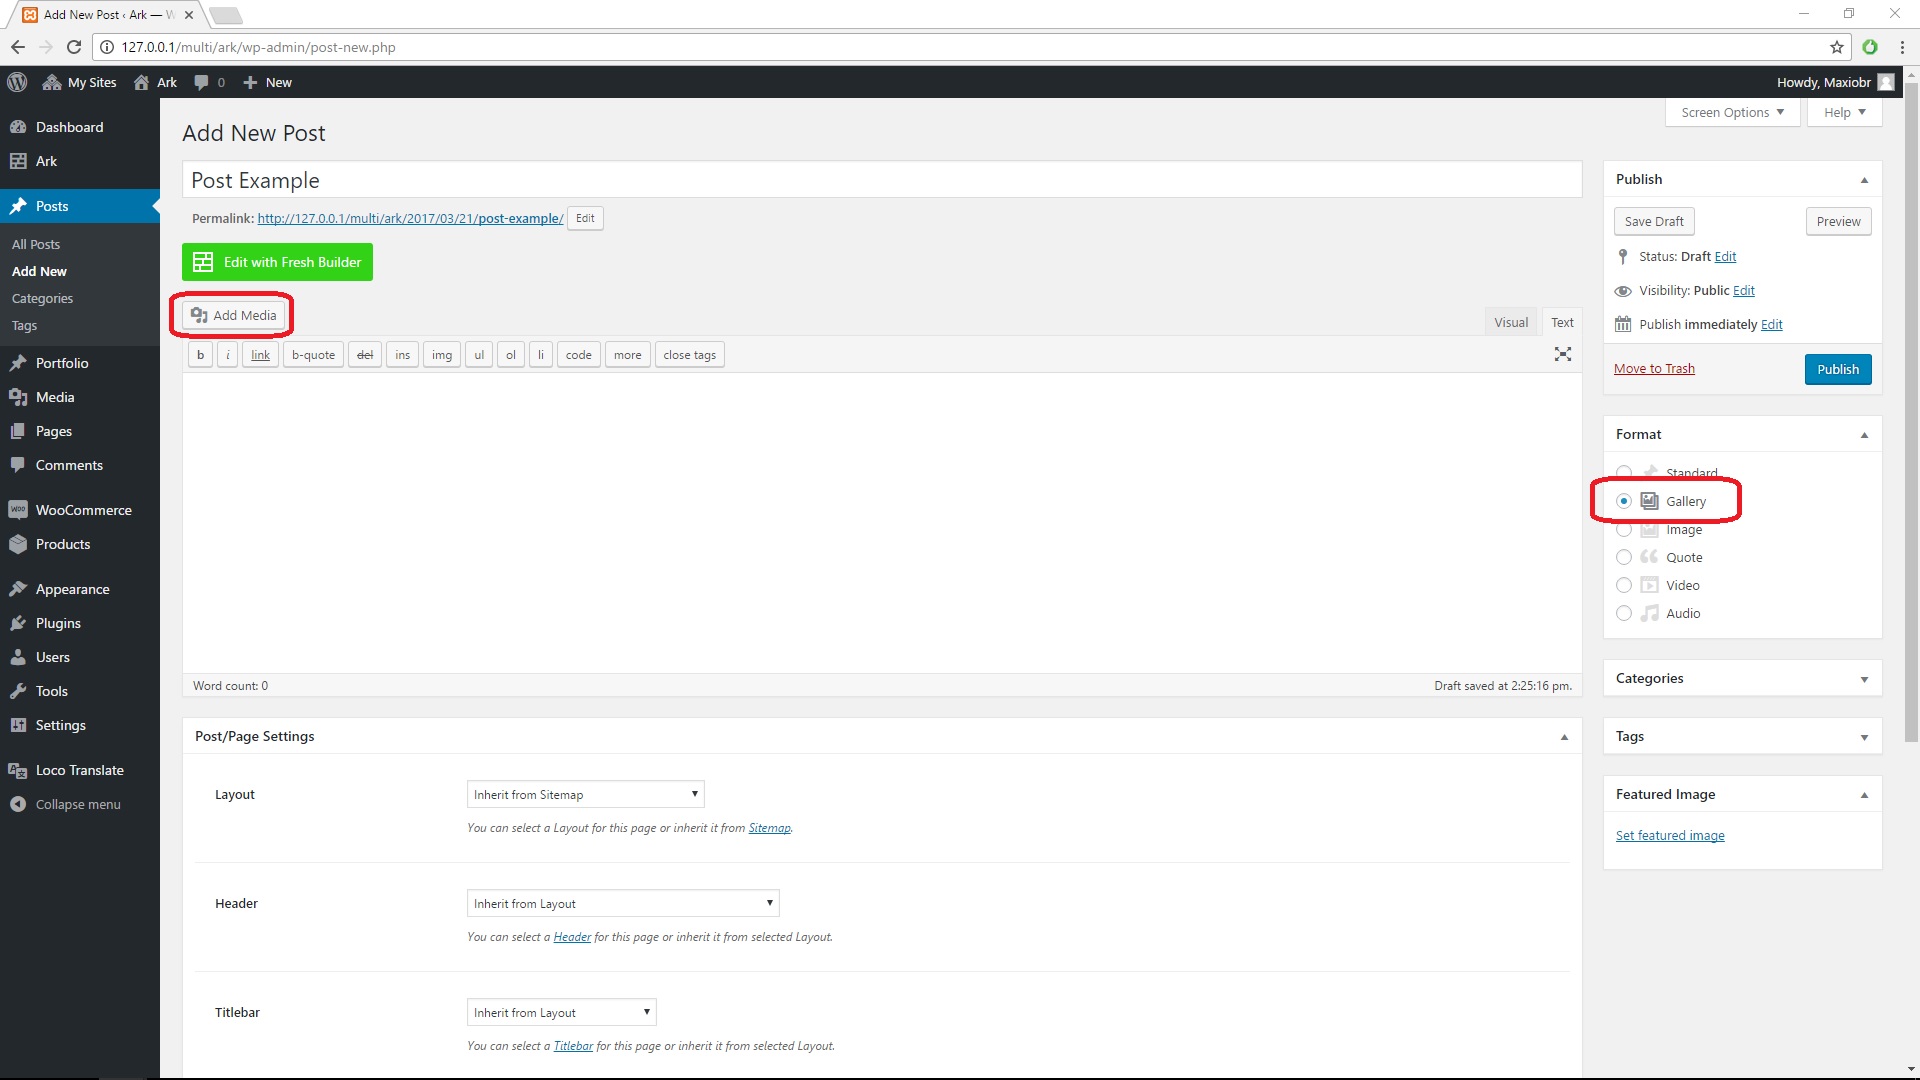
Gallery Post Format use first gallery in the content area. You need to set Gallery as format and you need to click to Add Media Button.
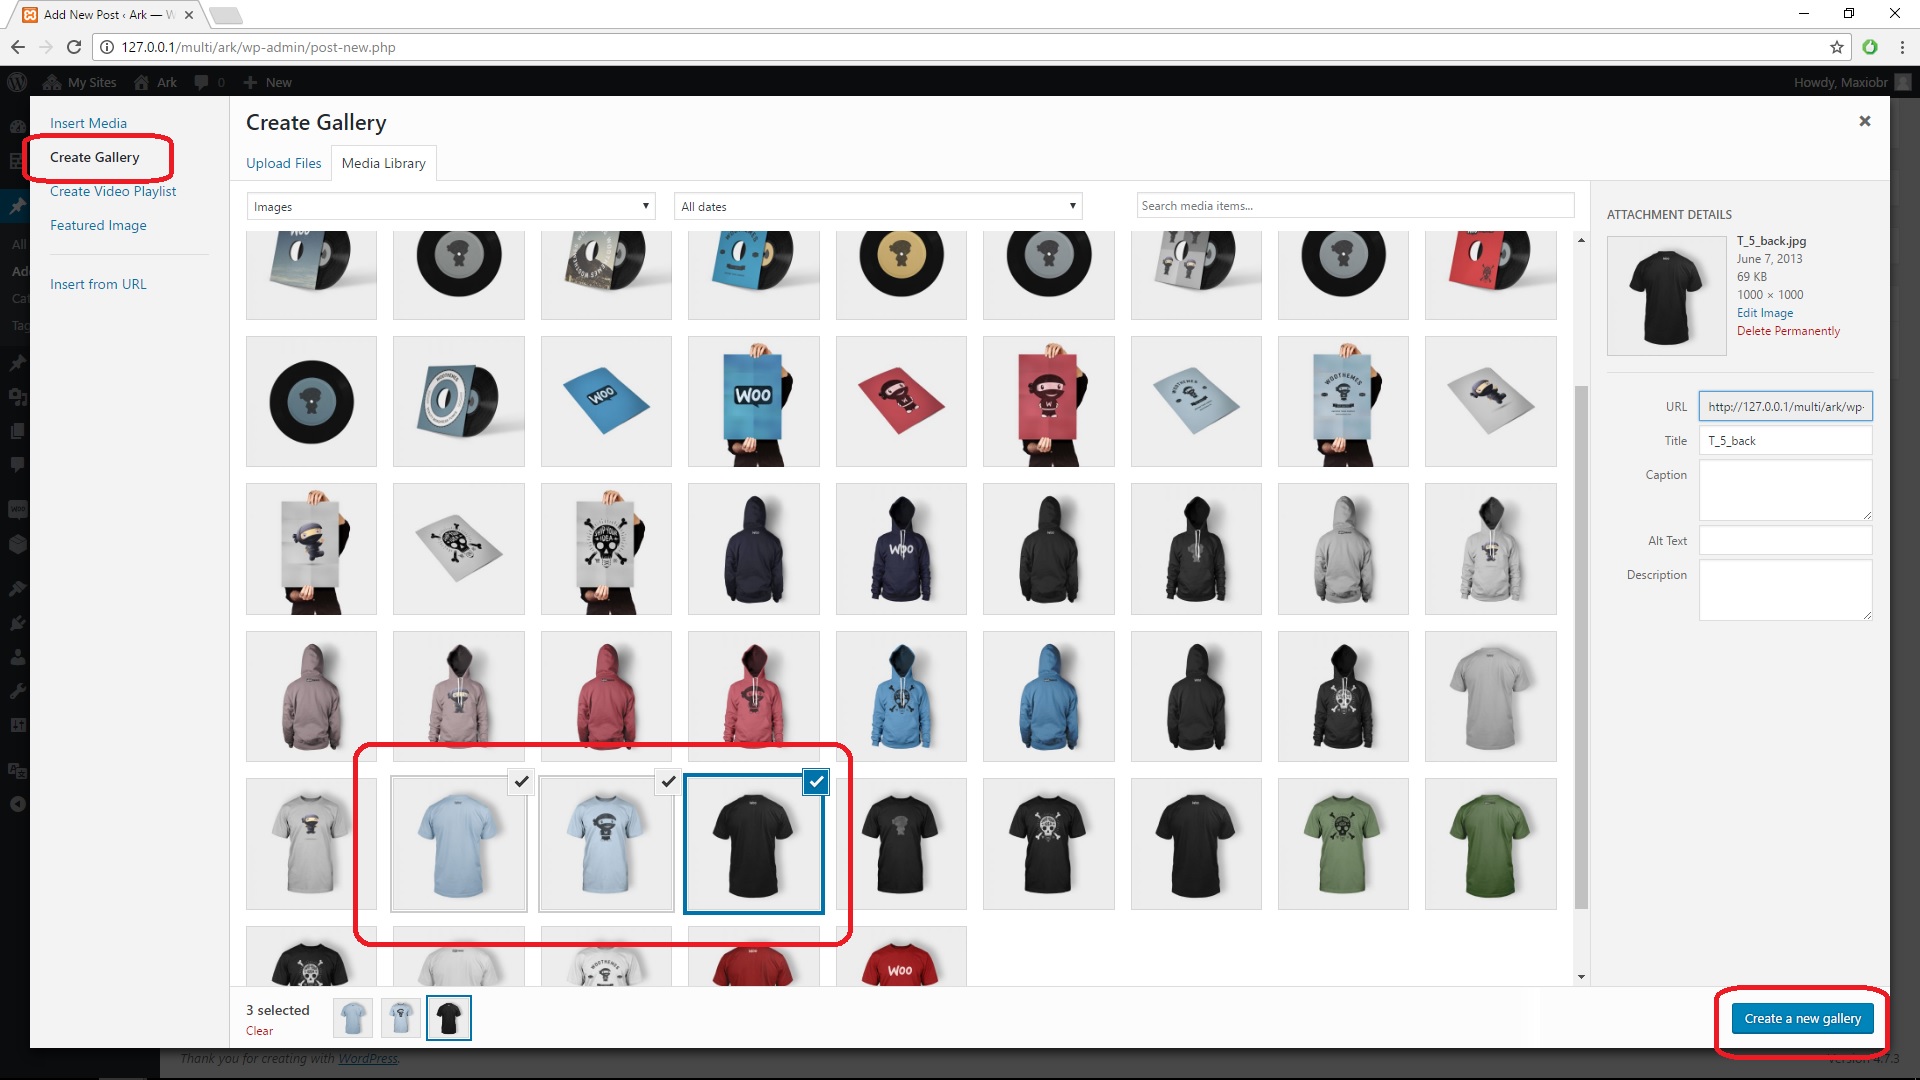
Change tab from Insert Media to Create Gallery, pick or upload gallery images and commit this with the button Create a new gallery.
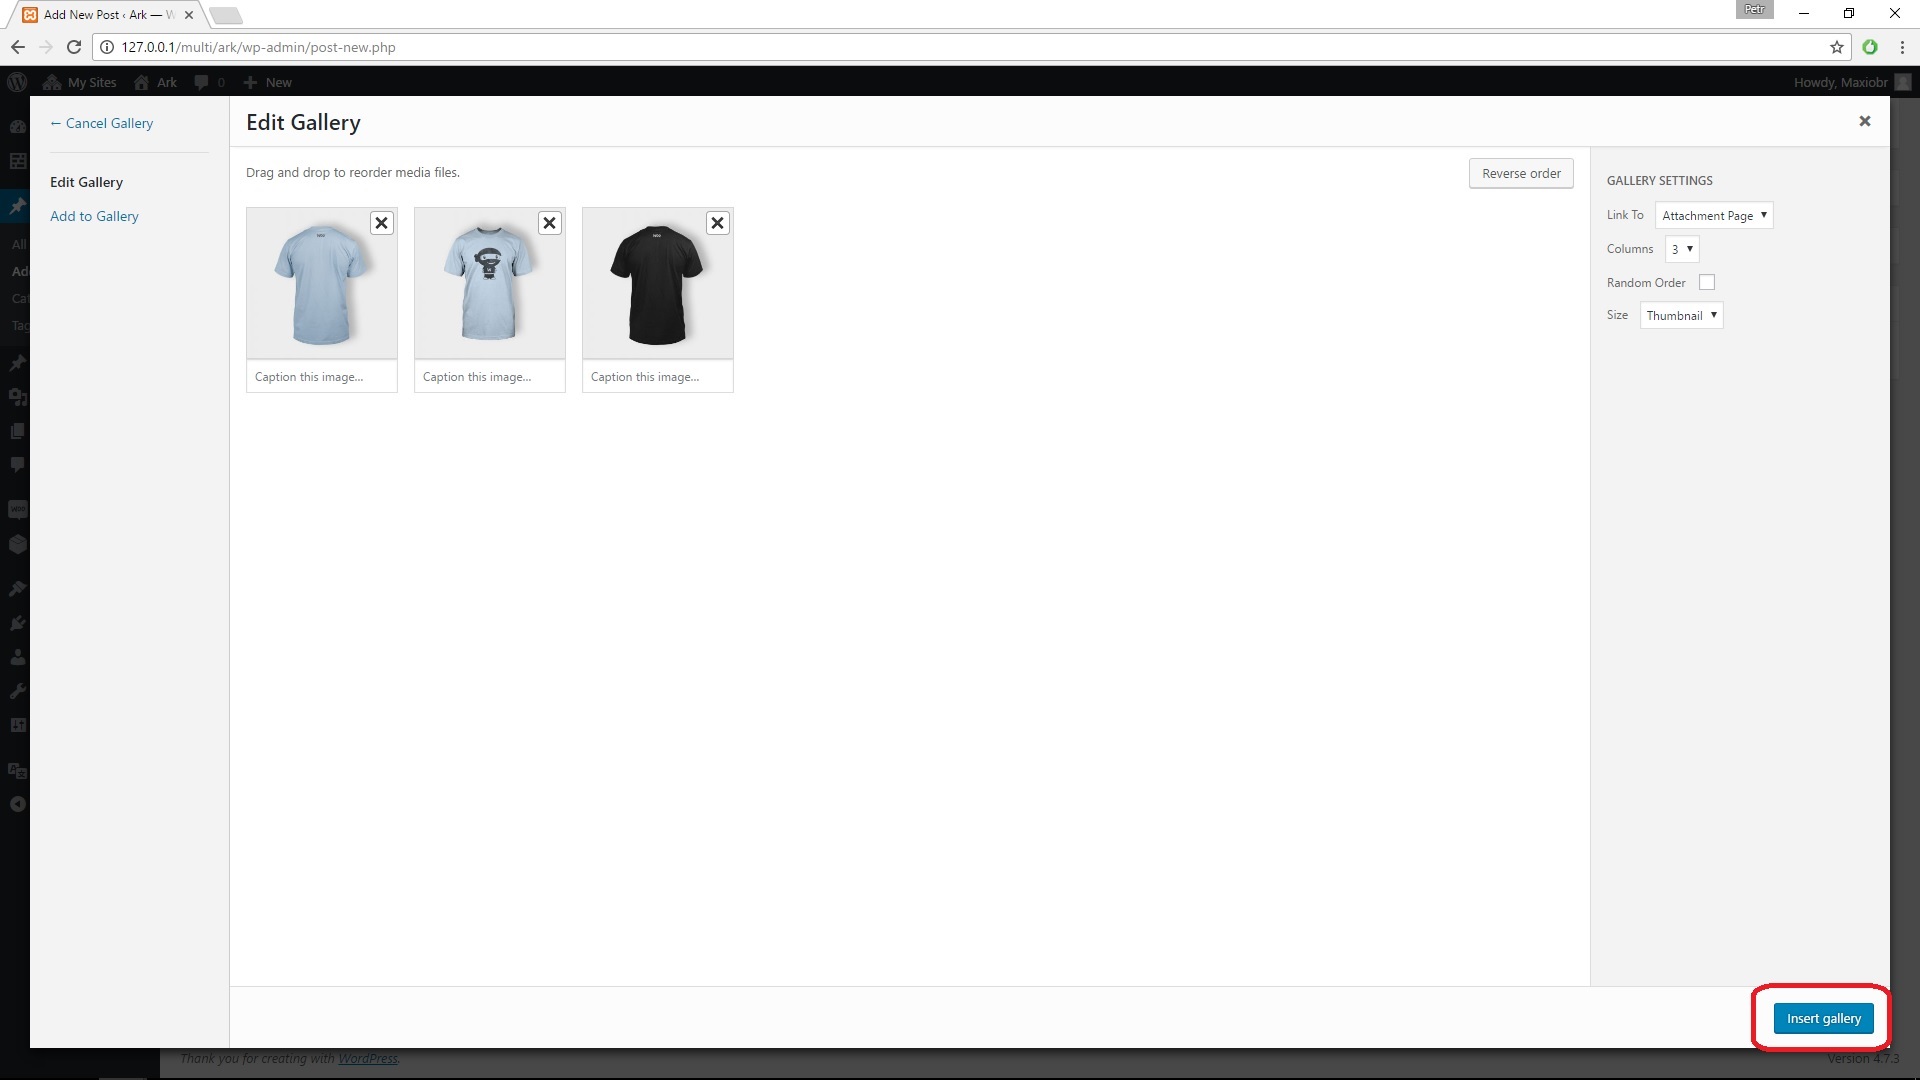
You can drag and drop to reorder media files. After that press button Insert gallery.
Quote Post Format
Way for showing quote format is, that you put quote into the title.
Video and Audio Post Format
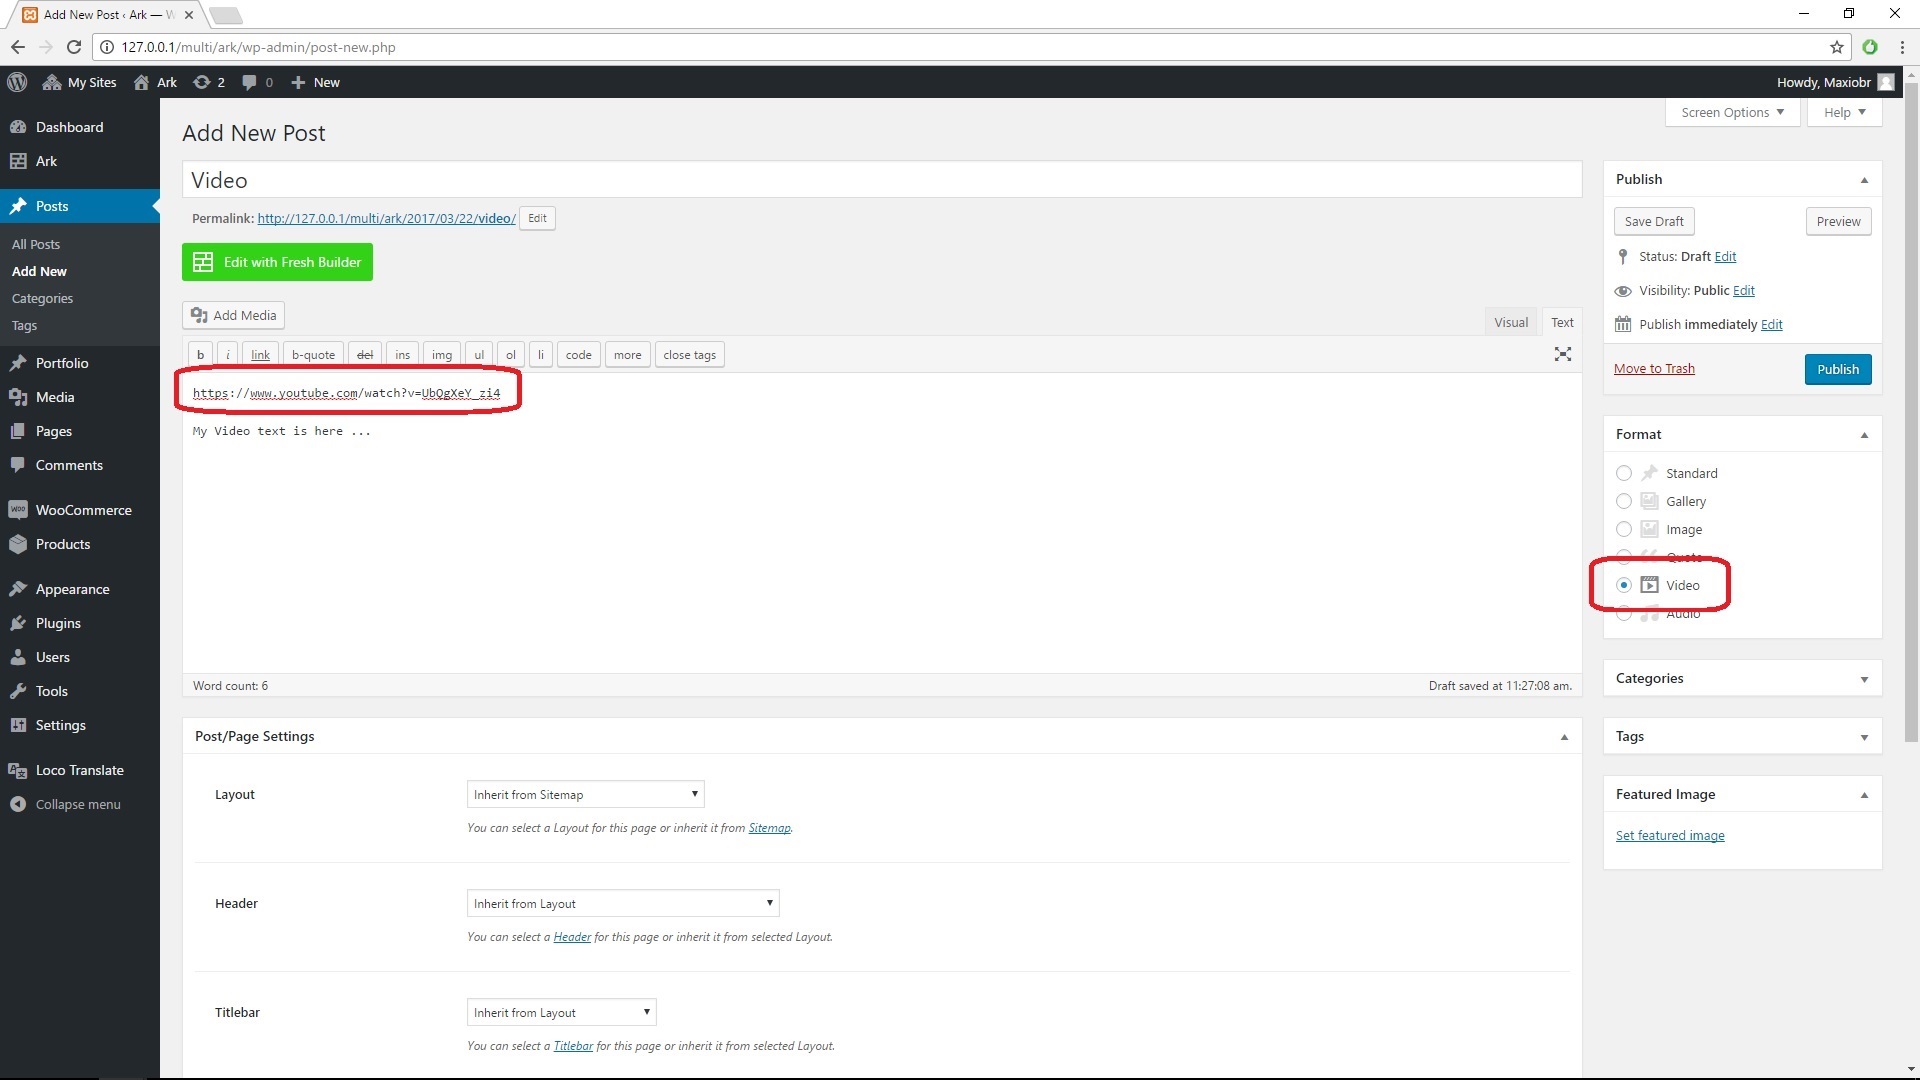
You need to set post format to Video (or Audio) and paste link into the post content. Supported are Vimeo, YouTube or SoundCloud, whole list is https://codex.wordpress.org/Embeds#Okay.2C_So_What_Sites_Can_I_Embed_From.3F.
You need to have the link on the line with no text before or afrer it!
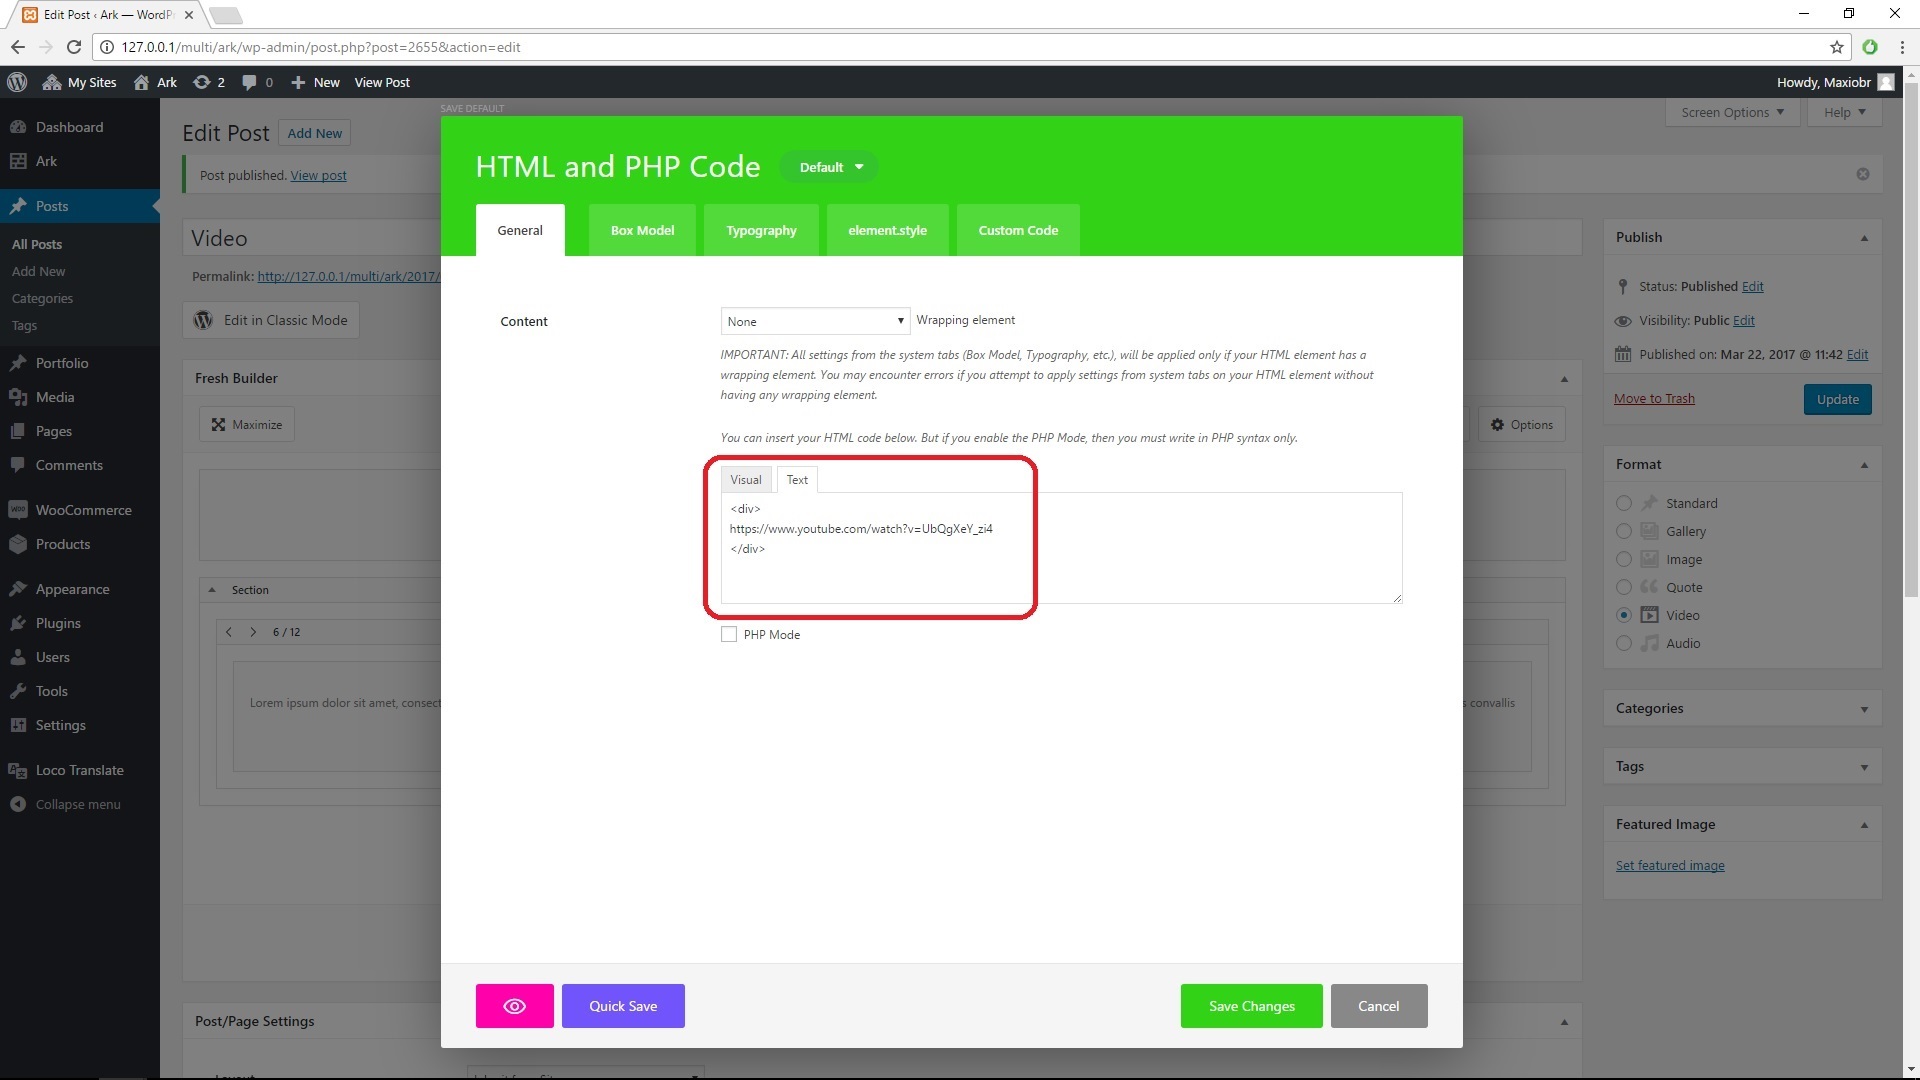
When you use Video (or Audio) post format in the Fresh Builder, you must use HTML and PHP Code element with code:
<div>
https://www.youtube.com/watch?v=UbQgXeY_zi4
</div>
Where you just replace the link with your video or audio.
You need to have the link on the line with no text before or afrer it!
Portfolio
Overview
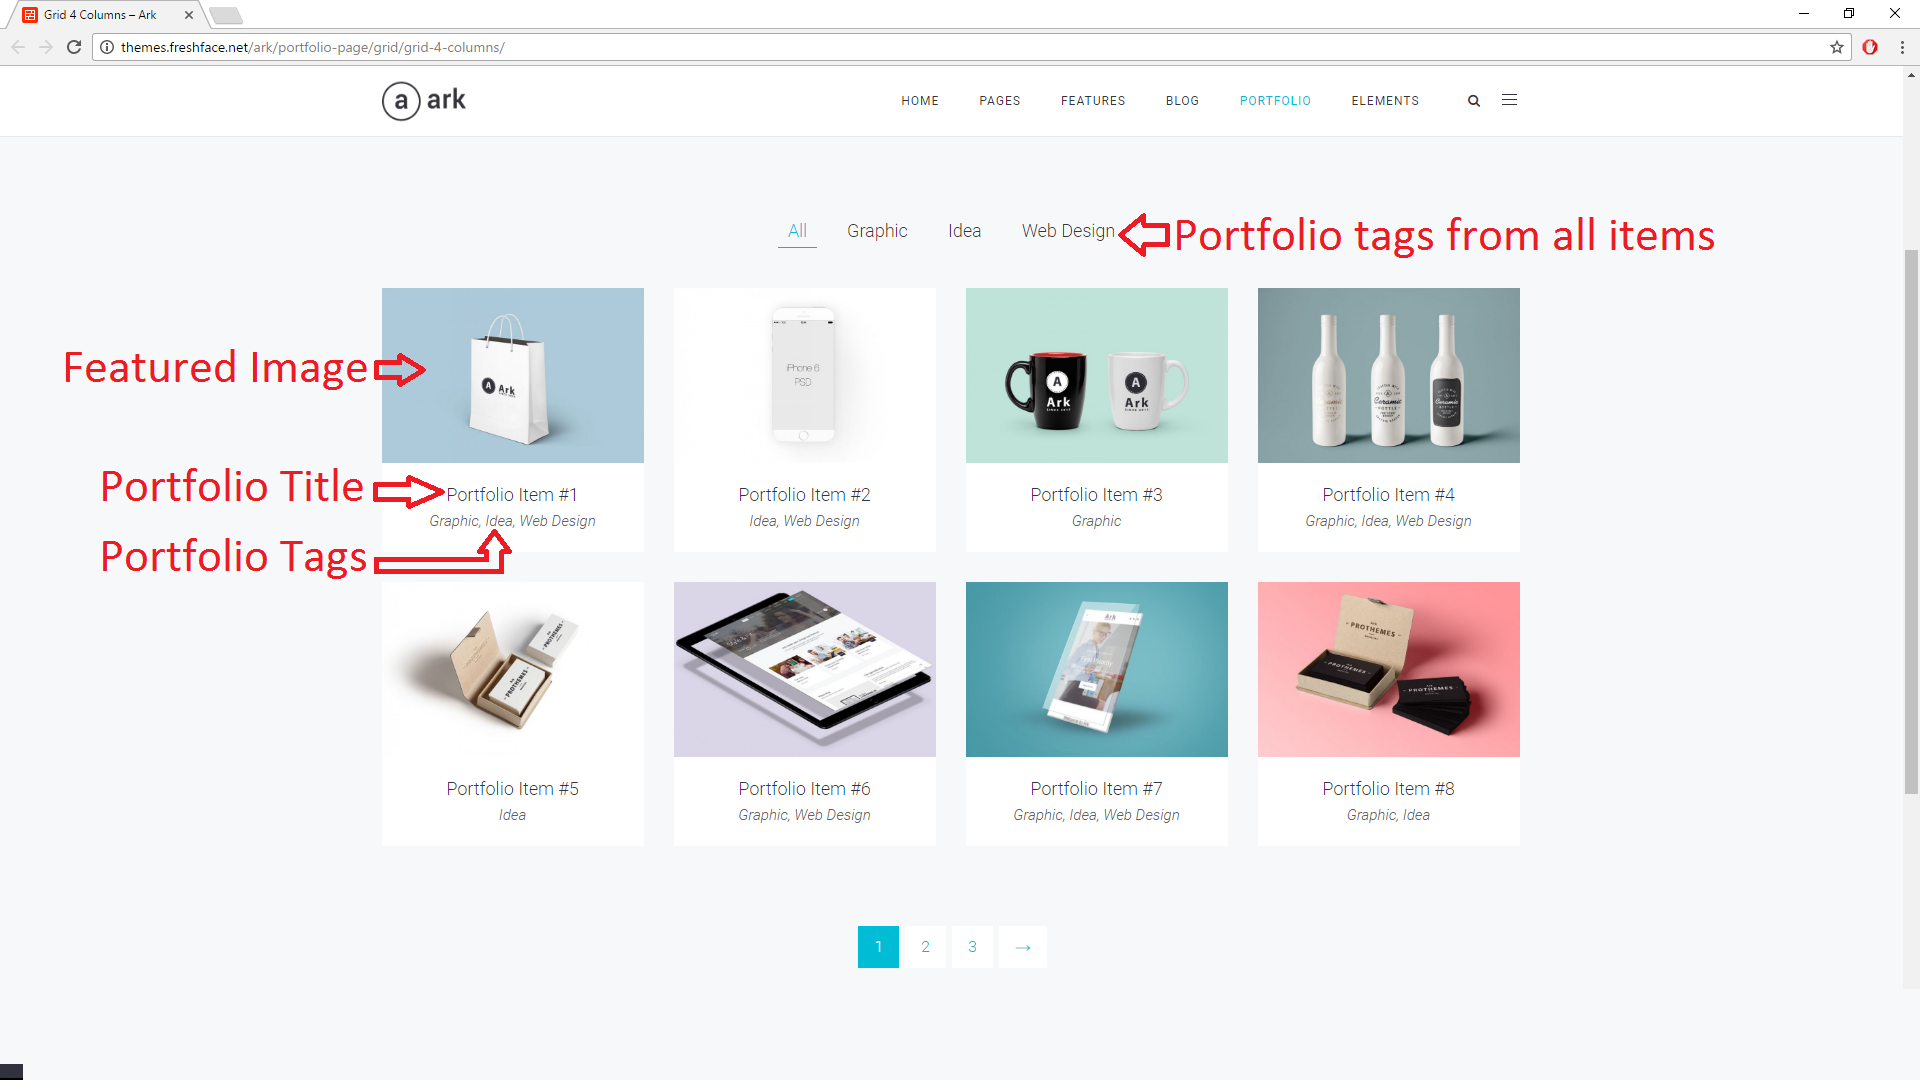
Image shows Portfolio element with full settings. If you wish to have similar portfolio you should:
- Create portfolio posts in WP Admin > Portfolio > Add New.
- Portfolio posts should have set featured image.
- If you wish to have filters in the portfolio, you add them as portfolio tags
- If you wish to use only selected portfolio items on the page, you should add to these portfolio posts at least one portfolio category.
Portfolio Single Post Settings
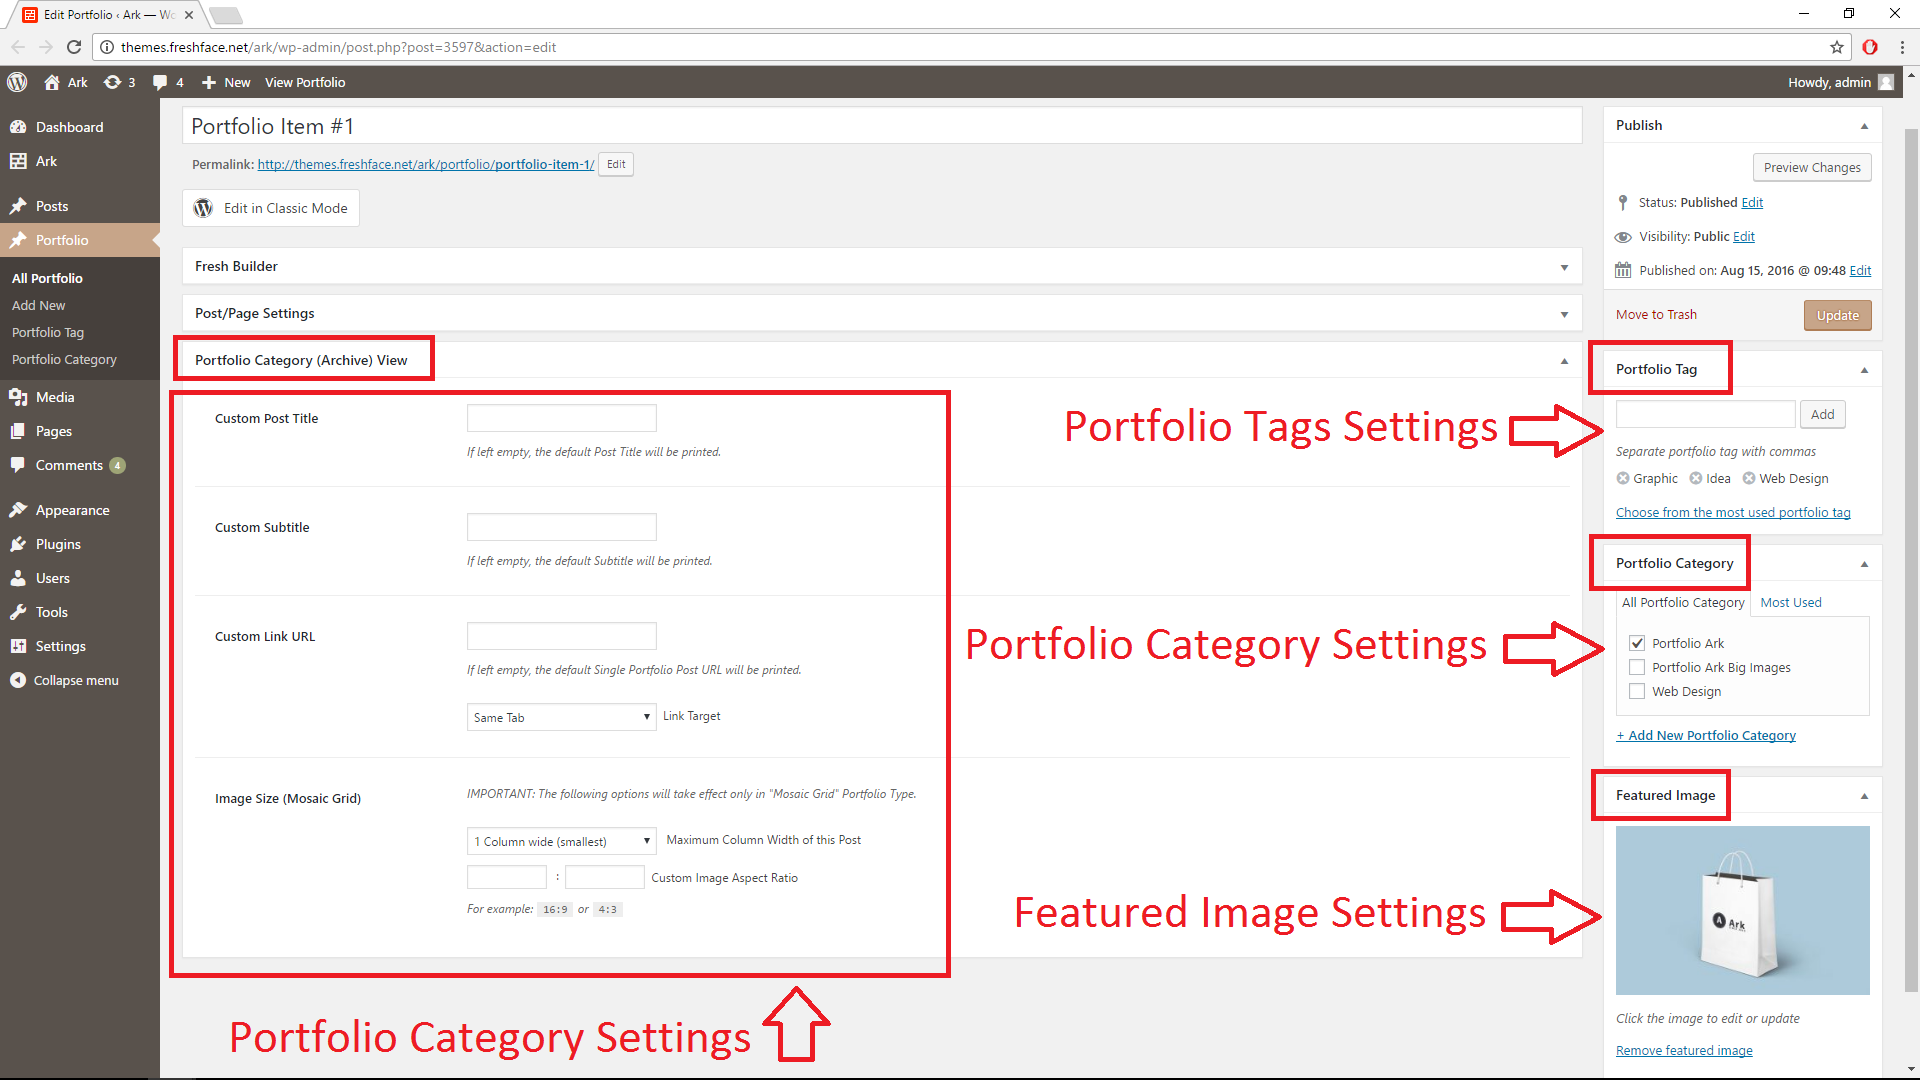
Each option above has its meaning in the portfolio category or in the Portfolio Element:
- Portfolio Category (Archive) View allows you to rewrite default behaviour.
- Portfolio Tag is for filtering.
- Portfolio Category - if you wish to have two and more portfolio elements with different set of portfolio items, then you should have two different portfolio categories. Please note, that one portfolio item may have more portfolio tags and categories.
- Featured Image - is image that you will see in the portfolio element. If you are not sure how to add featured image, then check FAQ chapter
- Portfolio Category (Archive) settings - there are settings for different behavior in the portfolio archives and Gallery element. If you keep this options blank, then default values will be printed:
- Custom Post Title - rewrites default portfolio title
- Custom Subtitle - hides portfolio tags (filters) and show this option
- Custom Link URL - rewrites default portfolio link ( image link ) to value. There is also the option, to open gallery links in new window or browser tab.
- Image Size (Mosaic Grid) - extra settings for columns grid gallery design.
Dummy Content Import
You can install demo content at WP Admin Menu ⇒ Ark ⇒ Demo Install. Please follow the on-screen instructions there.
Customization and Child Theme
We recommend not to edit the source code of the theme as well so you can easily update it (updates overwrite your changes). We recommend to use Child Themes.
We also deliver the child theme inside the package downloaded from themeforest, for more comfortable usage: ark-child.zip file (right-click on this link and select Save As!).
FAQ - Frequently Asked Questions
How I set Featured Image?

Edit the Post, Page or Portfolio, where you wish to add or change featured image. Scroll Down until you find the box with Title Featured Image. Click there on the link Set featured image.

Click on the chosen image and submit it button Set Featured Image.

Scroll Down until you find the box with Title Featured Image. There you can change or remove featured image.
There is no change after change
Some part of your page is probably cached. There are few solutions:
- If you use some cache plugin like W3 Total Cache or WP Super Cache or WP Fastest Cache, then please delete cache.
- It is also possible, that theme has some compatibility issues with some outdated plugin or with plugin which does not use standard WordPress interface. In that case, if you have installed Fresh File Editor, go to WordPress Admin ⇒ Tools ⇒ File Editor, open path WordPress ⇒ wp-content ⇒ uploads, right click on freshframework and in menu click on delete.
- It is possible, that you have set cache on your hosting. Try to refresh after 30 seconds.
- If you have problems with JavaScript or CSS, try to do web browser hard refresh:
- Windows: ctrl + F5
- Mac/Apple: Apple + R or command + R
- Linux: F5
You can also try anonymous browsing.
Portfolio shows 404
Go to WordPress Admin ⇒ Settings ⇒ Permalinks and press there Save changes even if you did not change anything.
I changed domain or HTTP to HTTPS and web is broken
We do NOT recommend to change domain or WordPress URL. We understand, that sometimes it is necessary. In that case:
- Do backup MySQL and whole Wordpress directory.
- Check backup once again (You must be sure that everything is backuped, really).
- Go to WP Admin.
- Replace page url from
/wp-admin/to/wp-admin/options.php - Find there options
homeandsiteurland replace values to the new right values - new WordPress URL - Press Save on the page bottom.
- You will have to change images path in pages, posts, portfolio posts and options.
I see no images or blank images
You need to allow writing in directory /wp-content/uploads/freshizer/ - if it is not created, please create it with writing rights by FTP.
Also please check your server configuration - do you have allowed GD library ( PHP library for images )? If not, allow it.
How to create twitter access token?
- Go to site https://apps.twitter.com/app/new and log in
- Into fields Name, Description, Website insert your website url f.e. http://freshface.net/
- Check "Yes, I agree"
- Click on button "Create your Twitter application"
- Find and click on Button "Test Oauth"
- Log in again
- Use inputs here - you may put anything in "Access Token" and "Access Token Secret"
Theme Updates
Please follow the instructions at WordPress Admin ⇒ Dashboard ⇒ Updates.
Bug reports and feature requests
Please let us know your concern via our support channel.
Support
We offer free support to our paying customers for general installation/usage/bugs, etc. You can open a support ticket.
